CABLE FLY
The cable fly is not about bringing your hands together—it is about closing a wide arc with your arms
The cable fly trains horizontal adduction of the pectoralis major by sweeping the arms from an open position into an arc in front of the chest. There is less elbow movement than in a press, which makes it easier to focus on the chest, but the long lever and the constant tension of the cable can produce a large moment at the shoulder joint even with light loads. Secure trunk and shoulder-blade stability, a consistent elbow angle, and a controlled range of motion before you think about load.
- Primary muscles
- Pectoralis major
- Secondary muscles
- Anterior deltoids · upper-arm stabilizers
- Difficulty
- Beginner
- Movement type
- Horizontal shoulder adduction
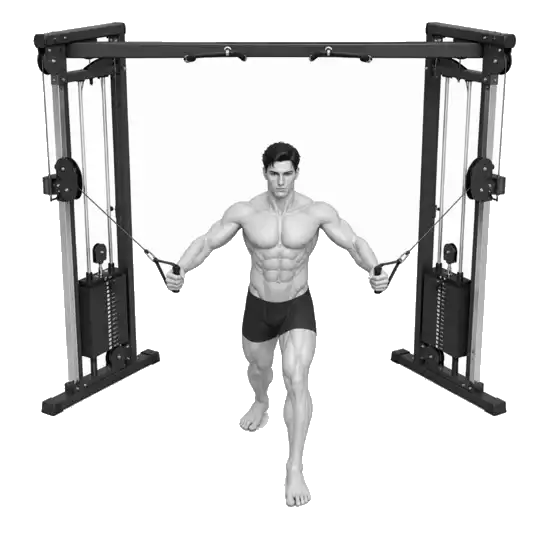
What height should I set the cables to?
A standard mid cable fly starts at shoulder height or slightly above so the handles meet in front of mid-sternum. Shoulder comfort and a symmetrical arc on both sides matter more than the exact pulley height.
STEP BY STEP
5 Steps for One Complete Rep

- 1
Match both pulleys to the same height
For a standard mid cable fly, set the handles at shoulder height or slightly above. Check that the pins and the load are identical on both sides, and start with a light weight you can stabilize at the shoulder.
- 2
Take the handles and walk to the center
Take one handle, then the other, and step to the middle of the machine. With tension already on the cables, step one foot forward and find a stable distance where your heel does not lift and your body does not rotate.
- 3
Lock in your shoulder blades and elbow angle
Do not push the chest out excessively; keep the ribs stacked over the pelvis. Move the shoulders away from the ears, then set a slight bend in the elbows. That angle should barely change for the rest of the set.
- 4
Close a wide arc in front of the chest
Exhale and sweep the whole arm through a wide arc, bringing the handles together in front of the chest. Rather than pushing with the hands by extending the elbows, feel the upper arms converging in front of the torso. The hands may meet or cross slightly, but do not cross them far.
- 5
Open slowly to a comfortable range
Inhale and open the arms along the same arc over two to three seconds. Stop where you feel the chest lengthen, but do not let the hands travel far behind the torso or allow the cables to drag the shoulders forward.
STANCE & BRACE
The split stance is the base that resists the cable
The cables pull you backward throughout the movement. Placing one foot forward and sharing pressure between the front and back foot makes it much easier to keep the trunk upright and move only the arms. This is a standing stance with just enough of a stride to reduce sway—not a lunge with a deeply bent front knee or a heavily inclined torso.
Brace the abdomen and glutes lightly and keep the ribs from flaring upward. If the pelvis slides back or the trunk rocks forward and back as you bring the handles together, the load is too heavy or your start position is too far from the machine.
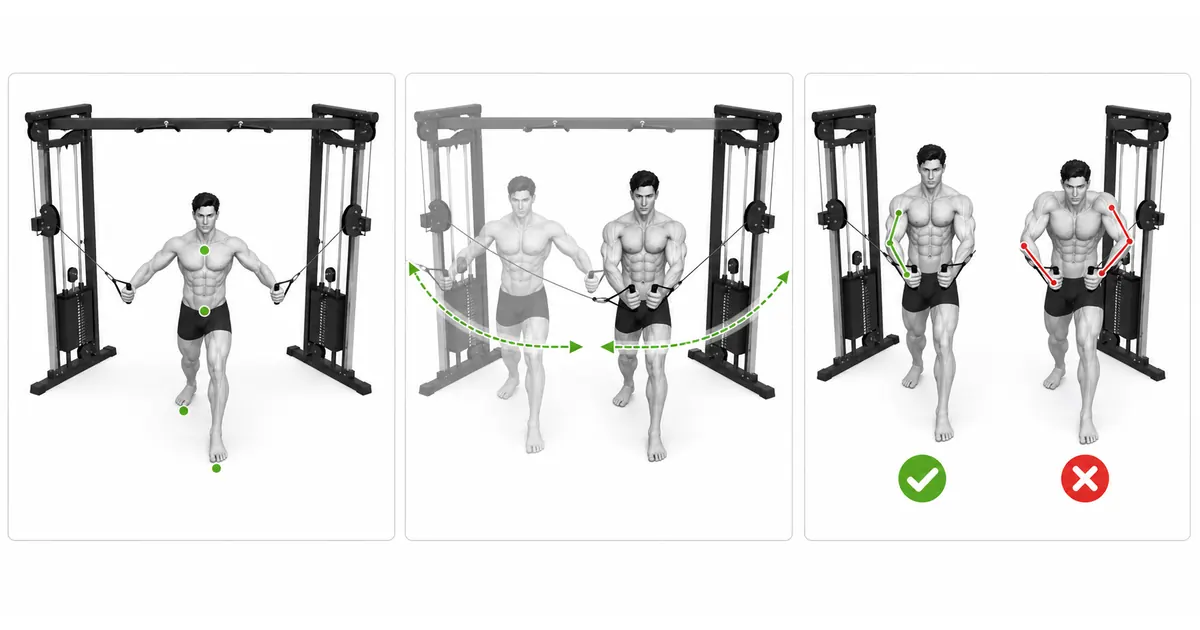
Key point: Practical cue: “Anchor both feet → stack ribs over pelvis → move only the arms through the arc.”
ARM ARC
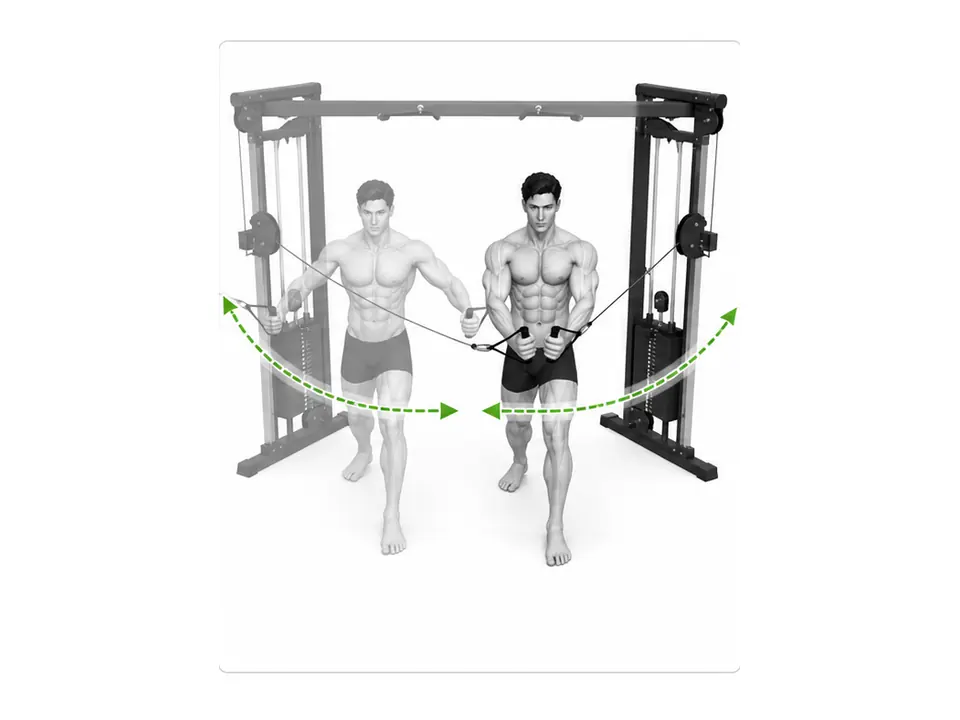
The upper arms, not the hands, should converge in front of the chest
With a slight bend held in the elbows, both arms trace a wide circle to a point in front of the chest. Rather than aiming the handles at each other, focus on the upper arm bones converging toward the front of the torso. If elbow flexion increases here, the movement becomes a cable press rather than a fly.
The handles usually meet around mid-sternum height, though this shifts a little with pulley height and your goal. What matters is that both hands move at the same height and speed, that the cables track naturally along the elbows and forearms, and that there is no sharp discomfort at the front of the shoulder.
ELBOW & SHOULDER
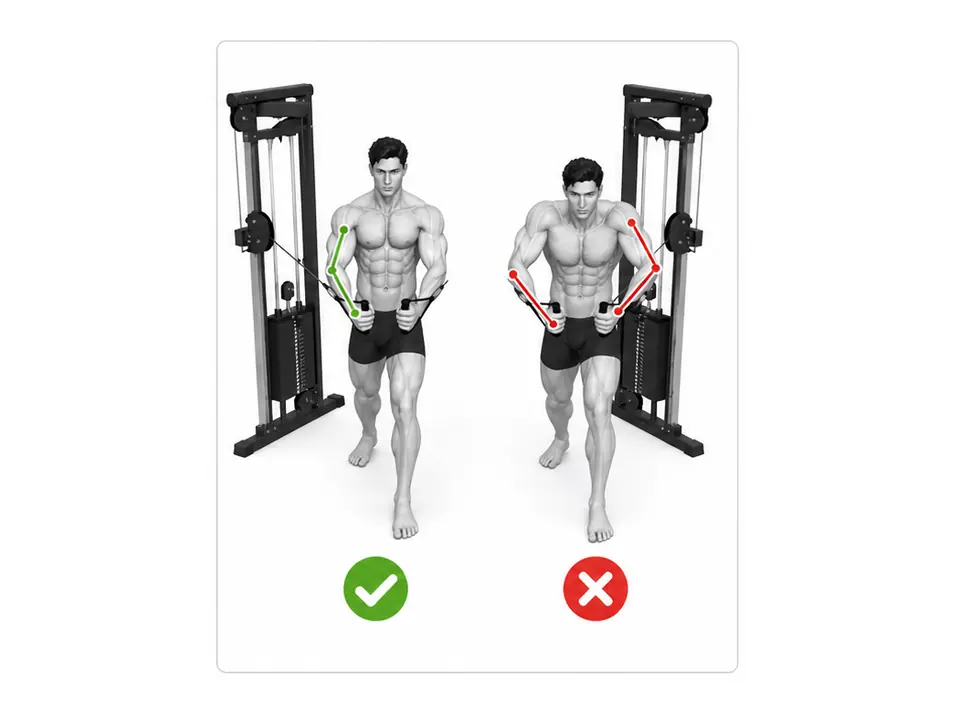
Keep the elbows softly fixed and do not throw the shoulders forward
Locking the elbows out completely lengthens the lever and can add unnecessary stress at the shoulder and elbow. Bending them more on every rep, on the other hand, brings the triceps and a pressing pattern into the movement. Hold the soft bend you set at the start through both the closing and the opening phase.
Do not round the shoulders forward to squeeze out a little more contraction at the end. The shoulder blades can move naturally on the rib cage, but finish within a range where the trunk does not collapse and the head of the shoulder does not push forward. One biomechanics study reported that the cable crossover showed joint-loading patterns and variability distinct from other chest exercises, underlining the importance of joint stability and sensible load selection.
TROUBLESHOOTING
Fix the cause of a mistake, not just its appearance
The elbows fold on every repetition
- What you see
- The elbows are pulled in toward the sides as the handles come together and the movement starts to look like a press.
- Likely cause
- The load may be more than the chest can control, or the focus may be on getting the hands together.
- How to correct it
- Reduce the load, set the elbow angle first, then practice closing a wide arc with the upper arms.
The arms open too far behind the torso
- What you see
- At the bottom the hands travel well behind the shoulder line and the front of the shoulder pulls or lifts.
- Likely cause
- The range may have been forced wider in search of a bigger stretch.
- How to correct it
- Change direction when the upper arms reach roughly the line of the torso, or at the point where the shoulder still feels comfortable.
The torso creates momentum
- What you see
- The upper body leans forward as the arms close and rocks back as they return.
- Likely cause
- The load is often too heavy, or the split stance and abdominal brace are too weak.
- How to correct it
- Place one foot forward and hold the ribs stacked over the pelvis. If you still sway, reduce the load.
The shoulders rise toward the ears
- What you see
- The traps tense first late in the set and the neck appears to shorten.
- Likely cause
- The handles may be set too high, or shoulder-blade stability may have faded with fatigue.
- How to correct it
- Lower the pulleys to shoulder height, keep the shoulders away from the ears, and end the set at a rep count you can still control.
The hands cross too far
- What you see
- One hand sweeps well past the other on every rep, rotating the torso and changing the cable heights.
- Likely cause
- Chasing more contraction, the hands may be traveling well past the center of the chest.
- How to correct it
- Stop where the hands meet or cross slightly, and keep the torso facing forward even when you switch which hand is on top.
REGRESSION & PROGRESSION
Match the difficulty before adding load
Band fly
Learn the elbow angle and the arc with a light resistance band first.
Single-arm cable fly
Work one arm at a time to resist trunk rotation and control the end range.
Light cable fly
Move both arms together and match height and speed side to side.
Cable height variations
Once the basic path is stable, use a low or high pulley to change the angle of the pull.
BEGINNER PROGRAM
A practical starting framework
Place it after your pressing work as an accessory, once or twice per week. For the first four weeks, use a light load where you can feel the chest lengthen and shorten while the shoulder stays stable, and leave two or three repetitions in reserve.
Reps
10–15
Open the arms under control over 2–3 seconds
Sets
2–3
Rest 60–90 seconds between sets
Load
+1 step
Only when form holds through all 15 reps
- If the torso stays square and the elbow angle stays the same on every repetition, move up one weight step next session.
- If the biceps or the front of the shoulder fatigue before the chest, recheck the load, the pulley height, and your elbow angle.
- If sharp pain appears at the front of the shoulder as you open, reduce the range; if it persists, stop the exercise.
Frequently asked questions
Do I need to cross my hands for a stronger chest contraction?
You do not need to cross them far. Even when the hands simply meet or overlap slightly, the upper arms have already converged well in front of the torso. Avoid a large crossover that rotates the trunk or rolls the shoulders forward.
Should I do cable flys or bench press first?
Generally you perform the compound lift that demands more load and skill, such as the bench press, first, and use the cable fly as an accessory. On days when you just want to rehearse the chest movement, you can use it lightly beforehand.