CABLE TRICEPS KICKBACK
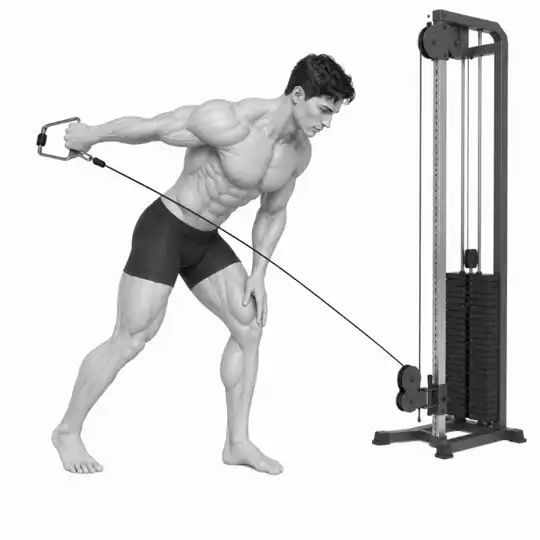
Cable Triceps Kickback — a controlled, hinge-position isolation movement to build triceps shape, elbow strength, and pushing control while minimizing shoulder substitution.
The Cable Triceps Kickback is a single-joint resistance exercise whose primary demand is controlled elbow extension while maintaining a stable upper arm. When executed with a cable line of pull, the movement provides continuous tension through the range and makes it easier to keep consistent muscular engagement compared with free-weight variations. This guide focuses on actionable setup cues, precise movement steps, a triad of technical sections covering alignment, torque management and grip mechanics, thorough troubleshooting for the most frequent faults, sensible progressions, and an evidence-aware approach to programming and safety. The instructions assume you are familiar with basic gym equipment and have no acute joint injury. If you have recent elbow, shoulder, or neck pain, consult a qualified clinician before loading the joint. The goal is muscle control, not maximal load: choose a resistance that allows the entire sequence below to be performed with strict technique and steady tempo.
- Primary muscles
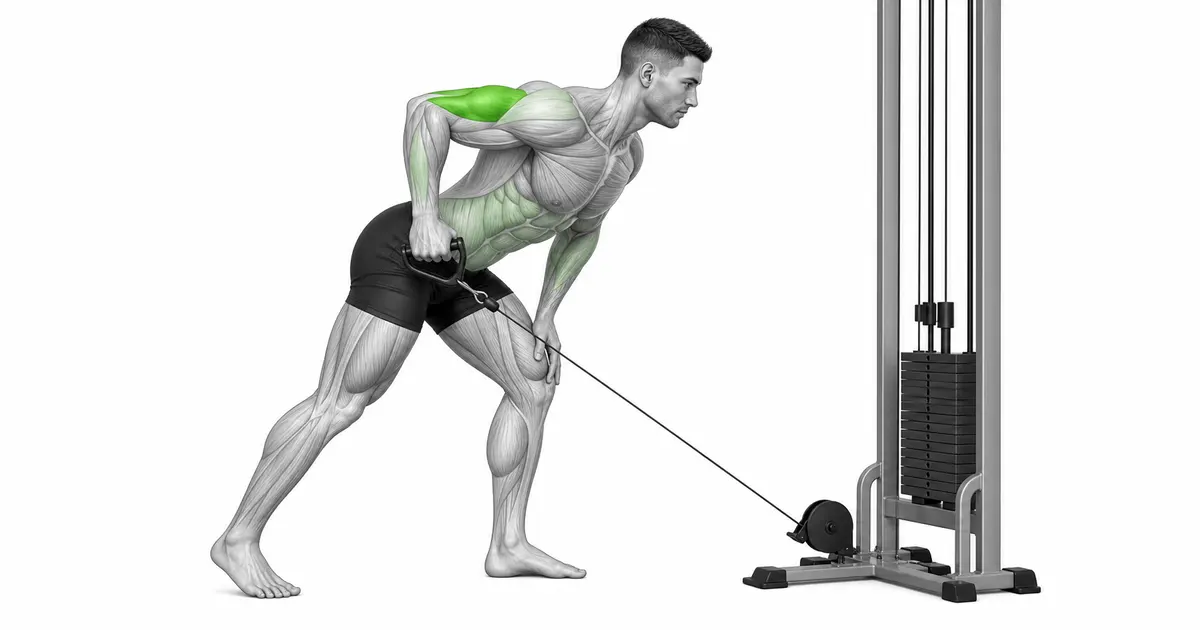
- Triceps brachii (long, lateral and medial heads) — emphasis on controlled elbow extension under resistance to refine the posterior upper-arm line and improve pushing stability.
- Secondary muscles
- Posterior shoulder stabilizers, scapular retractors, forearm extensors for grip control, and the deep core muscles for torso stability during the hinge.
- Difficulty
- Intermediate
- Movement type
- High-control isolation movement with a single-joint emphasis on elbow extension performed from a hip-hinged position, requiring strict upper-arm positioning to avoid shoulder compensation.
Can I perform the kickback after pressing movements?
Yes. Performing the Cable Triceps Kickback after compound pressing is appropriate because it functions well as an accessory. However, monitor volume — if your triceps are heavily fatigued from pressing, reduce load and sets to avoid excessive local fatigue that could impede recovery. When performed as a finisher, focus on clean technique and reduce resistance as needed rather than chasing additional repetitions with poor form.
STEP BY STEP
4 Steps for One Complete Rep
- 1
Set the machine and choose the handle
Attach a single-handle (D-handle) or a short straight bar to the low pulley. Stand sideways or slightly angled to the stack so the cable runs along the lateral plane of your working arm. Select a light to moderate load — one that allows you to move strictly by extending the elbow without creating momentum from the torso. If you have no experience with the exercise, begin with the smallest weight that produces clear resistance throughout the extension. Step close enough so the handle hangs roughly level with your elbow when your upper arm is parallel to the floor. Your feet should be hip-width with a small stagger if that helps balance; distribute weight evenly across both feet and keep the toes pointed forward or slightly outward depending on your stance comfort.
- 2
Establish the hinge and upper-arm position
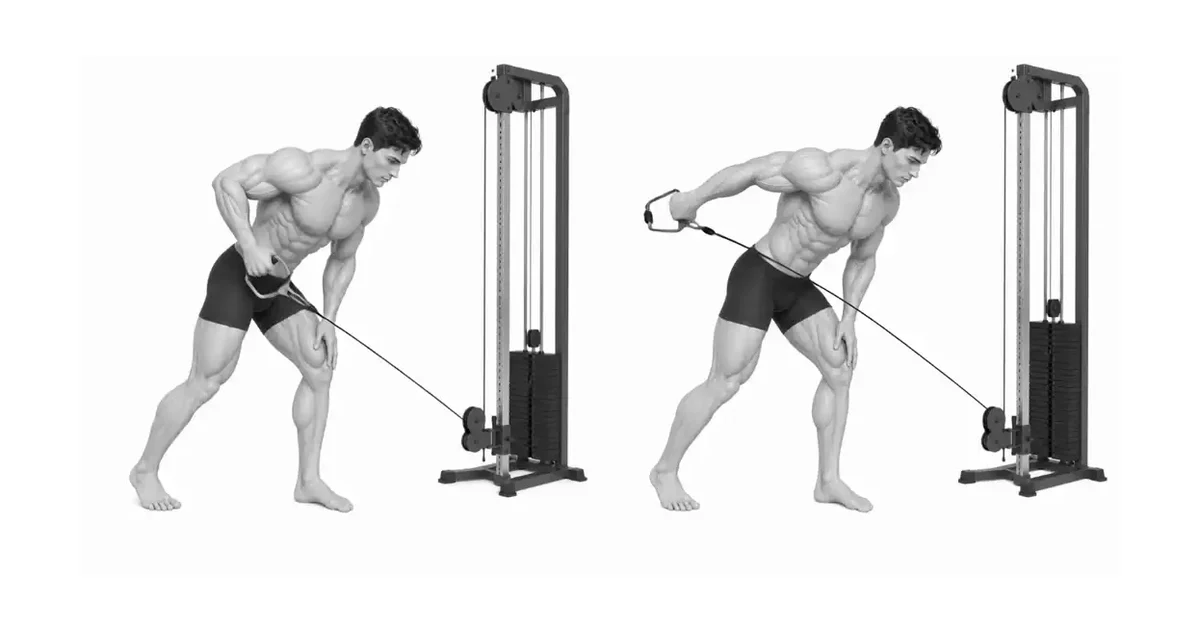
Hinge at the hips until your torso is inclined but not collapsed; maintain a neutral spine from head to tailbone and a gentle bracing of the core to prevent lumbar rounding. The working shoulder should be slightly flexed so the upper arm lies approximately parallel to the floor or slightly below, with the elbow close to the ribcage but allowed to float freely in space. Resist letting the humerus travel forward or rotate; the upper arm serves as a fixed lever while the forearm performs the extension. Keep the wrist neutral and the grip firm but not overly tight; avoid wrist extension or flexion that transfers stress into the forearm.
- 3
Execute controlled elbow extension (concentric phase)
From the start position with the elbow bent to approximately midway through the normal range, extend the elbow deliberately until the forearm is aligned with the upper arm. Focus on initiating the movement using the triceps; do not thrust the shoulder backward to gain additional horizontal distance. Maintain constant tension from the cable by moving smoothly and without pausing at intermediate positions. Exhale during the push phase to assist with core stability, and ensure the movement is driven by a single-joint action at the elbow rather than by momentum or upper-arm travel.
- 4
Control the return (eccentric phase) and reset
Slowly allow the forearm to return to the start position under control, resisting the cable rather than dropping into it. The eccentric phase is where you maintain muscle tension and develop positional control — move with a controlled tempo and avoid a fast rebound that turns the eccentric into an uncontrolled relaxation. Once the forearm approaches the starting angle, pause briefly to confirm alignment and reset scapular position if needed. Keep repetitions consistent: once form degrades, stop and reduce resistance, shorten range, or end the set.
OPTIMAL FORM
Detailed technical breakdown: joint alignment, torque management, and grip mechanics
1) Joint alignment and shoulder positioning — The cornerstone of an effective cable triceps kickback is keeping the upper arm functionally stable while the elbow performs the extension. Think of the humerus as a stationary lever: avoid gross shoulder flexion or horizontal adduction during the movement. Horizontal adduction (bringing the arm across the front of the torso) reduces triceps engagement and shifts load to the anterior shoulder. Instead, maintain the upper arm so the elbow remains approximately in line with the torso plane; a small amount of forward or backward drift is acceptable for comfort, but large excursions indicate loss of isolation. Keep the scapula gently retracted and depressed; this minimizes compensatory scapular elevation or protraction that commonly occurs when the body attempts to help with the lift.
2) Torque management and controlled lever length — Because the cable produces constant tension, the effective moment arm changes slightly with forearm orientation. To avoid excessive torque at the elbow, maintain a moderate bend at the wrist and do not fully straighten the elbow into a forced lock at the top. A soft end-point where the triceps are fully engaged without hyperextending the joint provides safer, higher-quality repetitions. When the resistance feels heavy enough that you begin to swing the torso or launch the upper arm, reduce the load or shorten the effective lever by keeping the elbow closer to the body. If you experience difficulty maintaining tempo during the eccentric phase, actively slow the return to enhance muscular control and tendon conditioning.
RANGE, LOAD & TEMPO
Choose a range and load that keep the Cable Triceps Kickback repeatable
The useful range of motion ends before your torso or working joints have to change position to move the load. Keep the triceps brachii (long, lateral and medial heads) — emphasis on controlled elbow extension under resistance to refine the posterior upper-arm line and improve pushing stability. producing the movement while the posterior shoulder stabilizers, scapular retractors, forearm extensors for grip control, and the deep core muscles for torso stability during the hinge. support the same alignment from the first repetition to the last.
Use a controlled lowering phase of about two to three seconds and avoid bouncing through the transition. If the final repetitions become shorter, faster, or visibly different from the first, reduce the load or stop the set before technique breaks down.
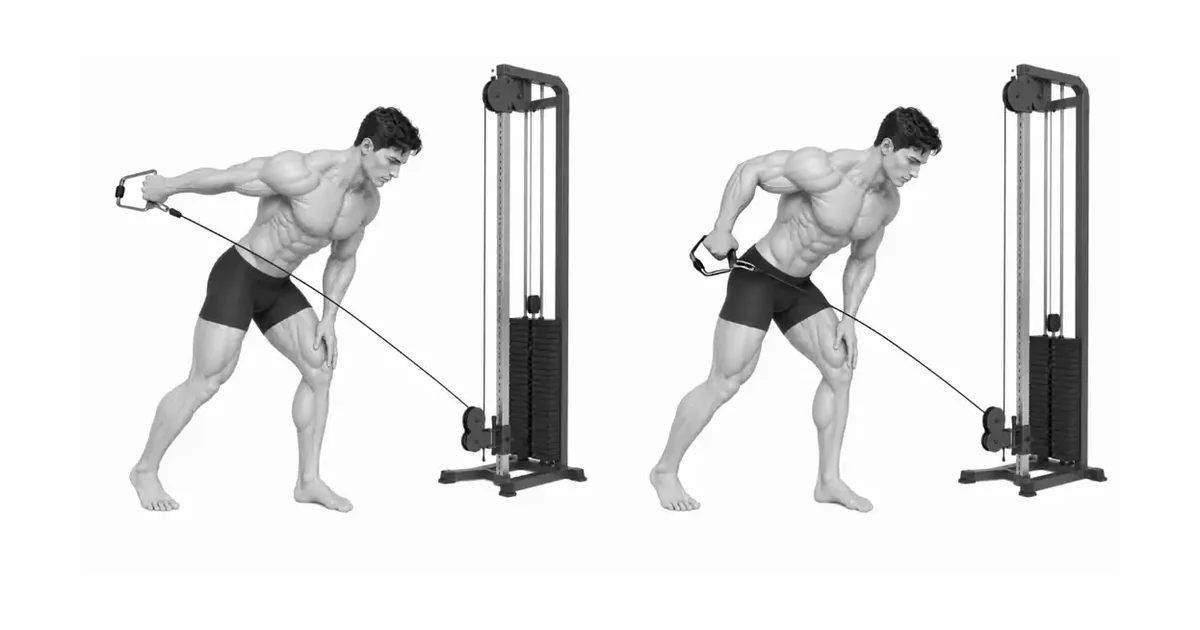
Key point: Progress the Cable Triceps Kickback only after every repetition follows the same path without joint pain.
TROUBLESHOOTING
Fix the cause of a mistake, not just its appearance
Using torso momentum (swinging)
- What you see
- You notice the torso thrusts backward, hips extend, or the shoulder retracts markedly to help the handle move.
- Likely cause
- The selected resistance is too heavy for strict elbow-dominant extension, or the athlete relies on whole-body momentum to complete repetitions.
- How to correct it
- Reduce the load to a level that allows full control through both concentric and eccentric phases. Re-establish the hip hinge and neutral spine, practice slow eccentric-only reps to build control, and consider performing single-arm variations with lighter resistance until you can maintain a strict upper-arm position for the entire set. Use tactile feedback or a mirror to ensure minimal shoulder and torso displacement.
Shrugging or elevating the shoulder
- What you see
- Scapular elevation or pronounced neck involvement during each repetition, often with the upper traps activating visibly.
- Likely cause
- Excessive reach of the upper arm, poor scapular control, or trying to create extra leverage by recruiting shoulder elevators.
- How to correct it
- Reset the shoulder by consciously depressing the scapula before each rep and keep the range of motion within a pain-free, stable corridor. Cue yourself to lead with the elbow and to imagine driving the forearm back from the elbow joint rather than pulling with the shoulder. If shoulder elevation persists, decrease the range of motion and re-train scapular control with low-load stabilization drills such as scapular retractions and low-row holds prior to performing kickbacks.
REGRESSION & PROGRESSION
Match the difficulty before adding load
Load and limb variations
Start with single-handle work at a light load and progress first by increasing repetitions while maintaining perfect form, then by adding sets. After technique is stable, increase resistance in small increments while preserving tempo. Introduce unilateral variations to correct side-to-side imbalances: perform single-arm kickbacks while the opposite hand stabilizes on a rack or bench. When unilateral control is solid, you can progress to heavier single-arm loads or double-handle staggered sets. If you need more mechanical difficulty without adding heavy weight, shift to a cable line angled slightly lower or higher to change tension timing through the joint.
Tempo and eccentric emphasis
Manipulate tempo to increase time under tension: make the concentric moderate and focus on a deliberately slow eccentric phase to improve tendon loading and motor control. Another refinement is contrast training by combining a set of controlled slow reps with a final cluster of shorter-tempo reps at slightly reduced resistance to work near-fatigue without sacrificing alignment. Avoid using tempo tricks as an excuse for poor technique; tempo progression should follow reliable positional control and absence of compensatory patterns.
BEGINNER PROGRAM
A practical starting framework
Use the Cable Triceps Kickback as a targeted accessory movement to refine elbow extension strength and enhance the shape of the posterior upper arm. Because it emphasizes a small muscle group, quality of technique and consistent tension are paramount; prioritize control and frequency rather than attempting maximal loads. This exercise pairs well with pressing days or as a finishing movement after compound upper-body work.
Frequency
2x per week
Place this exercise as an accessory after compound pressing or horizontal-pulling patterns. Maintain at least one full day of recovery before the next direct triceps session.
Volume
3~4 sets, 10~15 times
Aim for a range that allows quality repetitions; stop the set as soon as you cannot complete a rep with the prescribed technique. If you train both arms unilaterally, factor each side's workload into weekly totals.
- Prioritize technical control over load: if your torso or shoulder begins to move to complete reps, reduce resistance or stop the set.
- Breathe rhythmically: exhale during the concentric push, inhale during the controlled return; avoid breath-holding that increases intra-abdominal pressure.
Frequently asked questions
Should I perform single-arm or two-arm variations?
Single-arm work is generally preferable for identifying and correcting side-to-side imbalances and for maintaining strict control of the upper arm. Bilateral or two-arm versions can be useful for time efficiency and for slightly heavier absolute loads if you can preserve form. Begin unilateral at a manageable weight to ensure you can maintain the hinge and elbow alignment on both sides before progressing to bilateral or heavier unilateral loads.
Evidence and references
- 1. ExRx.net