PEC DECK FLY
The pec deck fly is not about closing the handles—it is about bringing your upper arms in front of your chest
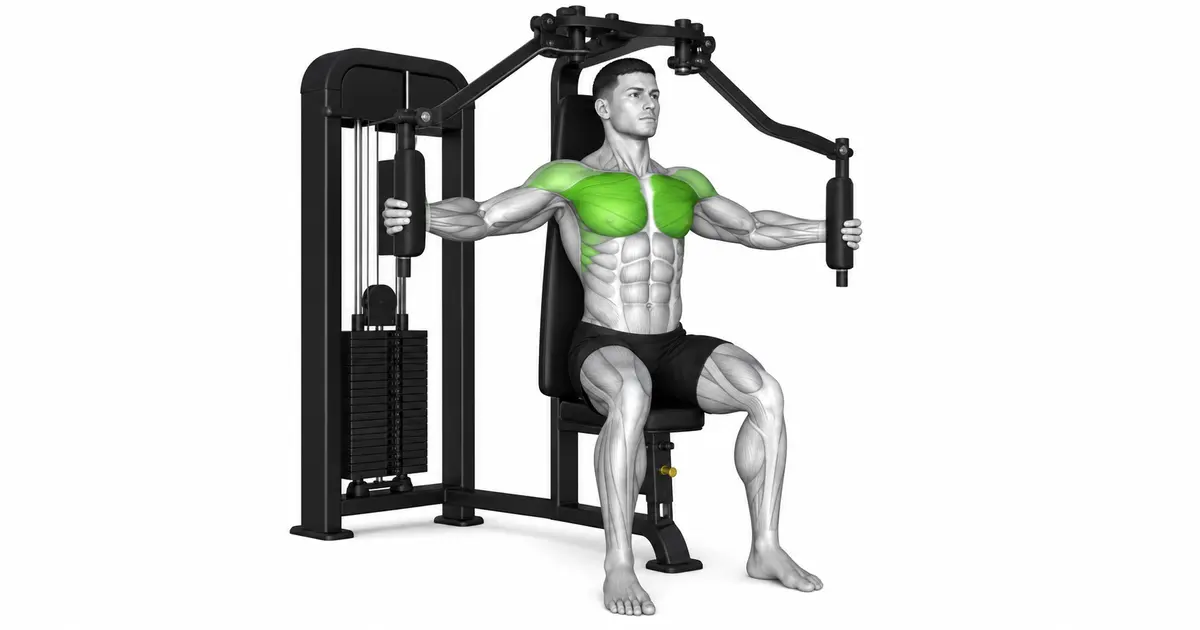
This guide covers the pec deck machine with vertical handles shown in the movement demonstration. Because the machine guides the path on both sides, you can practice horizontal shoulder adduction of the pectoralis major with less attention on trunk balance than a standing cable requires. A fixed track does not automatically fit your proportions, though. If the seat height and starting range are set wrong, the handles can end up above your shoulders or the upper arms can travel far behind the torso—so set your joint positions and back support before you think about load.
- Primary muscles
- Pectoralis major
- Secondary muscles
- Anterior deltoids · upper-arm stabilizers
- Difficulty
- Beginner
- Movement type
- Horizontal shoulder adduction
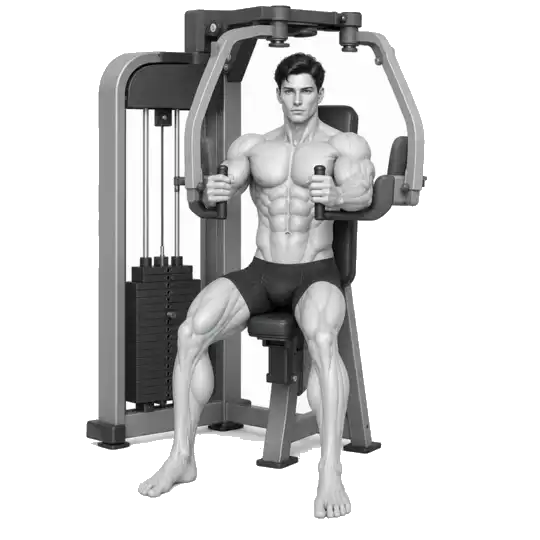
What height should the handles be relative to my chest?
Start between mid-chest and just below shoulder height. The elbows and wrists should sit at similar heights and the shoulders should not shrug. This shifts a little with machine geometry and arm length, so prioritize comfortable joint alignment.
STEP BY STEP
5 Steps for One Complete Rep
- 1
Check the weight pin and starting angle
With the machine at rest, confirm the pin is fully seated and select the lightest load first. If there is a starting-angle lever, set it so your upper arms are roughly in line with your torso when you take the handles, and avoid any position that puts them far behind your body.
- 2
Match the seat to the handle height
Once seated, adjust the seat so the handles fall between mid-chest and just below shoulder height. Find the position where the handles are not so high that your shoulders shrug, nor so low that your wrists bend.
- 3
Build support through your back and feet
Rest your pelvis, back, and if possible your head comfortably against the backrest, with both feet on the floor. Without pushing the ribs forward, take the handles and set a soft bend in the elbows that you will hold throughout.
- 4
Close a wide arc with your upper arms
Exhale and bring both upper arms together in front of the chest so the handles converge toward the center. Instead of pushing hard with the hands, think of the elbows and the whole upper arm tracing an arc, and do not let the trunk peel away from the backrest.
- 5
Open slowly along the same path
Pause briefly at the center, then inhale and open the handles over two to three seconds. Control the weight stack so it does not drop suddenly or tug at the front of the shoulder, and start the next repetition with the upper arms roughly in line with the torso or at a pain-free point.
SEAT & SUPPORT
Set seat height by the relationship between the handles and your chest
On the same machine, a low seat puts the handles above your shoulders and a seat that is too high drops them below your ribs. Start where the handles sit between mid-chest and just below shoulder height, with the elbows at about the same height as the wrists. The shoulders should not creep toward the ears.
The backrest is a reference point for your trunk, not a wall to bounce off. Keeping the pelvis and back on the pad and both feet pressed into the floor makes it easy to spot whether you are over-arching the low back or throwing the body forward as you bring the handles together. If the machine's seat adjustment does not suit your height, do not force it—use a different piece of equipment.
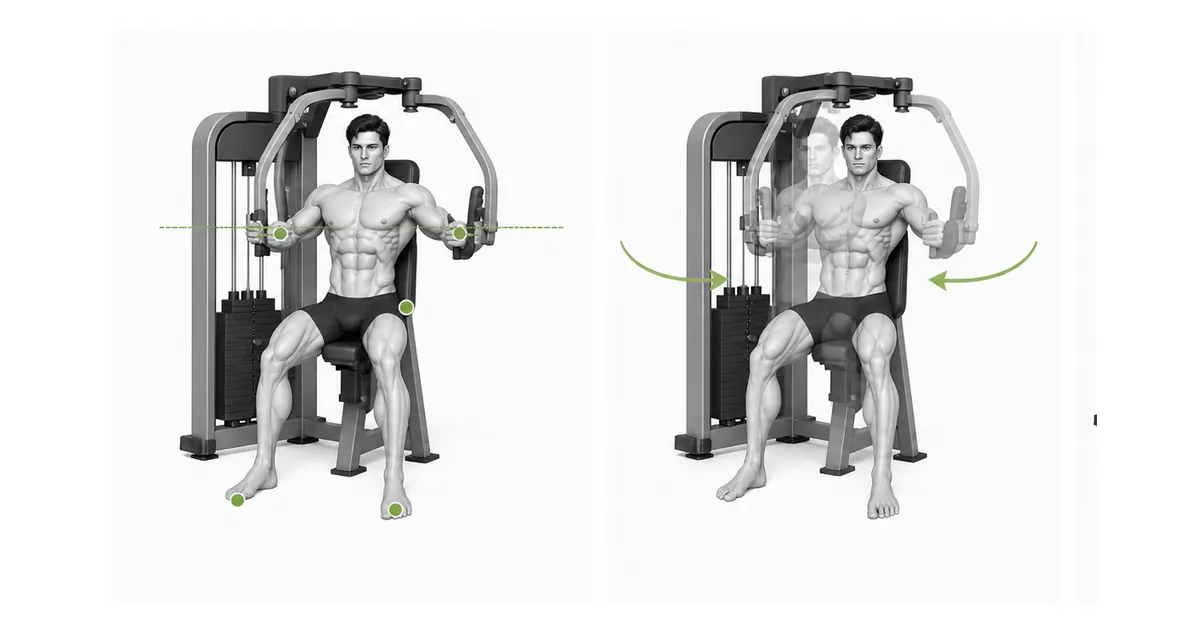
Key point: Order before the set: “Seat height → starting angle → weight pin → back and feet secured.”
ARM ARC
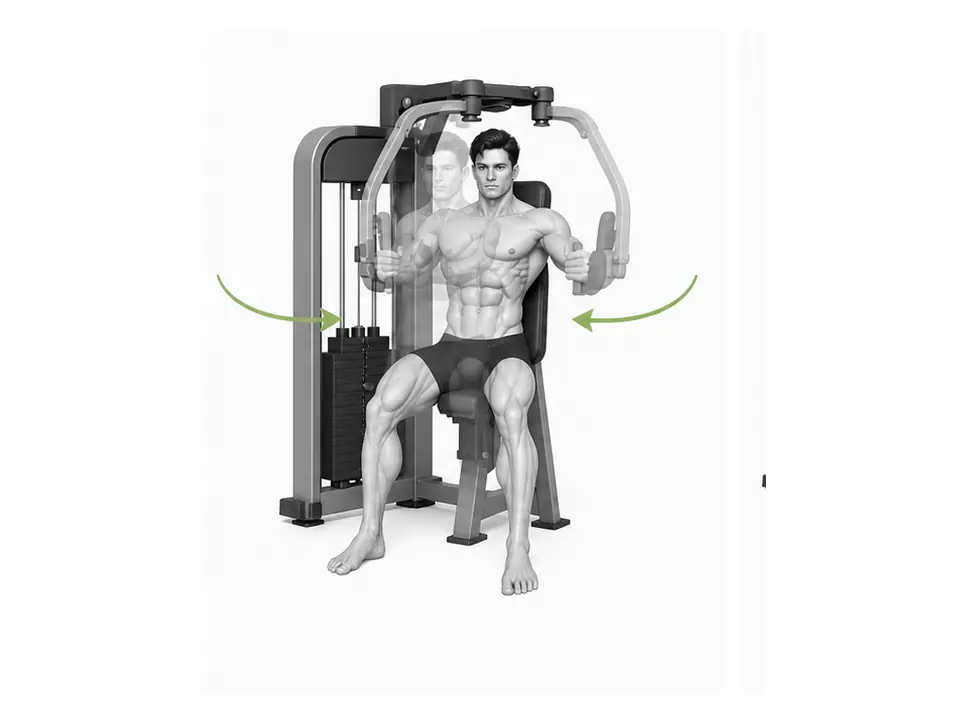
Follow the arc of the machine arms while holding your elbow angle
The primary joint action in the pec deck fly is not extending the elbows—it is horizontal shoulder adduction, bringing the upper arms toward the front of the torso. Hold the soft elbow bend you set at the start and make sure both machine arms move at the same speed. If the elbows extend substantially as you close, the movement becomes more of a press than a fly.
A repetition does not have to end with the handles touching in the center. Depending on the machine's geometry and your arm length, a gap may remain between them. It is better to change direction at a point you can control while keeping tension on the pectoralis major—before the shoulders push forward or your back leaves the pad.
RANGE & SHOULDER
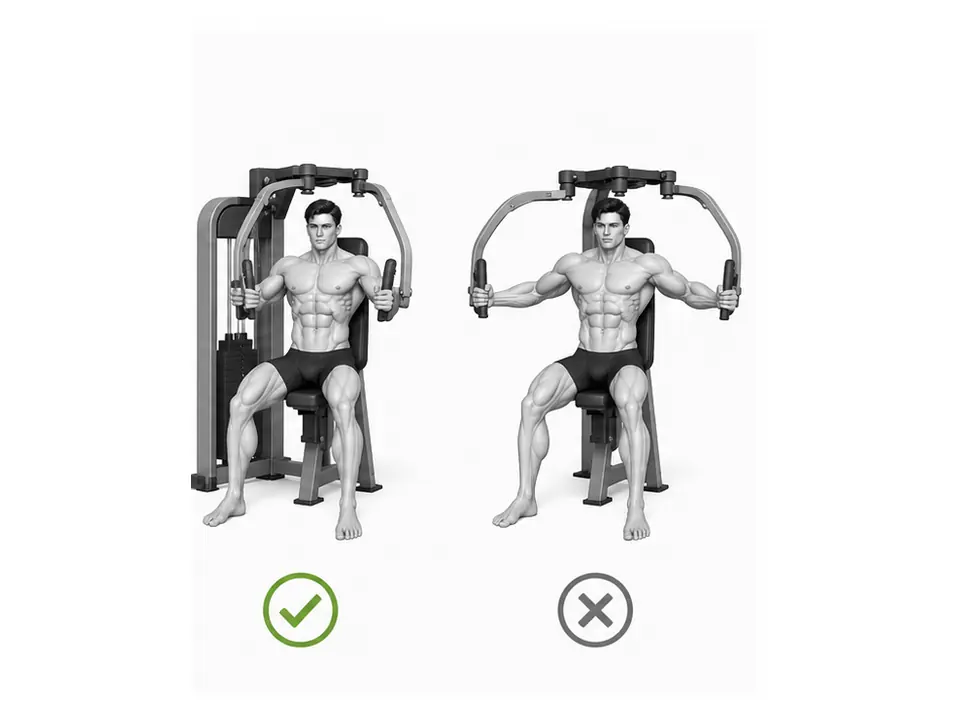
A range where the shoulder stays stable matters more than opening further
Letting the upper arms travel far behind the torso in the open position can increase the stretch on the chest, but it also places greater demands on the structures at the front of the shoulder. Do not force the handles open until they disappear from view; stop within a range that does not lift the shoulders or push them forward. The pain-free range varies from person to person.
EMG studies of fly-type movements show both the pectoralis major and the anterior deltoid participating, with activity varying by load and by phase of the contraction. EMG numbers alone, however, cannot justify excessive load or depth. Prioritize a repeatable path and a controlled lowering phase, and count this exercise within your total chest volume when you pair it with pressing work.
TROUBLESHOOTING
Fix the cause of a mistake, not just its appearance
The handles sit too far above the shoulders
- What you see
- The moment you take the handles, the shoulders rise toward the ears and the area around the neck tenses first.
- Likely cause
- The seat may be too low, or the machine's handle height may not suit your proportions.
- How to correct it
- Raise the seat so the handles sit between mid-chest and just below the shoulder. If it cannot be adjusted, use a different machine.
The upper arms open too far behind the body
- What you see
- In the open position the front of the shoulder pulls and the elbows travel well behind the backrest.
- Likely cause
- The starting angle or the range may have been widened too far to create a bigger chest stretch.
- How to correct it
- Narrow the starting angle one step and stop where the upper arms are roughly in line with the torso or at a pain-free point.
The elbows extend on every repetition
- What you see
- The arms lengthen as the handles come together and the elbows are nearly locked in the closed position.
- Likely cause
- You may be pushing the load with your hands to close the machine arms.
- How to correct it
- Reduce the load, set the elbow angle first, then move the whole upper arm through the arc.
The trunk leaves the backrest
- What you see
- The head and back come forward as the handles converge and the low back arches sharply at the closed position.
- Likely cause
- Often the load is too heavy, or you are forcing the handles to meet in the center.
- How to correct it
- Keep the pelvis and back on the pad and stop at a stable point even before the handles meet. Reduce the load if needed.
Bouncing off the weight stack on the way back
- What you see
- The opening phase speeds up and the plates clack together at the end of every repetition.
- Likely cause
- Focusing only on the contraction and releasing resistance during the lowering phase, or simply being fatigued.
- How to correct it
- Open slowly over two to three seconds and begin the next repetition before the plates make contact. End the set if you lose control.
REGRESSION & PROGRESSION
Match the difficulty before adding load
Unloaded path check
Remove the pin or use the lightest setting to confirm your seat and a pain-free starting range.
Light pec deck fly
Repeat the same arc for 12–15 reps with your back on the pad.
Paused pec deck fly
Hold for one second at the center and open over three seconds to control the movement without rebound.
Single-arm variation
Work one arm at a time when the machine allows, checking for trunk rotation and side-to-side differences.
BEGINNER PROGRAM
A practical starting framework
Place it as an accessory once or twice per week, after compound work such as the bench press or machine chest press. For the first four weeks, stay away from failure with two or three repetitions in reserve, and use a load that keeps your back on the pad in both the open and closed positions.
Reps
10–15
Open under control over 2–3 seconds
Sets
2–3
Rest 60–90 seconds between sets
Load
+1 step
Only when all 15 reps follow the same path
- If handle height, elbow angle, and backrest contact are the same on every repetition, move up one weight step next session.
- Prioritize both machine arms moving at the same speed and the shoulders staying stable over getting the handles to touch in the center.
- On days when your pressing performance matters, do the presses first. Pre-fatiguing with the pec deck does not necessarily raise chest activity in the presses that follow.
Frequently asked questions
Do the handles need to touch at the end?
They do not. Bring the upper arms together far enough while keeping back contact and shoulder position. Do not throw the trunk forward or roll the shoulders in order to reach the center.
Can I do pec deck flys before the bench press?
Warming up the chest movement with light loads is fine, but if pressing performance is your goal, you would usually press first. Pre-fatigue research has not confirmed that leading with the pec deck increases chest activity in the presses that follow.
Evidence and references
- 1. ACE-sponsored study — Muscle activity across chest exercises
- 2. Rodrigues et al. — Pectoralis major and anterior deltoid activity in horizontal flys
- 3. Huang et al. — Pectoralis major contraction during the pec deck fly
- 4. Gentil et al. — Pec deck pre-fatigue and exercise order
- 5. Solstad et al. — Muscle activity in the bench press versus the dumbbell fly