CHEST-SUPPORTED MACHINE ROW
The deck row is not an exercise that involves pulling hard on the handle, but rather a horizontal pull in which the chest is on the pad and the elbows and shoulder blades are sent back together.
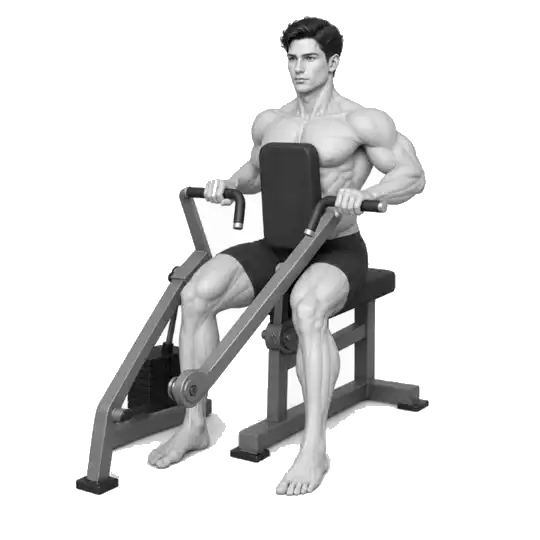
Since the name ‘deck row’ is used differently depending on the manufacturer and gym, this guide is based on the plate loaded chest supported machine row shown in the video. This is an action performed while sitting, supporting the sternum on the vertical chest pad and pulling the neutral handles on both independent levers. Chest support reduces the strain and recoil of bending your upper body, making it easier to focus on your elbow path, but if the seat height and pad distance are not aligned, your shoulders may shrug or your wrists may bend. In the seated row study, the latissimus dorsi, middle trapezius, rhomboids, and biceps brachii were active together, and the difference in overall muscle activity between the condition in which the scapula was intentionally fixed and the condition in which it moved freely was mostly not significant. Rather than forcing your shoulder blades all the way together, move forward naturally as you extend your arms, using a controlled range that doesn't allow your shoulders to rise toward your ears as you pull.
- Primary muscles
- Latissimus dorsi, middle trapezius, rhomboids
- Secondary muscles
- Rear deltoid, biceps brachii, brachialis
- Difficulty
- Beginner to Intermediate
- Movement type
- chest support horizontal pull
Are deck rows and seated cable rows the same exercise?
Both are horizontal pulls, but the deck row in this video has a chest pad and independent lever to support the torso and handle tracks. Cable rows have different stabilization demands and trajectories because the torso holds itself in place and pulls along the direction of the cable.
STEP BY STEP
6 Steps for One Complete Rep
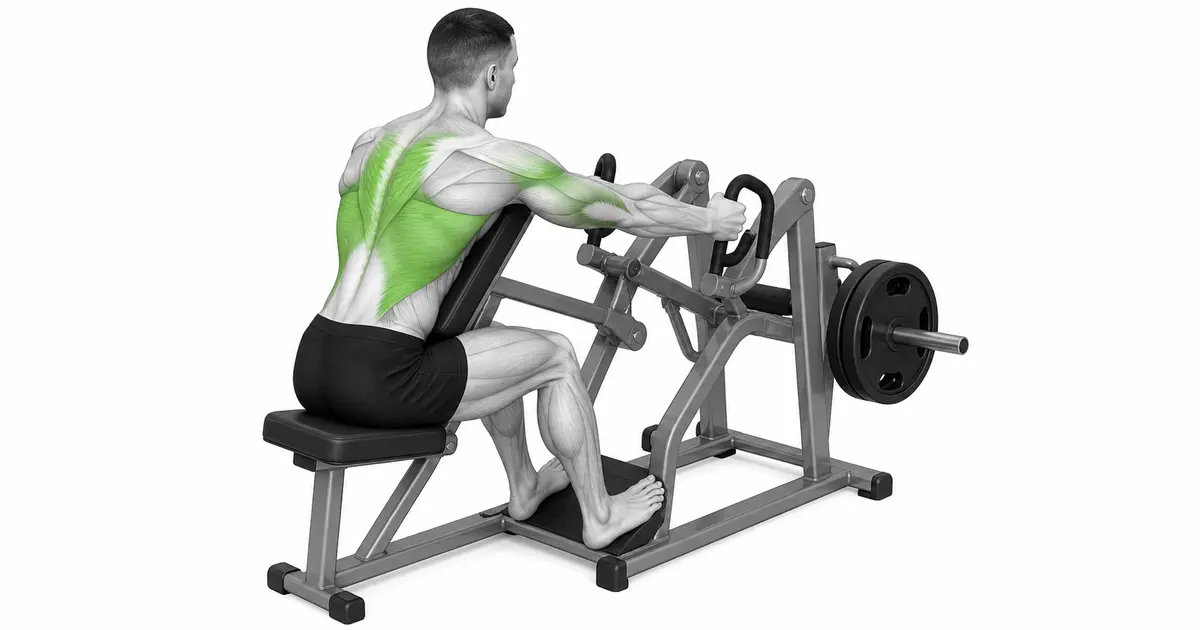
- 1
Checking the mechanism and left and right disks
Check that the seat/chest pad adjustment pins are fully locked and that the levers and handles are not loose or damaged. Insert discs of the same size and weight into the left and right sleeves and secure them with collars if necessary.
- 2
Adjust the handle to the level of your lower chest
When seated, adjust your seat so that the neutral handle is at the height between your lower chest and upper abdomen. An appropriate starting point is if your shoulders do not rise to your ears when you extend your arms from the starting position, and if your elbows are slightly below the shoulder line when pulled back.
- 3
Match chest pad distance and foot position
Adjust the pad to a distance where your arms are almost straight when you hold the handle, but your shoulders do not fall forward. Place the center of your sternum on the pad, place both feet on the floor, and keep your knees about hip-width apart.
- 4
Start with neutral wrists and long arms
Wrap your palms around the handle facing each other and close your thumbs. Keep your wrist and forearm in one line, extend your arm long without locking your elbow, and allow your shoulder blade to move forward naturally within a pain-free range.
- 5
Bring your elbows to your lower ribs
Exhale and pull your elbows back and down, keeping your chest on the pad. Rather than pulling on the handle with your hand, imagine your upper arm passing next to your torso, and make sure both levers move at the same speed.
- 6
Stop before lifting your shoulder and return slowly.
Once your elbows are next to your torso and the handle is close to your lower ribs, pause for one second. Without lifting your chest or leaning your shoulders too far back, straighten your arms for 1 to 2–3 seconds and start the next repetition before the lever hits the stopper.
SEAT & PAD
Seat height and chest pad distance first determine elbow path
If the seat is too low, the handles will be raised to shoulder height, causing your elbows to spread wide and your upper trapezius muscles to become overly involved. If it's too high, the handle may sink under your stomach, bending your wrists or causing your body to slide forward. Start with the handle at a height between your lower chest and upper abdomen.
If the chest pad is too far away, the elbows will bend from the start, shortening the range of motion. If it is too close, the shoulder will be dragged in front of the body when the arm is extended, or the lever will touch the stopper. Keep your sternum centered on the pad and your arms almost straight, with your joints at a comfortable distance.
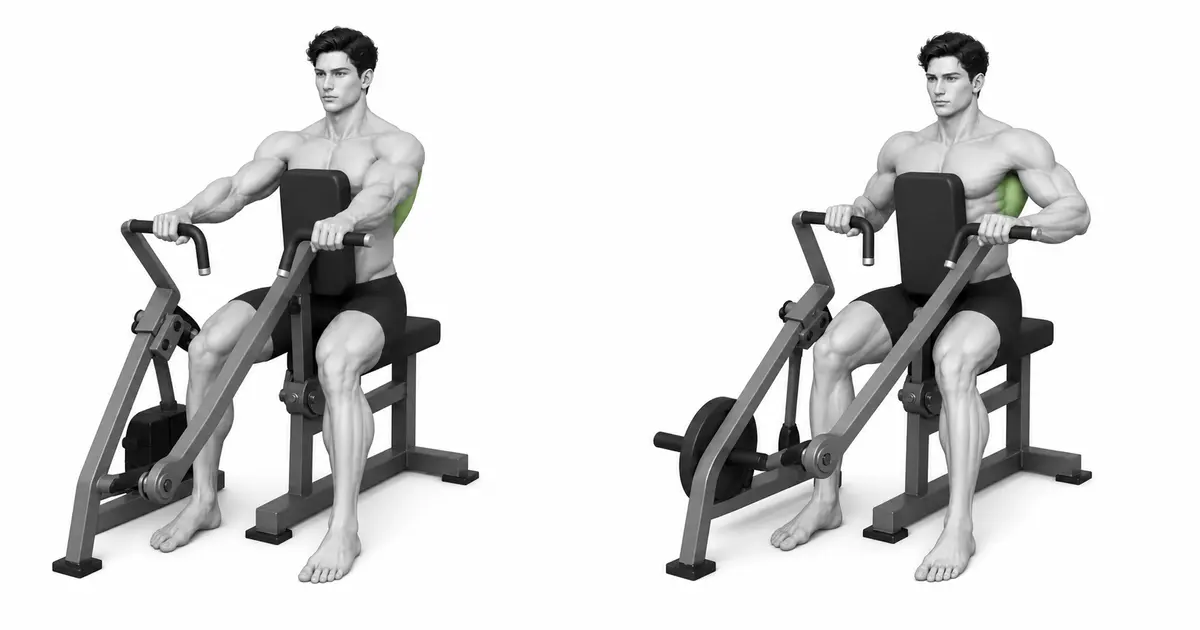
Key point: Criteria to try right away: Handle at lower chest height + sternum pad contact + arms almost straight from the start
SCAPULA & ELBOW
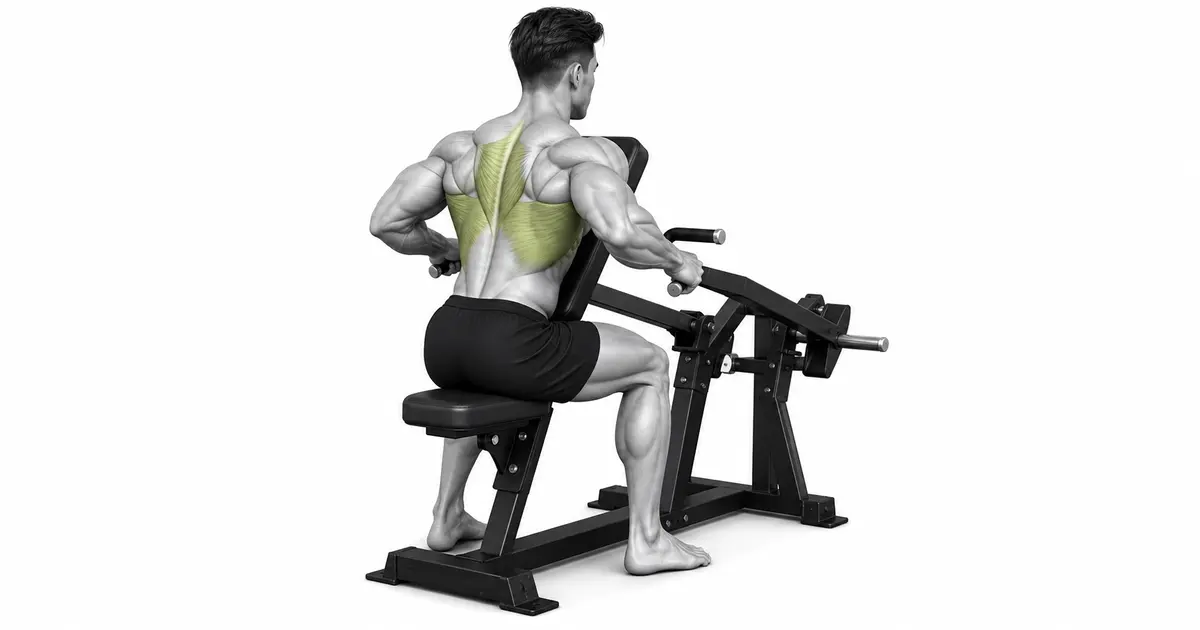
The shoulder blades are neither frozen nor squeezed all the way.
While extending the arm, the scapula naturally moves forward along the ribs, and returns back with the elbow when pulling. A recent seated row study found that fixed and freely moving scapula conditions were similar in overall excitation levels for most muscles, with differences only seen in some muscles and segments.
Therefore, pain-free movement and prevention of shoulder shrugging are more practical than the instruction to ‘always keep the scapula together.’ Keeping your elbows about 20–45 degrees from your torso and toward your lower ribs makes it easier for your lats and mid-back muscles to perform a horizontal pull together.
TROUBLESHOOTING
Shoulder shrugs and chest pad disengagement are usually a setting or weight issue
If the handle is too high or the weight is too heavy, your elbows will spread out to shoulder line and your shoulders will rise toward your ears. Raise your seat, lower the handle to your lower chest, and lower the weight to keep your neck long. This doesn't mean you have to completely avoid using your upper trapezius muscles, but the shoulder shrug doesn't have to dominate the movement.
If your chest comes off the pad and your body leans back as you pull, you are using your body weight to accelerate the lever. Maintain pressure on your sternum and stop where your elbows are next to your torso. Do not bend your wrists or push the front of your shoulders forward to pull them further back.
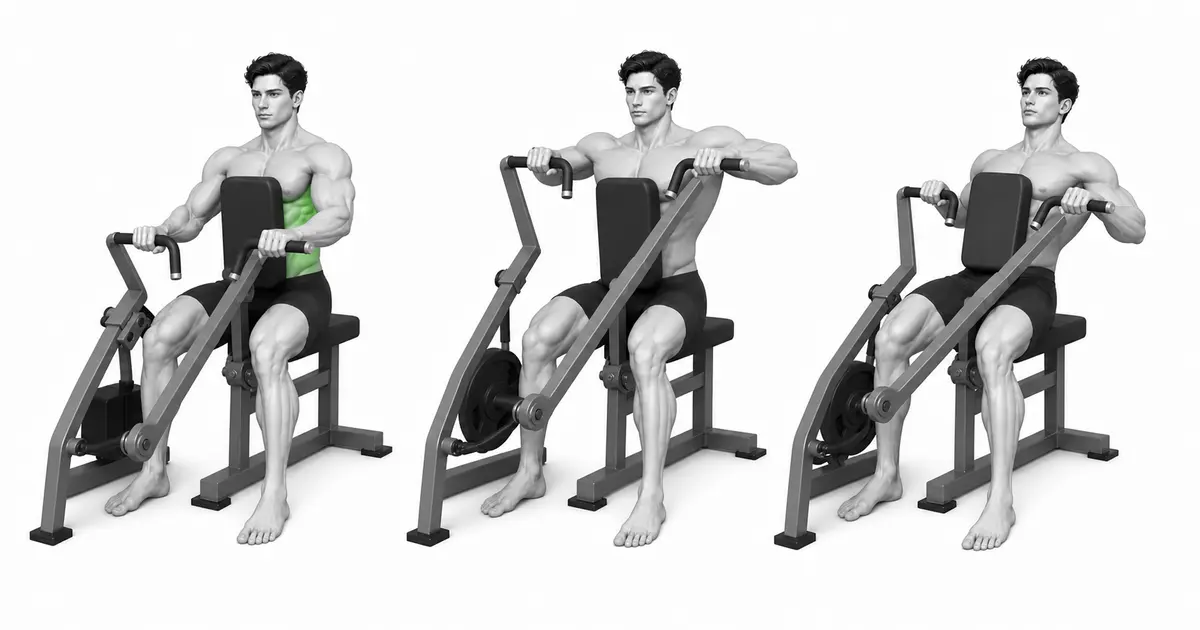
TROUBLESHOOTING
Fix the cause of a mistake, not just its appearance
The seat is low and the handles are at shoulder height.
- What you see
- From the start, as you shrug and pull, your elbows are spread wide to the shoulder line.
- Likely cause
- You either used the same seat numbers as the previous user or did not check the handle height.
- How to correct it
- Raise your seat, align the handle between your lower chest and upper stomach, and lower your elbows below your shoulder line.
Chest pad too far or too close
- What you see
- Even if you extend your arm, your elbow is bent too much or, conversely, your shoulder is pulled forward excessively and the lever touches the stopper.
- Likely cause
- I did not adjust the pad distance to suit my body type.
- How to correct it
- Change the pad or seat position so that your arms are almost straight and your shoulders are a comfortable distance apart, with your sternum resting on the pad.
Breasts come off the pad when pulled
- What you see
- With each repetition, your torso leans back and a gap forms between the pad and your chest.
- Likely cause
- You are currently unable to control the weight with your arms and back, so you use your body weight and bounce.
- How to correct it
- Lower the weight and continue to press your sternum into the pad. Stop at the range before chest contact disappears.
Wrists are bent inward or backward
- What you see
- The handle hangs over the fingers, and the back of the hand and forearm do not form one line.
- Likely cause
- You may be pulling hard by hand only, or the seat height does not match the handle rails.
- How to correct it
- Place the handle deep under your palm and wrap your thumb around it to maintain a neutral wrist. Also check your seats again.
One lever moves first
- What you see
- At the front, one handle is pulled first or the return depth is different on the left and right.
- Likely cause
- The loading of the left and right disks is different, or the stronger side is taking over the speed and range.
- How to correct it
- Check the disc again, lower the weight to a controllable weight on the weaker side, and adjust both handles to the same height and speed.
Release the lever on the return section
- What you see
- The arm suddenly extends and the disc or lever hits the stopper, producing a loud sound.
- Likely cause
- I only thought of the pulling section as repetition, or my grip got tired first.
- How to correct it
- Extend your arms for 2–3 seconds and stop just before the stopper. If you lose return speed, end the set.
REGRESSION & PROGRESSION
Match the difficulty before adding load
Band Seated Raw
Learn neutral wrists, low elbows and controlled shoulder blade movements with a light band.
light deck row
Practice the seat/pad setting and the same speed of the left and right independent levers at a weight that can be performed at least 15 times.
1 second pause deck low
When the handle approaches the lower ribs, pause for one second to check chest pad contact and shoulder position.
Slow relaxation deck rows
Extend your arms for 2–4 seconds to learn the natural protraction of the scapula and the controlled return of the lever.
Unilateral machine row
Pull only one lever to check the difference between the left and right sides, but keep the opposite pelvis and chest from rotating on the pad.
BEGINNER PROGRAM
A practical starting framework
It can be used 1–3 times a week as a complementary movement to the main horizontal pull in back training or the barbell row, which causes great back fatigue. For the first set, check the handle height, chest pad contact, and left and right lever trajectory at a weight that can be performed at least 15 times, and proceed with a weight that allows 2–3 repetitions until the end.
number
Episodes 8–12
Chest pad contact and same range left and right
set
2–4 sets
60–120 seconds recovery between sets
speed
1–2 seconds pull, 1 second pause, 2–3 seconds return
Control without lever conflict
- Before the first set, check the adjustment pins, levers, handles, left and right disks, and collars, and record the seat and pad numbers.
- If you maintain sternum pad contact, neutral wrists, low elbows, and the same speed from side to side on all repetitions, add one repetition to the next session.
- After hitting the top of your target reps on every set, raise both discs the same amount. If there is a torso deviation or shoulder shrug, return to the previous weight.
Frequently asked questions
Where should I pull the handle to my chest?
Pull the neutral handle between your lower chest and upper abdomen, toward your lower ribs. Any point where your elbows are next to your torso and maintain chest contact is sufficient.
Should I bring my shoulder blades all the way together?
There is no need to force it all the way through or lock it in from the beginning. When you extend your arms, let your shoulder blades move forward naturally, and when you pull them, let your shoulders return back within the range that does not shrug.
Is it wrong to lose strength in your arms first?
Rows also use the biceps and brachialis muscles, which bend the elbows, so some arm fatigue is normal. If your wrists are buckling or your chest is coming off the pad, lower the weight and realign your elbow path.
Can I use both levers with one arm?
You can, but your torso and pelvis should not rotate when pulling on one side. Hold a pad or hold handle with your opposite hand and use a weight that your weaker side can control.
If I have back discomfort, can I use it instead of barbell rows?
Chest support can reduce the need to bend over, but it does not treat the cause of your pain or eliminate all back strain. If symptoms recur, stop exercising and seek professional evaluation.
Evidence and references
- 1. Lehman et al. — Muscle activity by lat training movement, including seated rows
- 2. Dos Anjos et al. — Upper trapezius muscle activation and EMG feedback during seated rows
- 3. Carangelo et al. — Comparison of high-density electromyography of scapular fixed and free seated rows.
- 4. Fenwick et al. — Trunk muscle activity and spinal movement/load during different row movements
- 5. Youdas et al. — Shoulder and trunk muscle activity of inverted row and open chain horizontal row