DIAMOND PUSH-UP
The diamond push-up is less about hand shape than about holding the whole body as one piece on a narrow base
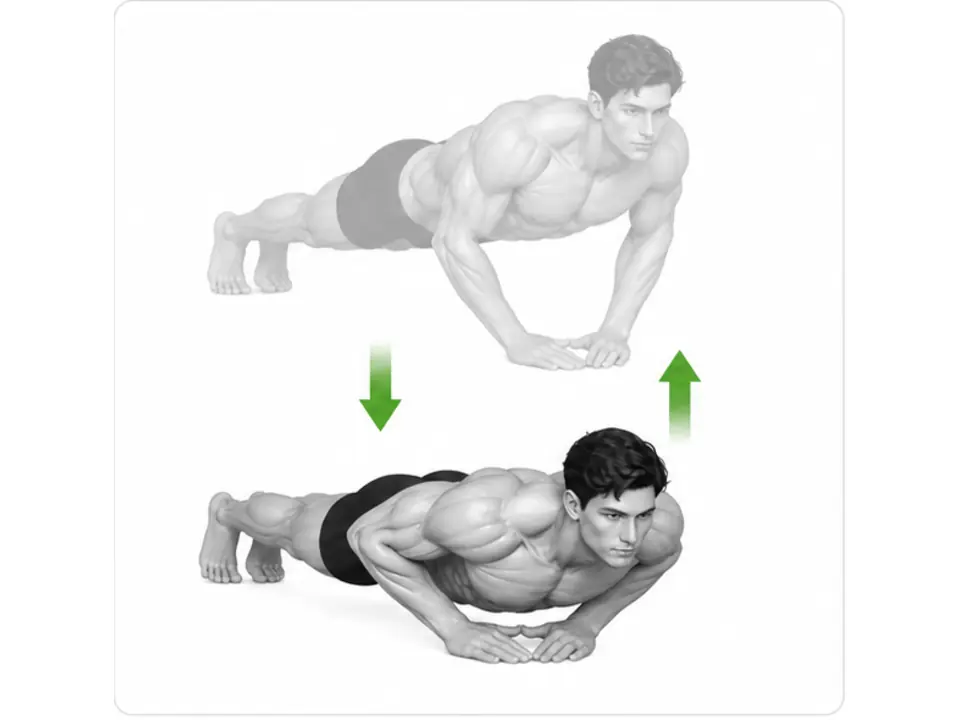
The diamond push-up is a narrow-base push-up performed with both hands close together beneath the chest. As in the movement demonstration, the trunk, pelvis, and legs stay in one line while the chest lowers over the hands and the elbows extend, with the triceps, pectoralis major, anterior deltoids, scapular stabilizers, and core all working together. Small EMG studies have shown higher triceps and pectoralis major activity with a narrow hand position, but that does not mean it develops the inner chest separately or guarantees growth in any specific muscle. Rather than forcing your fingers into a shape, prioritize a narrow spacing that is comfortable on the wrists and a whole-body alignment you can repeat.
- Primary muscles
- Triceps · pectoralis major
- Secondary muscles
- Anterior deltoids · serratus anterior · core
- Difficulty
- Intermediate
- Movement type
- Narrow-base horizontal press
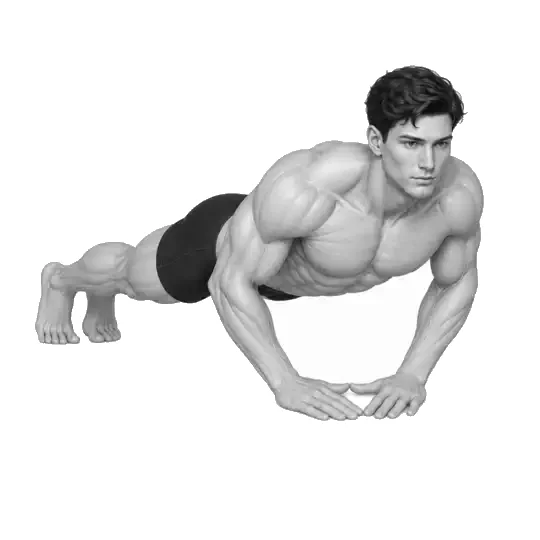
Do my thumbs and index fingers have to touch to form a diamond?
No. What matters is a comfortable narrow base beneath the chest. If touching the fingers twists your wrist or hurts, open the gap slightly and use a small triangle or a parallel hand position.
STEP BY STEP
5 Steps for One Complete Rep

- 1
Find a narrow base your wrists tolerate
From all fours, place both hands close together just below the sternum. A small triangle may form between your thumbs and index fingers, but the fingers do not have to touch. Press through the whole palm and the fingers, and find the spacing that produces no wrist pain.
- 2
Extend the legs into a firm plank
Step one foot back at a time onto the toes and align the head, back, hips, and heels. Squeeze the glutes and brace the abdomen so the ribs do not push forward, then distribute your weight so the shoulders sit near the hands.
- 3
Lower the chest over the hands together
Inhale and bend the elbows backward so the center of the chest descends over the hands. Move the whole body as one board so the head or stomach does not arrive first, and stop at a depth where the wrists, elbows, and shoulders stay comfortable.
- 4
Send the elbows back rather than pinning them
Do not clamp the elbows against your sides—hold a narrow angle to the torso as they travel backward. Find a path where the elbows neither flare to 90 degrees nor drift far outside the hands.
- 5
Push the floor away and rise as a whole
Exhale and push the floor away through the palms to extend the elbows and lift the whole body at once. Do not finish by arching the low back alone or shrugging toward the ears—rebuild the straight-arm plank before the next repetition.
HANDS & WRISTS
The diamond shape is one way to create a narrow base, not the goal
The narrow hand position used in research simply means both hands placed close together beneath the chest—not that everyone's thumbs and index fingers must form a perfect rhombus. If the hands overlap too much or only the fingertips reach the floor, the wrist can fold toward the little-finger or thumb side. Keep the heel of the palm and the fingers on the floor, and it is fine to leave a small gap between the hands.
Setting the shoulders far behind the hands makes the body descend at an angle and destabilizes the wrist and elbow path. Distribute your weight forward so the shoulders sit near the hands at the top, but use a position where the palms do not lift and the front of the wrist does not pinch. If wrist extension is uncomfortable, you can use parallel push-up handles or dumbbell handles.
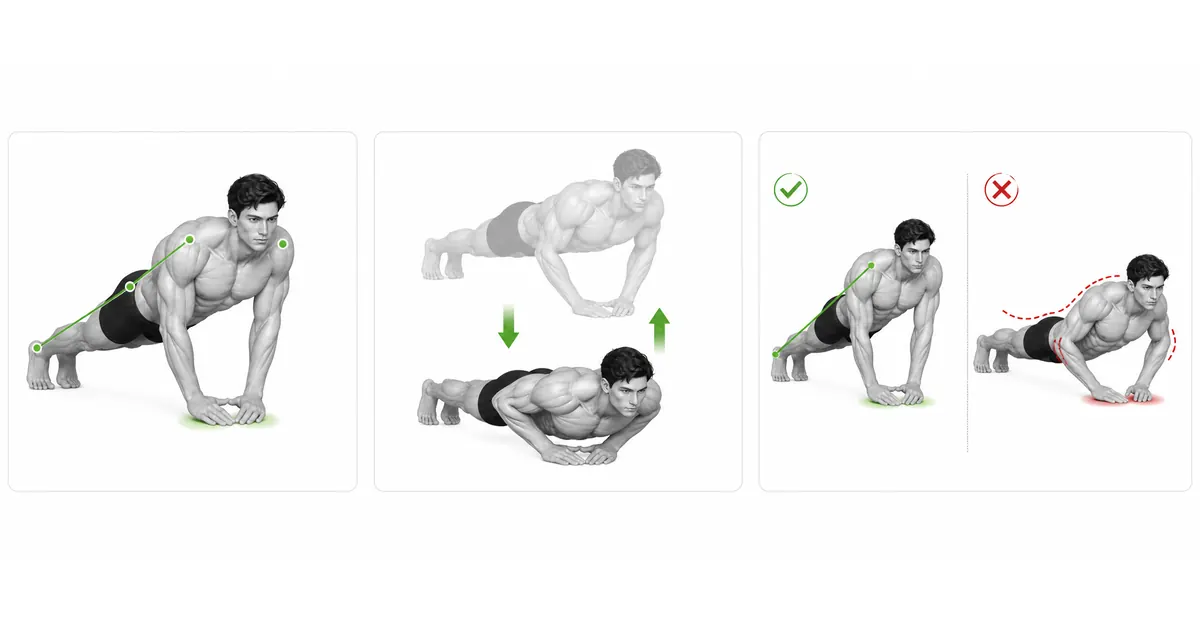
Key point: Practical cue: “A small, comfortable triangle → press the whole palm → shoulders near the hands.”
WHOLE-BODY PATH
It is not just the chest descending—everything from head to heels travels together
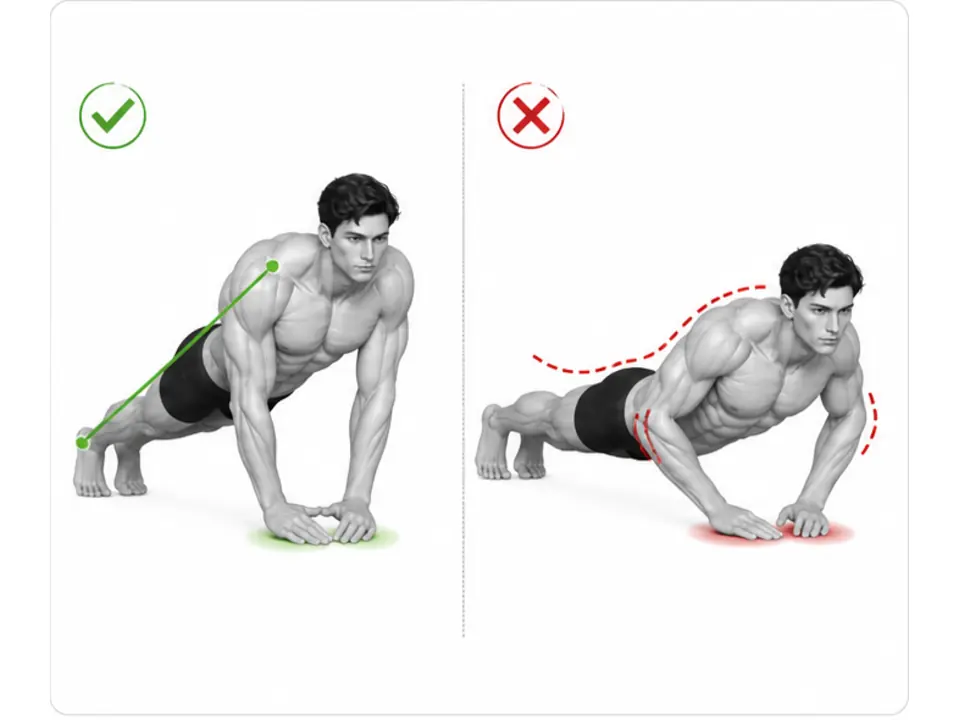
A narrow hand position shrinks the base and raises the elbow-extension demand, so you may get fewer repetitions than in a standard push-up. Hold abdominal and glute tension so the relative positions of the shoulders, hips, and heels do not change. Keeping the same trunk angle on the way down and up makes it easier to transfer force from the chest and arms into the floor.
At the bottom the center of the chest sits over the hands and the elbows pass the sides of the torso pointing backward. Forcing the elbows fully into your sides can bother the wrists and shoulders, so use the narrow angle that suits your proportions. If the head shoots forward first or only the stomach nears the floor, the difficulty is above your current strength.
LOAD & SCALING
Scale with the height of your support rather than by cutting repetitions
In a traditional toes-down push-up the upper body supports a substantial portion of your bodyweight, and dropping to the knees lowers the share carried by the hands. If you cannot hold whole-body alignment with a narrow hand position, start with an incline variation using a bench or a stable box. Lowering the support gradually brings you closer to the toes-down version.
Practicing a controllable range with the same body line at a lower difficulty teaches the skill better than grinding out many short repetitions where the chest never really descends. That said, the chest does not have to touch the floor to count. Change direction within the personal range where the wrists, elbows, and shoulders feel comfortable and the hips do not sag.
TROUBLESHOOTING
Fix the cause of a mistake, not just its appearance
Pressing the hands too close and folding the wrist
- What you see
- One side of the palm lifts off the floor and pressure concentrates on the thumb or little-finger side of the wrist.
- Likely cause
- You may be twisting the fingers and wrist to build a perfect diamond shape.
- How to correct it
- Open the gap between the hands slightly and spread the fingers comfortably to press through the whole palm. Use handles if needed.
The elbows flare wide to the sides
- What you see
- As you descend, the elbows open toward 90 degrees near the shoulder line and the chest stays behind the hands.
- Likely cause
- Often the hands are narrowed without shifting weight forward, or the difficulty is high enough that the path compensates.
- How to correct it
- Keep the shoulders near the hands and let the elbows pass the sides of the torso pointing backward. Reduce the difficulty with an incline variation.
The hips and low back sag
- What you see
- The stomach and hips drop before the chest does and the low-back arch grows at the top.
- Likely cause
- Abdominal and glute tension may have released, or the toes-down load may be too high for your arm strength.
- How to correct it
- Squeeze the glutes and stack the ribs over the pelvis. If you still cannot hold the alignment, place the hands on a higher support.
Leading with the chin and head
- What you see
- The chest stays high while the chin alone reaches forward past the hands, making the rep look deeper than it is.
- Likely cause
- Your gaze may be too far forward, or you may be creating a depth your trunk cannot control.
- How to correct it
- Look at the floor slightly ahead of your hands and keep the neck as an extension of the trunk. Lower the chest and hips together.
Not fully extending the elbows at the top
- What you see
- The elbows stay bent between repetitions and the shoulders drift behind the hands.
- Likely cause
- Triceps fatigue may have accumulated, or you may be pushing too many repetitions.
- How to correct it
- End the set before you lose the body line and finish the remaining reps with an incline or knee variation.
REGRESSION & PROGRESSION
Match the difficulty before adding load
Wall diamond push-up
Place the hands narrow on a wall to learn wrist pressure and the elbow path at the lowest load.
Incline narrow push-up
Put the hands on a stable bench or box to hold the body line while lowering the chest over the hands.
Knee diamond push-up
Build one line from knees to head and reduce the bodyweight on the hands to practice the full range.
Toes-down diamond push-up
At standard height, hold the elbow path on both sides and the alignment from head to heels.
BEGINNER PROGRAM
A practical starting framework
Place it as the main movement of a chest and triceps session, or as an accessory after standard push-ups, once or twice per week. At first, leave two or three repetitions in reserve and choose the variation height that keeps your wrists comfortable and your whole-body alignment intact rather than chasing a target rep count.
Reps
6–12
Hold the same body line on every repetition
Sets
2–4
Rest 90–150 seconds between sets
Progression
Lower the support
Only when 12 reps are stable
- Once all 12 reps at the same support height move the chest and hips together with no wrist pain, lower the hand support slightly next session.
- If the toes-down version gives you fewer than five reps or the hips sag, go back to the knee or incline variation to recover the full range.
- If the narrow hand position is uncomfortable, abandon the touching-fingers shape and use a pain-free spacing. Joint comfort comes before the name of the exercise.
Frequently asked questions
Does the diamond push-up build the inner chest specifically?
The pectoralis major contracts as a whole, and hand position alone cannot fully separate the inner fibers. Studies have found higher triceps and pectoralis major activity with a narrow hand position, but that is not evidence of growth in a particular shape.
What should I change if my wrists hurt?
Open the hands slightly and spread the pressure across the whole palm. If it is still uncomfortable, hold parallel push-up handles or stable dumbbell handles to keep the wrist neutral, and raise your hands onto a support to reduce the load.
Evidence and references
- 1. NASM — Proper Push-Up Form and Technique
- 2. Cogley et al. — Pectoralis major and triceps activity by push-up hand position
- 3. Youdas et al. — Shoulder, trunk, and arm activity across push-up variations
- 4. Suprak et al. — Bodyweight supported in traditional and modified push-ups
- 5. Kang et al. — Review of shoulder muscle activity across push-up variations