GLUTE BRIDGE
Glute bridge is a movement that straightens the hip joint while keeping the ribs and pelvis together rather than lifting high.
Glute bridge is a basic movement in which you place your back on the floor, bend your knees, press your feet into the floor, and straighten your hip joints. Although the gluteus maximus and hamstrings are involved in hip extension, you don't need to arch your lower back all the way to push your pelvis higher. Stop at a comfortable diagonal from your shoulders to your knees, and return to the lower range when your ribs lift or your lower back begins to arch first. Studies of muscle activity in body weight bridges can have different results depending on posture and measurement method, so long-term effects cannot be determined based solely on the activity levels of specific muscles. The criteria for this guide are pain-free range, stability of foot pressure, and repeatable pelvic control rather than numbers.
- Primary muscles
- Gluteus maximus
- Secondary muscles
- Hamstrings, erector spinae, abdominal stabilizers
- Difficulty
- Beginner
- Movement type
- Hip extension
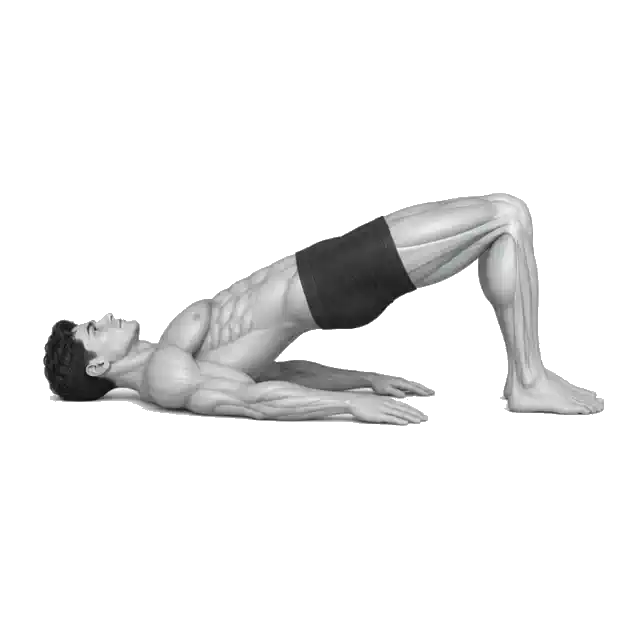
Should I raise my hips as high as possible on the glute bridge?
No. The goal is hip extension, not maximum height. Stop at a comfortable diagonal range with your shoulders, hips, and knees before your ribs lift or your lower back begins to arch further.
STEP BY STEP
6 Steps for One Complete Rep
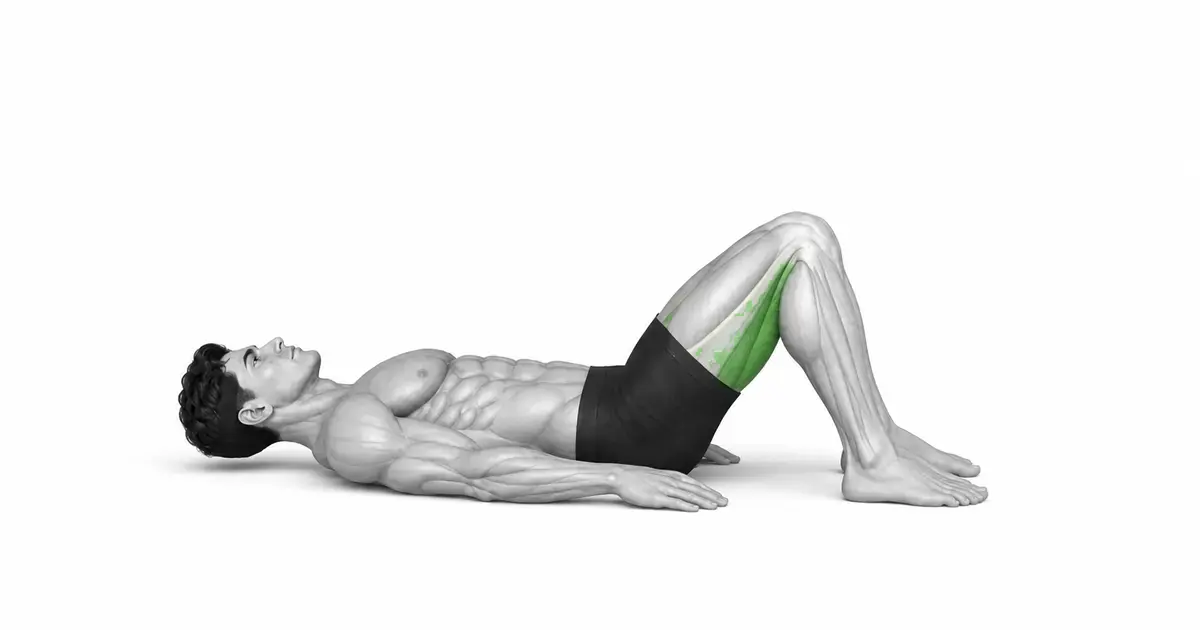
- 1
Lie on your back on a flat, non-slip surface.
Lie on your back on an exercise mat or flat surface. Place your arms comfortably next to your torso, and keep your head and neck long. Do not force your chin toward your chest or press your neck hard against the floor. If you experience discomfort in your neck and shoulders, adjust the height of your head with a thin towel, but first check that your neck is not excessively bent.
- 2
Bend your knees and place your feet at hip width.
Bend your knees so that the entire soles of your feet touch the floor. Do not spread your feet too wide or put one side forward; keep your knees and toes pointing in the same direction. Exactly one foot spacing doesn't fit everyone. From the starting position, find a distance where you can control your knees and pelvis without lifting your heels even if you lift your pelvis.
- 3
Place your ribs over your pelvis and lightly tighten your abdomen.
After inhaling, lightly tighten your abdomen so that the front of your ribs do not lift too much. You don't need to push your lower back hard into the floor until it's completely flat, but you also don't want to overextend your lower back to start with. Prepare your torso so that your pelvis and ribs do not move away from each other.
- 4
Press both feet into the floor and lift the pelvis together
Quietly press the heels and midfoot of both feet into the floor and lift your pelvis. Rather than pushing your knees forward or tilting your waist back, straighten your hip joints in a direction that moves your hips away from your feet. If your left and right foot pressures differ significantly or your knees collapse inward, lower the height and number of repetitions and realign.
- 5
Stop in a range where your shoulders, pelvis, and knees form a smooth diagonal line.
Lightly squeeze your hips at the top, but don't lift your ribs or arch your back to go higher. Make sure that there is almost a single diagonal line from your shoulders to your hips and knees. If your hamstrings are pulling hard like a cramp or the pressure in your lower back is increasing, try moving your feet a little closer to your hips or lowering the height, but don't continue through the pain.
- 6
Slowly lower the pelvis and realign it before the next repetition
When coming down, do not fall all at once, but slowly bring your pelvis to the floor. Before the next repetition, make sure your feet are pushed in, your knees are pointing in the same direction, and your ribs are back over your hips. When the speed increases and your lower back shakes or you lose pressure on one foot, end that set and lower the number of reps or range in the next set.
RIBS & PELVIS
The movement of lifting the pelvis and bending the waist are not the same
The goal of the glute bridge is not to send your pelvis as high as possible, but to channel the force of your feet pressing into the floor into hip extension. If your ribs are lifted forward and upward when you try to tighten your glutes at the top and the curve of your lower back increases, you may be experiencing lumbar hyperextension rather than hip movement. In that case, place the pelvis a little lower and find the diagonal lines of the shoulders, pelvis, and knees again.
Studies examining bodyweight hip extension exercises have shown that muscle activity values for bridge variations vary widely depending on posture and study method. So we can't say that a 'higher bridge' or a particular angle will work everyone's glutes better. A more practical standard is whether you can maintain the relationship between your ribs and pelvis for each repetition and reproduce the same range without discomfort.
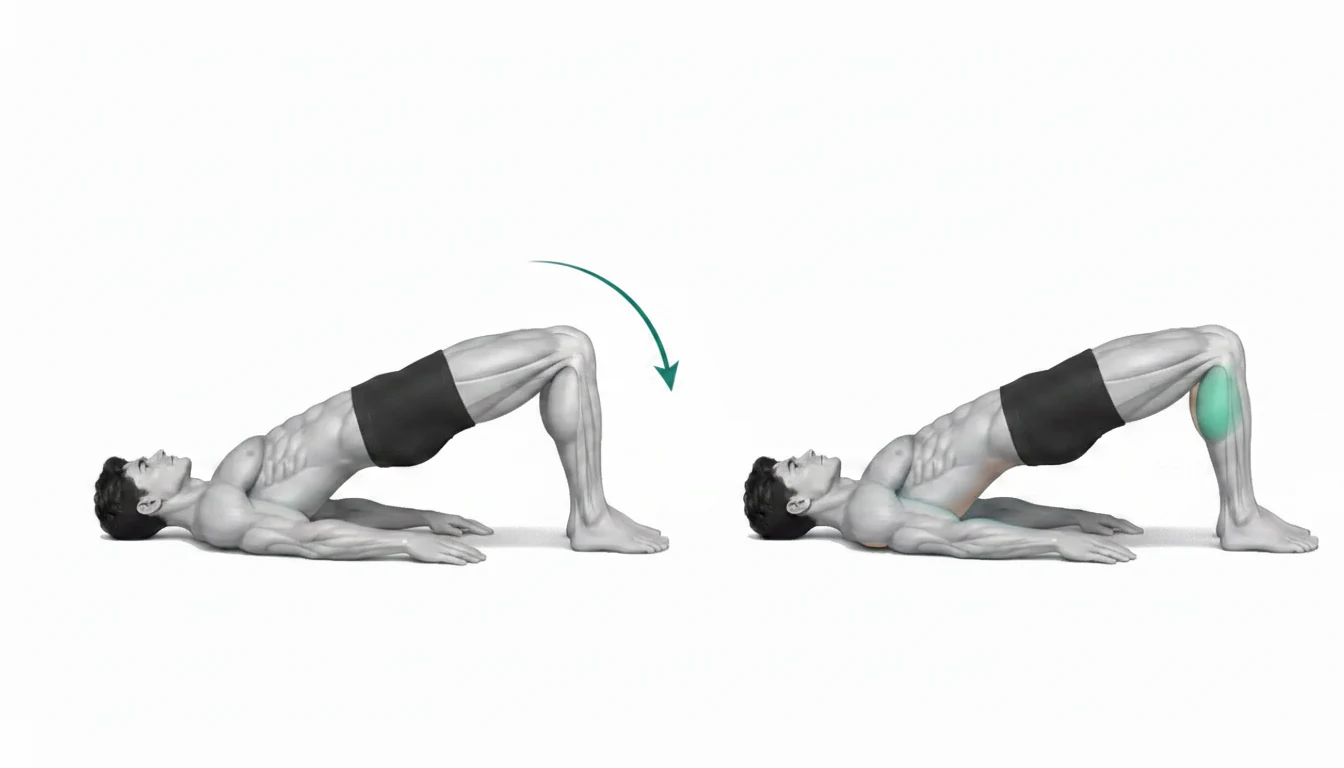
Key point: Practice Cue: “Keep your ribs down and push your hips away from the floor.”
FOOT PRESSURE
Pressure from the entire sole stabilizes both pelvises
Placing your feet on the floor does not automatically create equal pressure on both feet. If one heel is lifted or one knee is turned in, the pelvis may rotate or tilt. Before starting the repetition, make sure that both big toes, little toes, and heels are touching the floor and that your feet are not slipping as you go up.
If your feet are too far apart, it can put more strain on your hamstrings or make it difficult to lift your pelvis, while if they are too close together, it can cause discomfort in the front of your knees. One distance is not the answer. If hamstring cramps or one-sided pelvic shaking recur, adjust your foot position slightly and select the most stable position within a pain-free range.
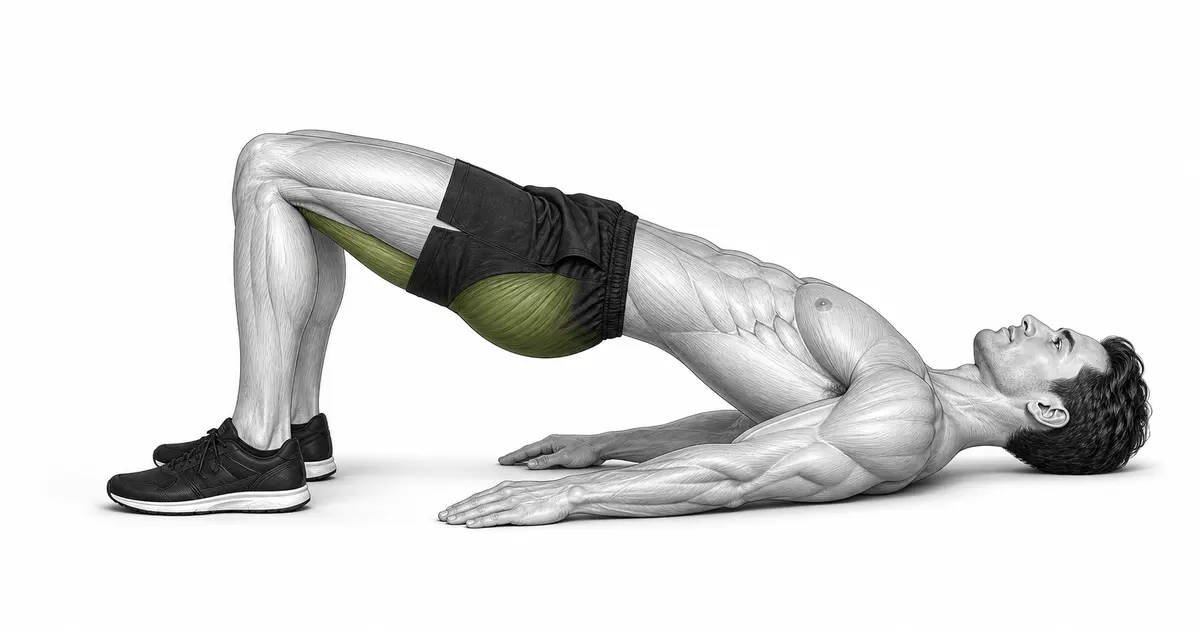
Key point: Points to check: Both heels remain on the floor, and knees maintain the same direction as the second and third toes.
RANGE & PROGRESSION
Repeat the same alignment than the height and then add transformation
If you can keep the pelvic height, foot pressure, and rib position constant in a two-legged bridge, you can consider a one-legged variation, band, or external load. However, a one-legged bridge requires greater control of the hip and pelvis on one side. If the off-foot finds the floor or the pelvis drops and rotates, the transformation may still be faster than your current level of control.
In the study, one-legged bridge and band variations were able to show higher muscle activity, but the subjects, posture, and measurement conditions were limited. Therefore, do not use this as a basis for a quick step up. It is safer to maintain the same speed and range in a bare body position with both feet and then increase only one of the number of repetitions, maintenance time, or load at a time.
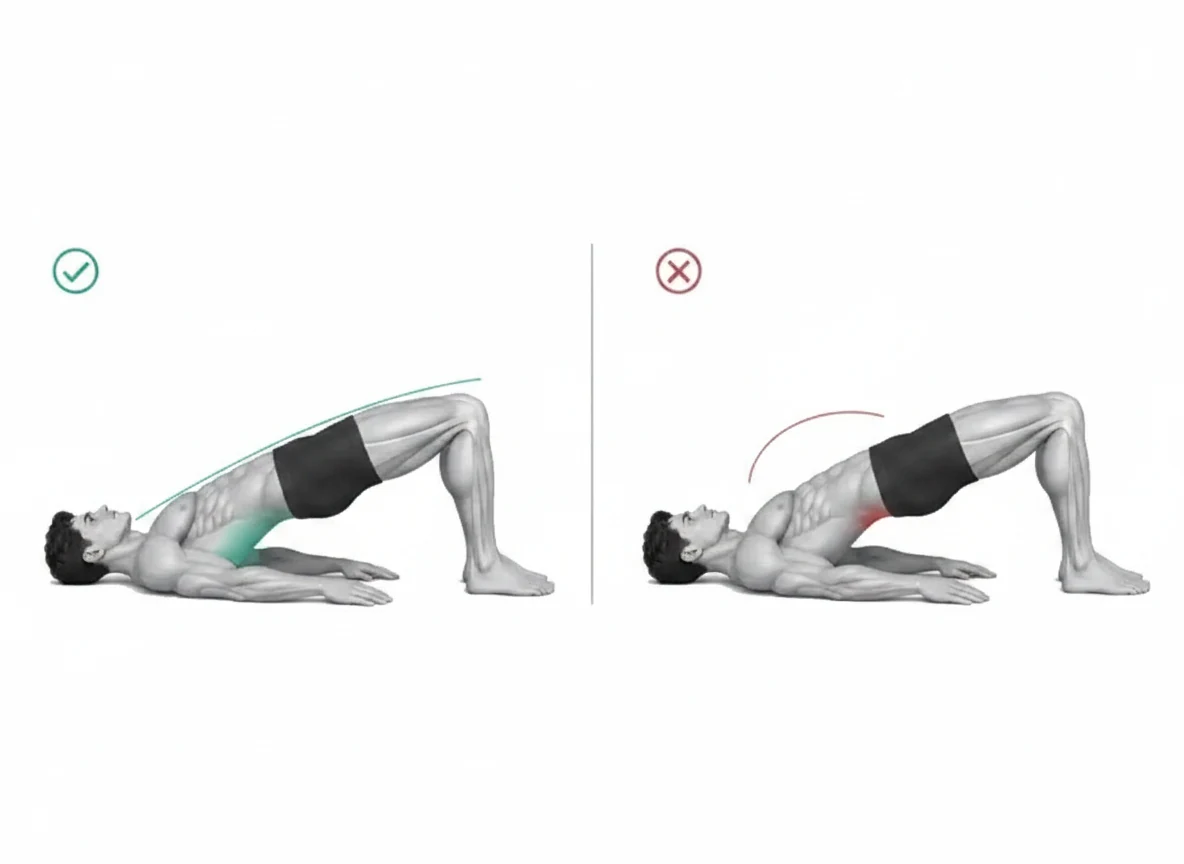
Key point: Progression principle: If the range is unstable, reduce the height, and increase it by one variable only when alignment is maintained.
TROUBLESHOOTING
Fix the cause of a mistake, not just its appearance
The more you lift your hips, the more your back bends.
- What you see
- The ribs stick out at the top, the curve of the waist increases, and pressure is felt in the lower back rather than the buttocks.
- Likely cause
- You may be trying to go 'higher' rather than moving your pelvis with your hip joints, or the distance between your ribs and pelvis may be wide to begin with.
- How to correct it
- Lower the height you rise, exhale and place your ribs over your pelvis. Stop at the point where your shoulders, pelvis, and knees form a diagonal line, and do not push your lower back further.
One knee collapses inward
- What you see
- When going up or down, one knee goes in toward the other knee and the pelvis tilts to one side.
- Likely cause
- Foot pressure may vary from side to side, or control around the hip joint may not be maintained at the current range/rep count.
- How to correct it
- Reset feet to hip width, reduce height and number of repetitions. Repeat only within the range where both knees continue to point toward the second and third toes.
Heel lifts or foot slides
- What you see
- When you raise your pelvis, your heels lift, and your feet move away from your hips or slip on the floor.
- Likely cause
- Your feet may be too far away, the floor may be slippery, or the pressure of your legs pressing against the floor may be inconsistent.
- How to correct it
- Do this on a non-slippery surface and adjust your feet to a small size. Raise your pelvis so that both heels and midfoot remain on the floor.
Only the hamstrings are strongly pulled or cramped.
- What you see
- The back of the thighs tightens first before the buttocks, or contracts cramp-like during repetitions.
- Likely cause
- Foot position, current hip control, and fatigue may be putting greater strain on the hamstrings. Not all cramps have the same cause.
- How to correct it
- Immediately stop the set, move your feet a little closer to your hips and try again in the lower range. If cramping or pain recurs, do not proceed with the modification and consult a qualified health care professional.
Repeat quickly with recoil
- What you see
- The pelvis bounces as soon as it hits the floor, and there is no time to check the position of the feet, knees, and ribs from the top and bottom.
- Likely cause
- You may be speeding up to maintain the number of repetitions, or the currently selected set may be beyond the controllable range.
- How to correct it
- Go up and down slowly, rechecking your feet and rib position at the bottom of each rep. If the alignment still wobbles even when you lower the speed, reduce the number of repetitions.
Adding one-foot variant too early
- What you see
- The supporting leg shakes, the pelvis drops and rotates, and the knee and foot of the supporting foot do not maintain the same direction.
- Likely cause
- The foot pressure and pelvic control of the two-foot bridge may have increased instability or loading before they stabilized.
- How to correct it
- Return to the two-foot bridge and repeat with the same pressure on both feet and hip height. Only add one-leg support or bands step by step when you can control the position without pain.
REGRESSION & PROGRESSION
Match the difficulty before adding load
Short range two-legged bridge
Start in a low range where you can maintain pressure on your feet without arching your lower back, without having to lift your pelvis fully high.
Two-foot glute bridge
Make the diagonals of your shoulders, pelvis, and knees at the same height for each repetition, and make sure that both feet do not slide off the floor.
Stop Glute Bridge
Pause briefly at a controllable height at the top and then slowly lower. If your back begins to arch further, do not increase the pause time.
One foot assist or band glute bridge
Proceed only after the pelvic height and foot pressure are stable in a two-foot position. If one hip drops or the knee collapses inward, return to the previous step.
BEGINNER PROGRAM
A practical starting framework
Use 2–3 times a week as a warm-up or light assistance exercise for lower body exercises. For the first two weeks, start in a low, controllable range, making sure your foot pressure and rib/pelvic alignment are the same for every repetition. If you've already performed high-fatiguing lower body exercises like squats, lunges, or hip hinges on the same day, check first to see if your form is holding rather than increasing the number of repetitions or hold times.
Number of iterations
8–12 times
Range where both foot pressure and pelvic height are the same for each repetition
Number of sets
2–3 sets
Rest 60–90 seconds between sets and recheck foot position
Progress
+1–2 times or +2–3 seconds
Just add one when alignment is maintained for all repetitions without pain
- The criteria for slightly increasing the number of repetitions or top hold time in the next session is to keep both feet on the floor until the last repetition, knees facing the same direction, and not bending the lower back excessively.
- If your pelvis drops to one side, your feet slide, and your hamstrings cramp repeatedly, the set is over. For the next set, lower at least one of the height, number of repetitions, and holding time.
- Distinguishes between intense gluteal fatigue and sharp pain, numbness, and dizziness in the waist, hips, and knees. Do not repeat if you have joint or nerve symptoms.
Frequently asked questions
Am I doing something wrong if I feel my hamstrings more?
The hamstrings can be felt to some extent as they are also involved in hip extension. However, if the pull is strong like a cramp or the back of the thigh continues to be burdened rather than the glute, stop the set and adjust the foot position, range, and fatigue level.
How far should your feet be from your hips?
The distance is not the same for everyone. The current starting point is a position that does not lift the heel, maintains both foot pressure and knee direction, and controls the pelvis without pain.
Does your lower back have to be completely on the floor?
There is no need to press your lower back hard into the floor in the starting position. Instead, it is important not to lift your ribs excessively or let your lower back rise too wide from the start, and not to hyperextend your lower back when going up.
When can I do one leg glute bridge or band?
Proceed when you can maintain foot pressure, knee direction, and pelvic height for all repetitions without pain in a two-foot bodyweight bridge. If the pelvis drops or rotates in the one-legged variation, the previous step is still more appropriate.
Evidence and references
- 1. Macadam & Feser — Systematic review of gluteus maximus electromyographic activity during body weight hip extension exercises
- 2. Lehecka et al. — Electromyographic analysis of hip muscle activity in modified one-legged bridge
- 3. Gasibat et al. — EMG comparison of band one-legged glute bridge and other glute exercises