TRAP BAR DEADLIFT
The trap bar deadlift is not an exercise in which you lift the bar with your hands, but rather an exercise in which you push the floor from the center of your frame to raise your entire body.
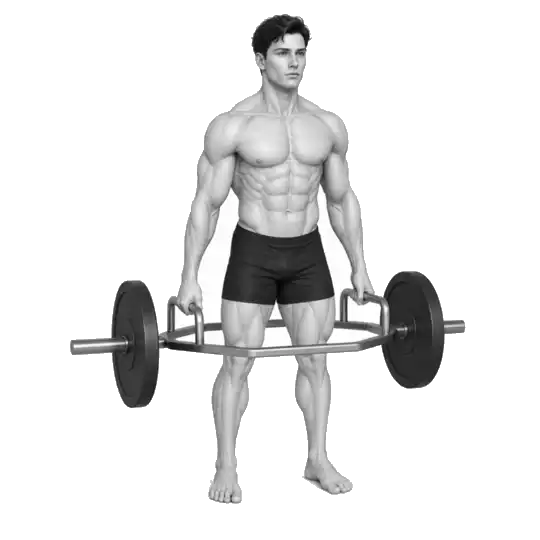
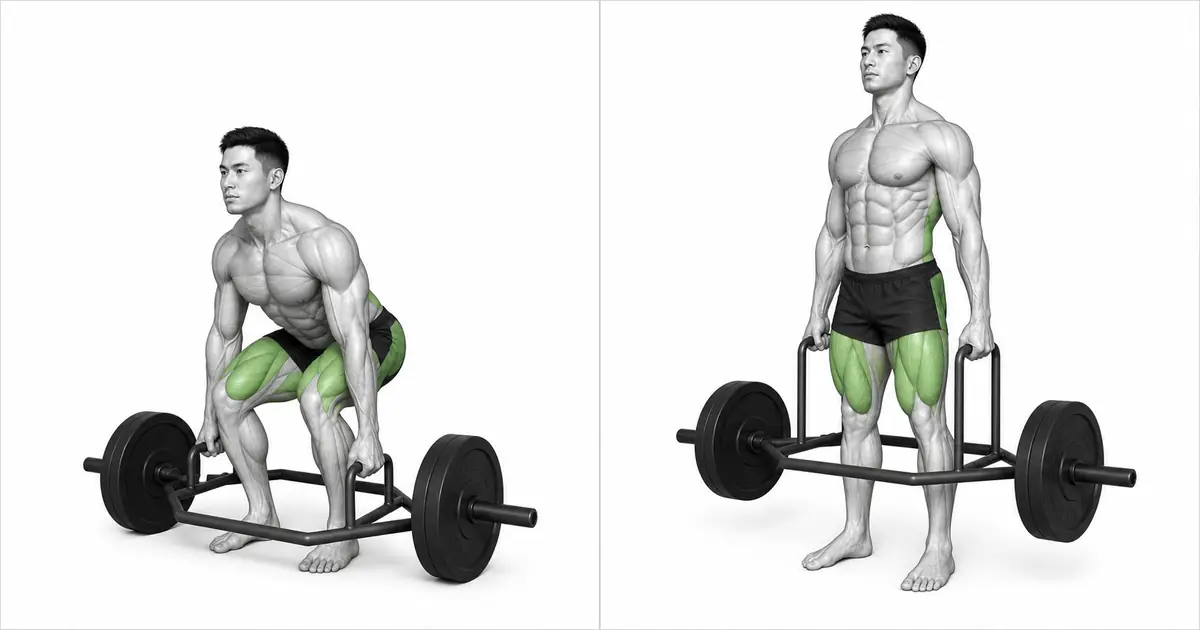
The trap bar deadlift is a deadlift variation where you stand inside a hexagonal frame and hold neutral handles on either side of your body. The bar in this video uses a handle that is raised above the frame, so the starting height may be higher and the range of motion may be shorter than a lower handle even if the same disk is installed. Studies comparing the straight bar deadlift have shown different mechanics, with the trap bar increasing demands on the knee joints and lowering the peak moments of the lumbar and hip joints, increasing vastus lateralis femoris activation and lowering hamstring and erector spinae activation. But that doesn't mean it's completely stress-free or safer for everyone. With the foot in the center of the frame and the handle moving vertically over the midfoot, the technique of controlling the torso and pelvis together comes first.
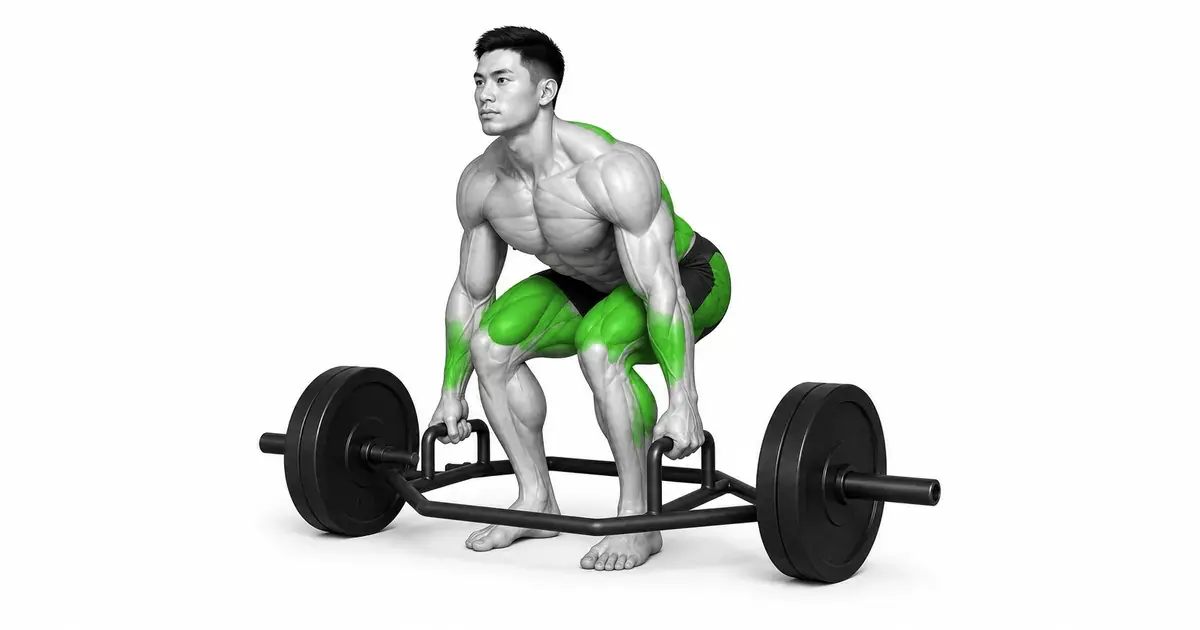
- Primary muscles
- Quadriceps, gluteus maximus, erector spinae
- Secondary muscles
- Hamstrings, trapezius, forearms
- Difficulty
- Intermediate
- Movement type
- Simultaneous extension of knee and hip joints
Are trap bar deadlifts necessarily safer for your back than straight bar deadlifts?
no. Some studies have shown lower lumbar peak moment or erector spinae activity with trap bars, but this varies depending on weight, handle height, technique and individual condition. Back locking and progressive weight setting are still necessary.
STEP BY STEP
6 Steps for One Complete Rep
- 1
Check the bar, disc and surrounding space
Check that the trap bar welds, handle, and sleeve are not bent or shaken. Insert discs of the same size and weight on the left and right and secure them with collars. Check that there are no people or objects on all sides of the bar and around the discs.
- 2
Place your feet in the exact center of the frame
Step inside the trap bar, place your feet about hip-width apart, and spread your toes slightly apart. When viewed from the side, adjust the front and rear position so that the center of the handle is in the middle of the foot, that is, above the midfoot.
- 3
Bend at hips and knees to grasp neutral handle
Send your hips back and bend your knees, holding the centers of both handles symmetrically and wrapping your thumbs around them. Make sure your arms are vertical below your shoulders and that your left and right shoulders are at the same height as your hips.
- 4
Eliminate gap and fix body
Inhale to firm your stomach and sides, tighten your armpits, and stabilize your shoulders. Before lifting the bar, lightly pull the handle upward to remove any slack in your arms and bar, but leave the disc on the floor.
- 5
Push into the floor to straighten your knees and hips together
Push the floor with the soles of your feet and allow your chest and pelvis to rise at similar speeds. Move the handle almost vertically over your midfoot, and hang from the bar with long arms, without bending your elbows.
- 6
Stand upright and put it down on the same path.
Complete the repetition when your knees and hips are extended and your ribs are resting over your pelvis. Do not lean your shoulders back excessively. Send your hips back first, bend your knees, and quietly place the disc on the floor, then reset after each repetition.
CENTER & HANDLES
Align your feet and load with the center of the frame before the handle height.
Because a trap bar wraps around the body, it's easier to keep the load closer to the body than a straight bar, but if your feet are too far forward or too far back within the frame, the bar will tilt and you'll lose the same advantage. When you hold an empty bar and lift it slightly, find the position where the front and back discs come off the floor at the same time.
A raised handle like in the video can reduce knee and hip joint bending and overall range of motion by increasing the starting height compared to a low handle. The high handle trap bar is also treated as a separate variant in the study. Do not apply the weight you learned with the high handle to the low handle. Make sure that the direction of use and the height of the left and right handles are the same.
Key point: Standards to try right away: Handle above the middle of the foot, same grip on the left and right sides, simultaneous takeoff of the front and back discs
KNEE & HIP BALANCE
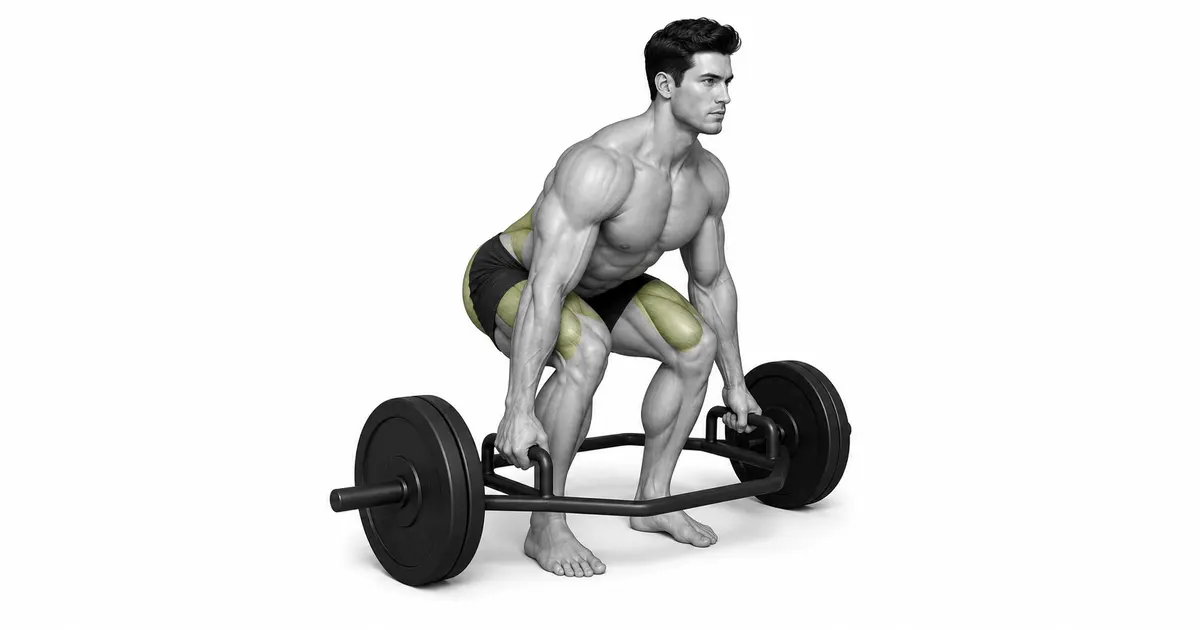
The trap bar is neither a squat nor a straight bar deadlift, but rather a hybrid knee and hip pattern.
If you lower your hips too much, your knees will push in front of the handle and your pelvis will bounce first on the first movement. Conversely, raising your hips too high will push your torso closer to horizontal and place greater demands on your lower back and hamstrings. Find the midpoint where your shins lean slightly forward and your shoulders are slightly ahead of the handle.
In studies comparing straight bars, trap bars showed greater knee joint moments and vastus lateralis femoris muscle activation, while depending on the condition, lower back/hip joint moments or hamstring/erector spinae muscle activity were observed. This means that the entire lower body works together, not that there is no need to anchor the lower back.
TROUBLESHOOTING
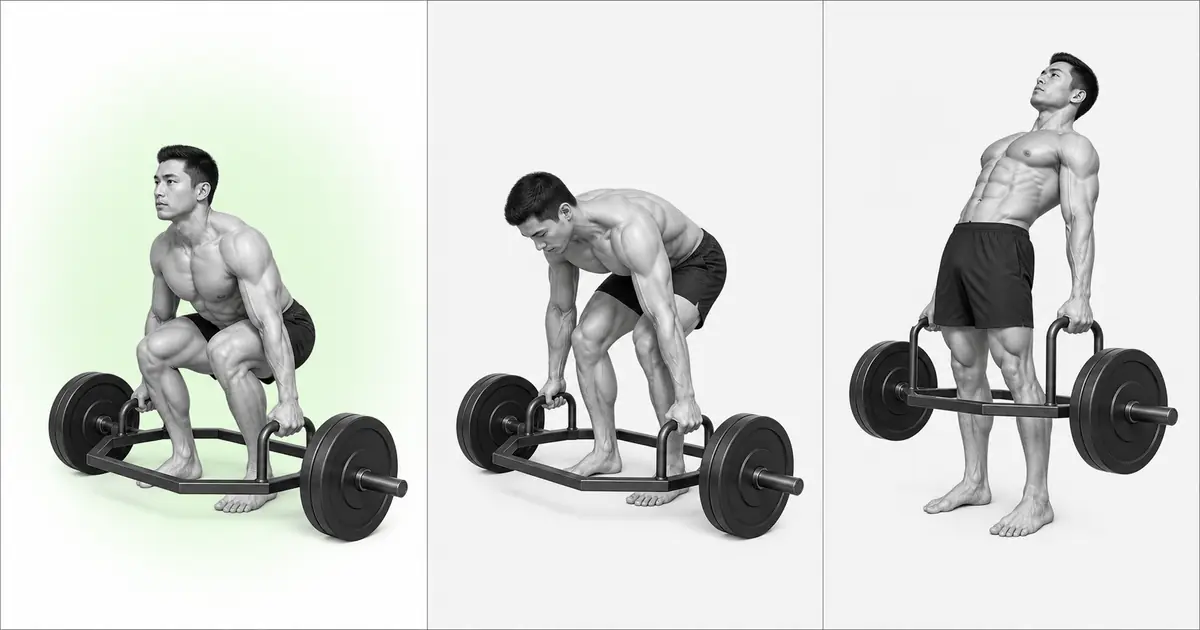
Back arching, frame tilt, and upper hyperextension are signals to readjust your position and weight.
If your back is rounded and only your hips rise first, your starting height may be low or the weight may be too heavy for your current mobility and strength. If your form fails after using the raised handle in the video, lower the weight and start again with empty bar repetitions, moving your hips and chest together.
Locking your knees at the top, pushing your torso back, and arching your back is not a full lock. It is sufficient for your hips to be centered between the handles and your ribs to rest over your pelvis. Don't shrug your shoulders by your ears or drag the handle back.
TROUBLESHOOTING
Fix the cause of a mistake, not just its appearance
It is biased towards the front or back of the frame.
- What you see
- When you start lifting, one of the front and rear discs floats first and the trap bar tilts or shakes.
- Likely cause
- Instead of aligning the middle of my foot with the center of the handle, I just looked at the shape of the frame.
- How to correct it
- On an empty bar, find the position where the front and back discs rise at the same time and remember your foot position as the floor reference point.
Hips bounce first
- What you see
- Before the disc leaves the floor, only the knees straighten and the torso suddenly bends.
- Likely cause
- Squat positions with the hips too low or weights that are difficult to control with the quadriceps muscles.
- How to correct it
- Start with your hips slightly raised and your shoulders slightly in front of the handles. Raise your chest and pelvis at the same time.
The waist and upper back are greatly curled.
- What you see
- From the moment you grab the handle, your back is rounded, and the more you lift, the more its shape changes.
- Likely cause
- The weight was too heavy or the bar was pulled sharply before the torso was stabilized.
- How to correct it
- Lower the weight, stabilize your torso with your breath, and remove any play on the bar first. If you cannot achieve a neutral position, use a higher handle or block.
pull the handle with your arm
- What you see
- The elbow is bent and there is strong tension in the biceps brachii or front of the elbow.
- Likely cause
- I added a curling motion with my hands to quickly lift the bar.
- How to correct it
- Position your arms like a long rope and stabilize only your armpits. Push the floor with your feet to raise your body.
Hyperextension back at the top
- What you see
- After straightening your knees, push your pelvis forward and lean your chest and shoulders back significantly.
- Likely cause
- I thought I had to pull my shoulders back to complete the lock.
- How to correct it
- Stop when your knees and hips are extended and your ribs are over your pelvis. Return your gaze and neck to neutral.
Drop the bar on the floor and bounce immediately.
- What you see
- The disc bounces off the floor and changes foot and hand positions for the next repetition.
- Likely cause
- Omit the relaxation section or use the rebound of the rubber disc.
- How to correct it
- Quietly bend your hips and knees and reset your torso and foot positions once the bar has come to a complete stop.
REGRESSION & PROGRESSION
Match the difficulty before adding load
kettlebell deadlift
Lift the load between your feet and learn to press your midfoot, use long arms, and simultaneously straighten your knees and hips.
empty trap bar high handle
Repeat the frame center position and simultaneous takeoff of the front and rear disks.
light trap bar deadlift
Reset for 1 second at the bottom of each rep, maintaining the same starting height and torso angle.
Low handle trap bar deadlift
Only when you have sufficient mobility and control do you lower the weight and progress to longer ranges.
BEGINNER PROGRAM
A practical starting framework
This is a key compound exercise for lower body and full body strength and can be placed once or twice a week. For the first set, use an empty bar or a weight that can be performed at least 10 times. Check the center of the frame, direction of the handle, and simultaneous takeoff of the disc, and leave room for 2-3 times in the working set. It does not carry over records of straight bars or other handle heights.
number
4–8 times
Reset your form at the bottom of each rep
set
2–4 sets
2–3 minutes recovery between sets
increase
+2.5–5%
Only when frame level and torso angle are maintained
- If the front and back discs rise simultaneously, the chest and pelvis rise together, and there is no upper hyperextension, add one repetition to the next session.
- Once you've hit the top reps on every set, add the same disks to the left and right in smallest increments. If you change the direction of the handle, see it as a new variation and reset the weight.
- The set ends when the grip loosens, the frame tilts, and the shape of the back changes. Use the strap for its intended purpose after learning grip techniques and safe placement.
Frequently asked questions
Where should I stand in the frame?
When viewed from the side, the center of the handle is above the midfoot, and when lifting an empty bar, the position where the front and rear discs rise simultaneously is the standard. Because the trap bar geometry is different, the visual center of the frame and the actual balance point may be slightly different.
Should I use a high handle or a low handle?
The video uses a raised handle. High handles generally have a higher starting height and shorter range. Start with a handle that suits your current mobility and torso control, and lower the weight when changing directions to get a new setting.
Should I lower my hips as much as possible like a squat?
no. A mid-position is required where the knees and hip joints move together. Find a position where your hips are too low and bounce on the first move, or so high that your torso is barely level.
Evidence and references
- 1. Swinton et al. — Biomechanical comparison of straight bar and hex bar deadlifts.
- 2. Camara et al. — Comparison of muscle activity and power between straight bar and hex bar deadlifts
- 3. Lake et al. — Effect of a hex bar on deadlift mechanical demands.
- 4. Lockie et al. — High Grip Hex Bar and Conventional Deadlift 1RM Mechanics
- 5. Stahl et al. — Back Squat and Hex Bar Deadlift Biomechanics Comparison