RACK PULL
The rack pull is not a short deadlift, but a hip hinge that trains the upper section by fixing the starting height.
The video shows a rack pull in which the barbell is placed on the left and right safety pins of the power rack at a height just below the knees, and the person stands up by stretching the pelvis and knees while stationary. The shorter travel distance and more favorable starting joint angles than floor deadlifts allow you to lift more weight, but a shorter range doesn't mean it's safer for your back. A partial deadlift study comparing 10 experienced men found that the partial movement produced smaller net joint moments at the knees and lower back than the regular deadlift, but also had different posture and mechanics, and a 18-week pilot study of 6 wrestlers found that partial range training increased partial range 1RM but did not significantly increase full range 1RM. Therefore, the rack pull should not be an automatic replacement for the floor deadlift, but should be used as a separate variation at a specific starting height to practice upper strength, the feel of keeping the barbell close to the body, and supporting heavy loads.
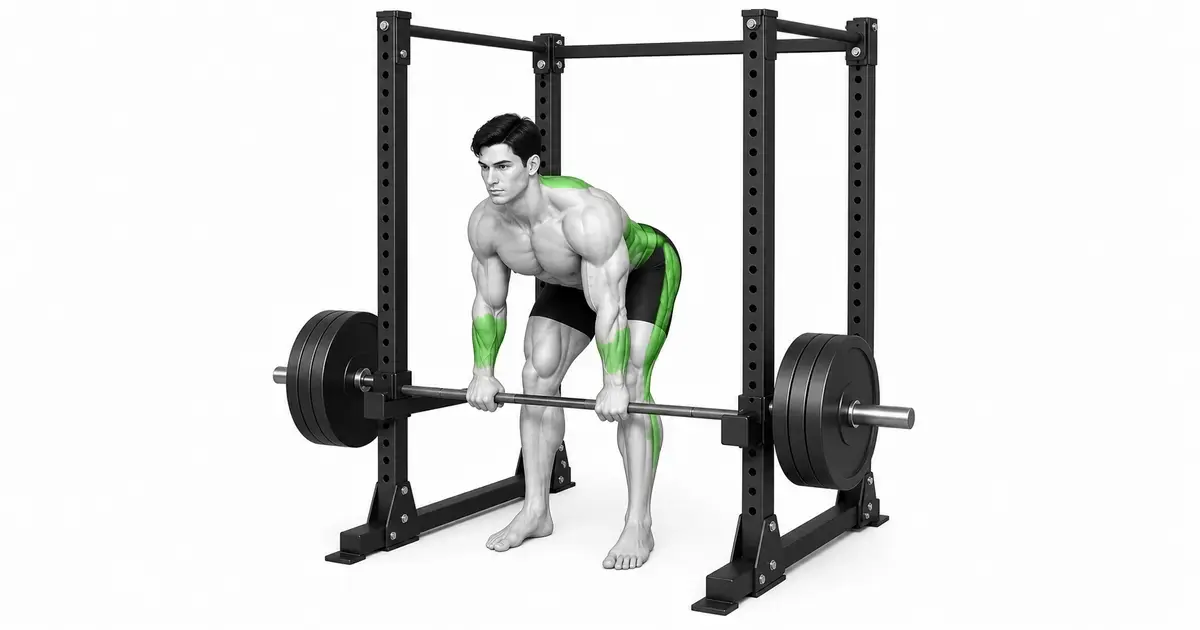
- Primary muscles
- Erector spinae, gluteus maximus, hamstrings
- Secondary muscles
- Trapezius, lats, forearms
- Difficulty
- Intermediate
- Movement type
- Limited range of motion hip hinge
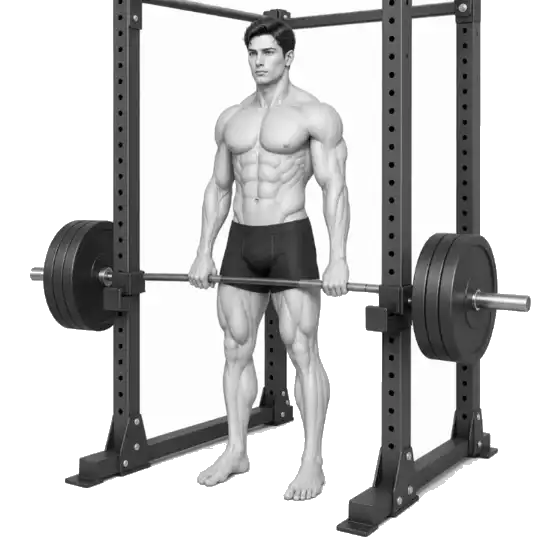
At what height should I place the bar for rack pull?
Start just below your knees. If you're working on a specific deadlift area, adjust before and after that point, but compare using the same safety pin hole each session.
STEP BY STEP
6 Steps for One Complete Rep
- 1
Checking the fastening status of the rack and safety pins
Make sure the rack is securely placed on the floor and that the left and right safety pins or safety arms are fully locked into the same holes. Check the allowable load of the barbell and disk, insert the same disk on the left and right, and secure them with collars.
- 2
Place the bar at a height just below your knees
Initially, set the bar so that it is just below your kneecaps and at the top of your shins. As you increase height, your range and hip hinge decreases and the weight you can lift increases, so record your safety pin hole numbers and bar height each session.
- 3
Set the distance between your feet and the bar first
Stand with your feet about hip-width apart and the bar almost touching your shins over the center of your shoelaces. Place the heels, thumbs, and balls of your feet on the floor, and do not push your knees toward the rack to grab the bar.
- 4
Send your hips back to grab the bar
Fold your hips back and gently bend your knees. Place both hands on the outside of your legs, wrap your thumbs around the bar, and tighten your armpits to pull the bar toward your body, making your entire torso, not just your back, tight.
- 5
Eliminate any play and quietly remove from the safety pin.
Inhale to make your stomach and sides firm, keep your arms straight, and first eliminate any wobble of the barbell and disc. Press your feet into the floor and straighten your hips and knees together so that the bar rises close to vertical without bouncing off the safety pins.
- 6
Stop at an upright point and let go under control.
Place the bar on your thighs and stand with your body straight, then pause briefly with your hips and knees straight. Rather than leaning back or shrugging, fold your hips back and lower the bar in the same path, quietly placing it on both safety pins at the same time.
PIN HEIGHT
Safety pin height is a more important training variable than the name of the rack pull
Below-the-knee rack pulls have a relatively large range of hip folding back and torso tilt, while above-the-knee rack pulls shorten the movement, resulting in stronger upper locking and static load-bearing characteristics. When the height changes, the same weight and number of repetitions become completely different exercises, so it is difficult to compare by only recording ‘rack pull 100 kg’.
A small mechanical study comparing partial deadlifts and regular deadlifts showed differences in starting joint angles and knee and lumbar moments. So, to compensate for the deadlift on the floor, rather than arbitrarily picking the highest pin, it makes sense to use heights before and after that actually slow you down, and also keep your full-range deadlift exercises separate.
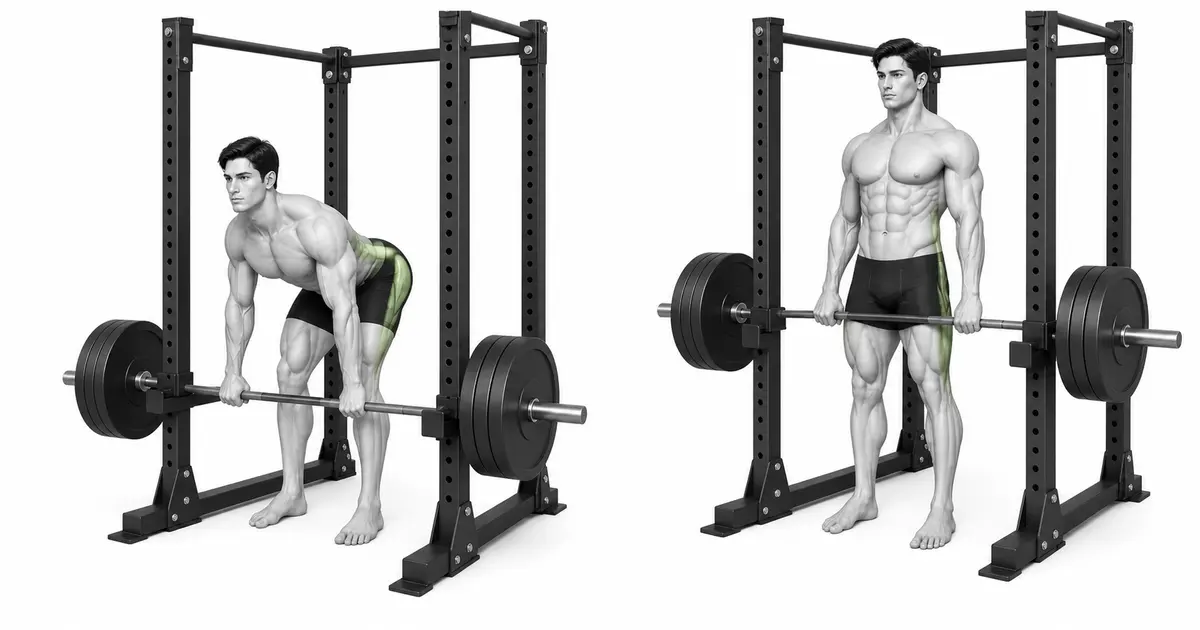
Key point: Recording criteria: number of safety pin holes + height of bar relative to knees + weight + number of repetitions
WEDGE & BAR PATH
Before pulling the bar, remove any play between your body and the bar.
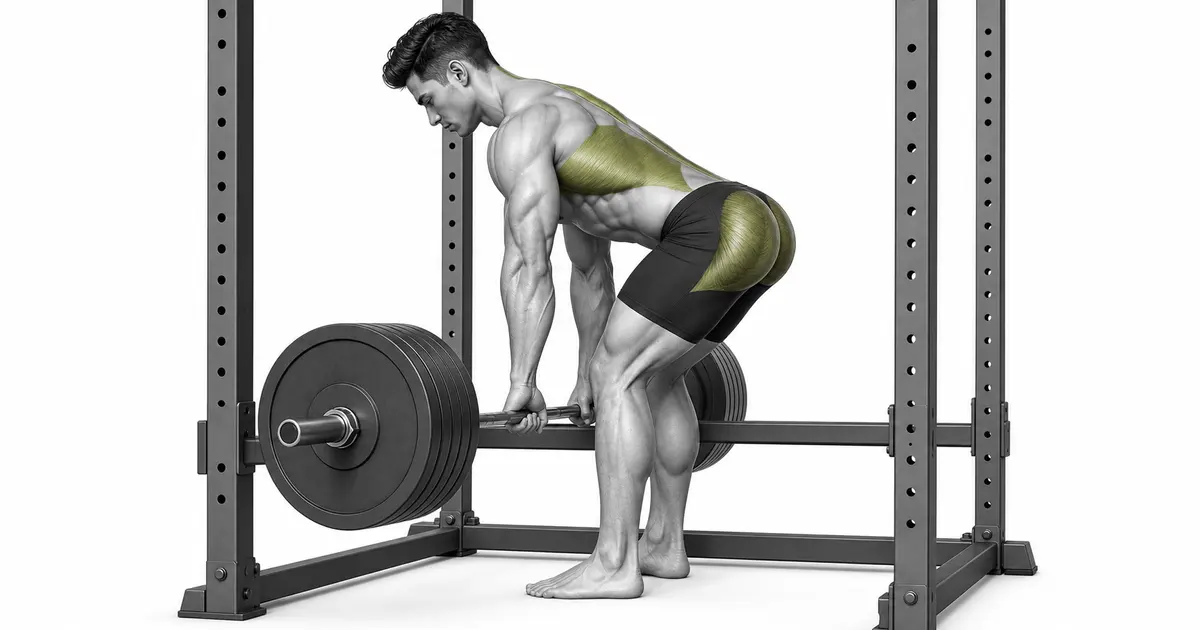
A barbell on a safety pin is more likely to roll left or right or bounce on the pin than a disc on the floor. After grabbing the grip, don't just raise your chest sharply. Tighten your armpits to attach the bar to your legs, create 360-degree pressure on your torso, and then press your feet into the floor. Keep your arms straight like a rope and do not pull the bar up with your elbows.
The farther the bar is from your body, the greater the horizontal distance between the load and your lower back, making it more difficult to support your torso. The barbell should be moved from the start to the top so that it grazes your shins and thighs, and do not extend your knees first to allow the bar to rotate forward or support the bar with your thighs at the top.
TROUBLESHOOTING
Shorter range allows for greater weight but does not eliminate technical standards
By raising the safety pin to mid-thigh, you only need to move it a few centimeters, which can add up quickly. However, adaptations to partial range training may be specific to the range used. In a 6-week pilot study, the group that added partial range training improved partial range 1RM but did not significantly improve full range 1RM.
Some back movement with heavy weights has also been observed in observational studies of deadlifts, but this doesn't mean you should intentionally round them out. If the bar moves away or your back changes suddenly during a set, or you start to bounce off the safety pins or lean back at the top, take that as a sign that your current weight is out of your technical range and lower it immediately.
TROUBLESHOOTING
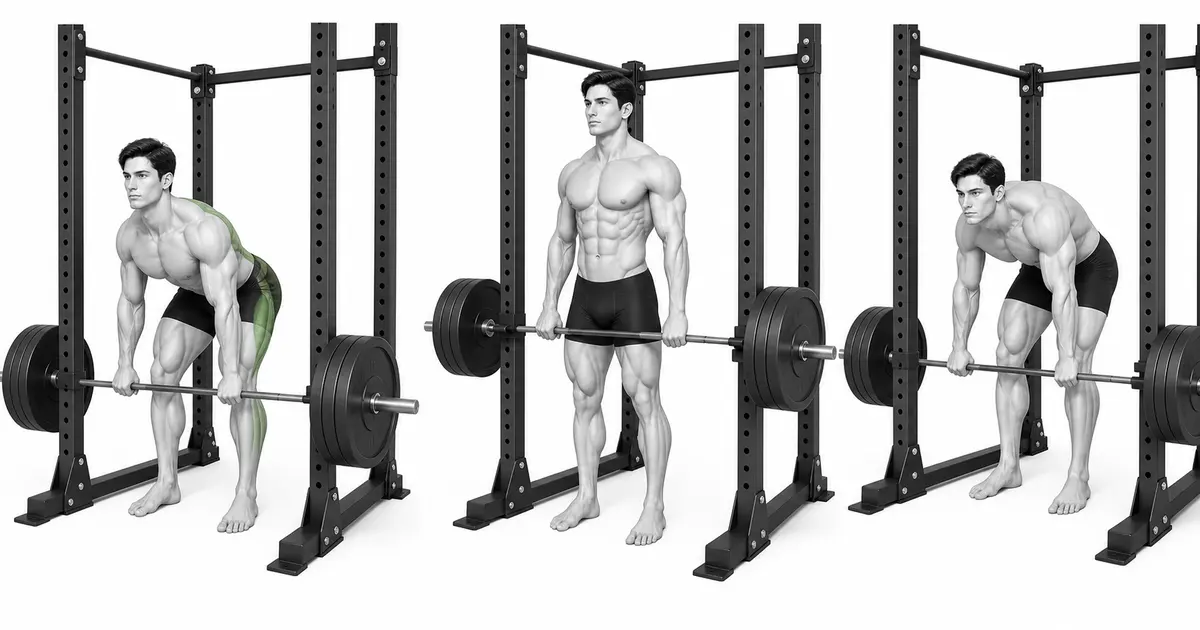
Fix the cause of a mistake, not just its appearance
Left and right safety pin heights are different
- What you see
- From the start, the barbell is tilted and one disc or hand comes up first.
- Likely cause
- The safety pins may have been inserted into different holes, or one lock may not go all the way in.
- How to correct it
- With the disc lowered, recheck the left and right hole numbers and locking pins. It does not fit the tilted bar.
Start with the bar away from your body
- What you see
- The bar stays away from your shins and swings forward the moment you lift it.
- Likely cause
- Your feet may be too far from the rack, or you may not have aligned your knees with the bar first.
- How to correct it
- Stand one step closer so that the bar is over the center of your shoelaces, tighten your armpits to attach the bar to your legs, and press up.
Bounce the bar off the safety pin
- What you see
- At the first moment, a loud metal impact sound is heard and the disc shakes left and right and changes position.
- Likely cause
- I started with a rebound without creating body pressure or barbell clearance.
- How to correct it
- Begin each repetition from a complete stop, build tension in your grip and torso, and then gently release the safety pin.
Extend your knees first, leaving your hips behind
- What you see
- The bar rises slightly, but the hips are pushed back and the torso angle is more bent.
- Likely cause
- You may only be pushing the bar with your legs, or the current weight will make it difficult to straighten your hips and knees together.
- How to correct it
- Lower the weight and straighten both joints together using the cue ‘Push through feet, hips toward bar’.
At the top, lean back and shrug your shoulders.
- What you see
- Once your body is vertical, push your pelvis in front of the bar, lean your chest back, and raise your shoulders toward your ears.
- Likely cause
- I thought overlocking was a more complete rep, or I was holding the weight with my trapezius muscles.
- How to correct it
- Stop in a vertical position with your ears, shoulders, pelvis, and ankles stacked. Tighten your buttocks, but do not lean your ribs back.
Raising weight too quickly for range
- What you see
- Your grip will loosen and your back will change significantly, or you'll drop the bar into a pin.
- Likely cause
- Because of the short travel distance, I over-increased my weight for the full-range deadlift.
- How to correct it
- Set a new repeatable technique weight for the rack pull itself, increasing it by 2.5–5% only when you can quietly put it down for every repetition.
REGRESSION & PROGRESSION
Match the difficulty before adding load
empty bar hip hinge
Hold the bar in front of your thighs and fold your hips back to learn the path the bar travels along your legs.
Light rack pull below the knees
Fix the safety pin height and practice eliminating clearance and quiet starting and landing for 8–10 times.
1 second pause rack pull
Immediately after the bar leaves the pins or at knee height, pause for one second to keep the bar close without kickback.
Progressive Weight Rack Pull
Perform 5–8 reps with the same bar path, then increase the weight by 2.5–5%. The pin height does not change simultaneously.
Block pull or floor deadlift
To couple the upper power of the rack pull with a longer reach, practice the low block pull, followed by the floor deadlift, separately with lighter weight.
BEGINNER PROGRAM
A practical starting framework
Place them in a deadlift top-assisted or heavy hip hinge variation about once a week. If you perform a lot of floor deadlifts or rows in the same week, reduce the rack full sets to account for cumulative fatigue in the lower back, posterior chain, and grip, and check the rack and bar path at a weight that can be performed at least 10 times for the first set.
number
5–8 times
Same lock with every repeat stop start
set
2–4 sets
2–3 minutes recovery between sets
increase
+2.5–5%
When fixing pin height and maintaining technique
- Before the first set, check the rack fixation, left and right safety pin height, barbell, disk, and collar, and record the pin hole number.
- If, on every repetition, the bar is close to your legs, your back shape and locking position are consistent, and you come down quietly to the pins on both sides, add one repetition to your next session.
- Increase the weight only after you have achieved the top of your reps on every set. Do not change pin height and weight simultaneously on the same day.
Frequently asked questions
Are rack pulls safer for your back than deadlifts?
Although range and some joint moments may be reduced, the overall risk cannot simply be lowered by the ease of lifting larger weights. Even short ranges require torso lock, close bar path and controlled weight.
Can just doing rack pulls make floor deadlifts stronger?
Not automatically. In a small 6-week study, partial range training increased partial range 1RM but did not significantly increase full range 1RM. If bottom strength is your goal, maintain full range exercises as well.
Do I have to set the barbell down on the safety pin every time?
The rack pull in this guide is a stop-start approach every rep. Quietly lower down on both pins, bring the bar to a complete stop, re-establish body pressure and clearance, and then repeat.
Do you need to pull your shoulders back hard at the top?
no. It is sufficient if your body is upright and your pelvis and knees are straight. Excessively shrugging your shoulders or leaning your torso back will not improve your lock but will add unnecessary movement.
Can I use straps or mixed grips?
If your grip limits your target first, you can use a strap, but you'll need to learn how to wrap it and release it. Practice mixed grip by changing left and right directions, and do not bend the elbow of the arm with the palm facing forward.