INVERTED ROW
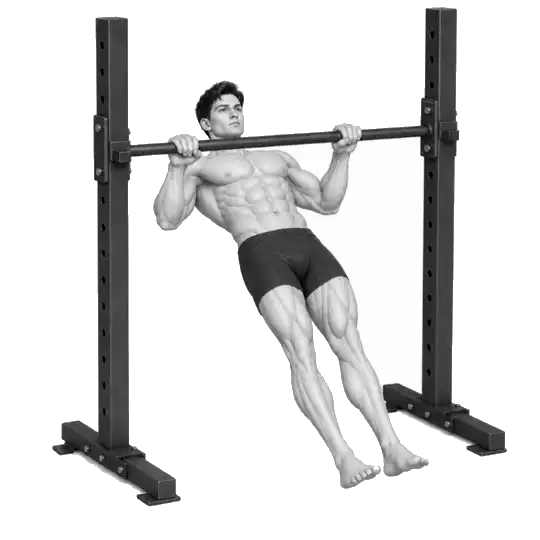
The inverted row is not an exercise where you fold your body and only raise your chest, but an exercise where you pull your whole body into a plank towards the bar.
The inverted row in the video is a bodyweight row in which you hang with an overgrip under a low bar, place your heels on the floor, maintain a line from your ears to your ankles, and pull your chest toward the bar. In an electromyography study comparing four inverted row conditions in 26 people, high activity was observed in the latissimus dorsi, biceps brachii, lower trapezius, and rear deltoid in both the grip and one-leg and two-leg support conditions, and the difference in muscle activity between one-leg and two-leg support was not significant. Another small row comparison study found that inverted rows significantly activated the lats, upper back, and hip extensors, while placing lower back strain than comparable bent-over rows. This does not mean that it is unconditionally safe for everyone or that single-leg support is meaningless, but it serves as a basis for adjusting more direct difficulty variables such as bar height and body tilt first.
- Primary muscles
- Latissimus dorsi, middle/lower trapezius, rhomboids
- Secondary muscles
- Rear deltoids, biceps brachii, glutes, abdominal muscles
- Difficulty
- Beginner to Intermediate
- Movement type
- Body weight horizontal pulling/anti-extension
How do I determine the height of the inverted low bar?
Start as high as possible for 6 to 12 reps, keeping your body straight and chest close, lowering for 2 to 3 seconds. If it's too difficult, raise the bar or bend your knees, and if it gets easier, lower it one step at a time.
STEP BY STEP
6 Steps for One Complete Rep
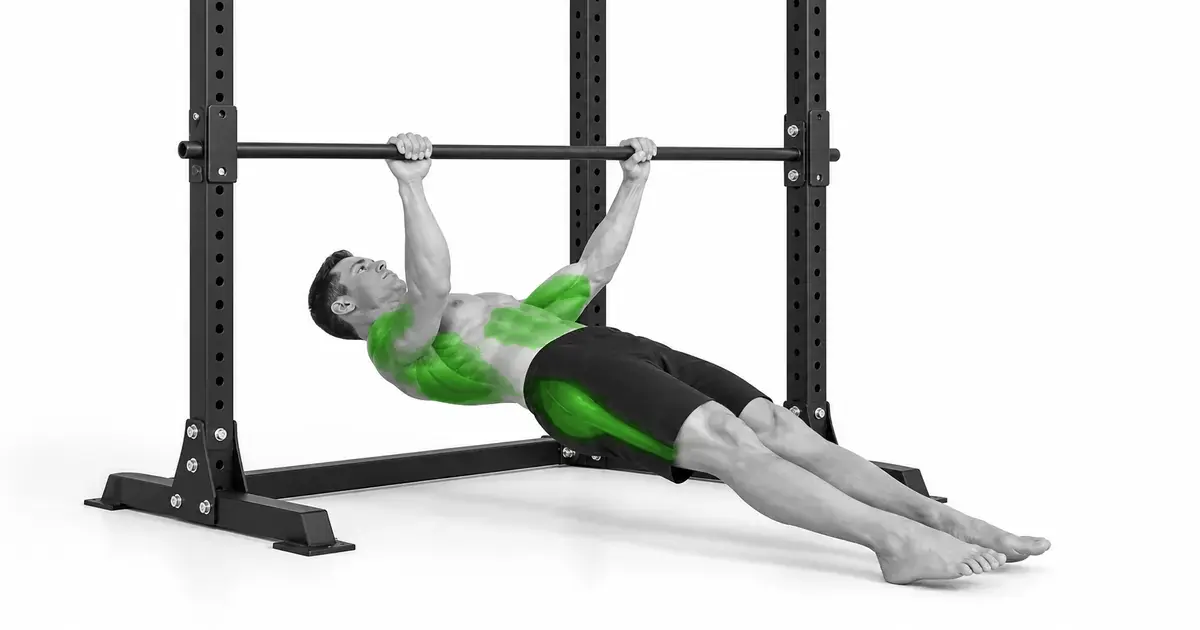
- 1
Checking the status of bars and racks
Make sure the bar can support your current body weight without rotating or coming off the J-cup or safety bar. Make sure the rack feet are firmly on the floor and remove any discs, benches or sharp objects from under the bar.
- 2
Choose a controllable bar height
Start with your body relatively erect, such as between waist and chest level. Keep your body straight and find a height that allows you to do at least 8 reps, and when it gets easier, lower the bar or move your feet further apart.
- 3
Grab an overgrip slightly wider than your shoulders
Sit under the bar, hold the bar with your palms facing your feet, and wrap your thumbs around them. Use a width that allows your wrists to be straight and your elbows to naturally go behind your torso at the top.
- 4
Make a line from heel to ear
Extend your legs and place your heels on the floor. Squeeze your buttocks and stomach, stack your ribs and pelvis, and make your entire body like a single board without letting your buttocks drop or your lower back get too wet.
- 5
Pull your chest toward the bar
Exhale and bring your elbows back, bringing the center of your chest closer to the bar. Rather than shrugging your shoulders toward your ears or sticking out your chin, make sure your heels and torso move together.
- 6
Lower your arms straight for 2–3 seconds
Slowly straighten your elbows while maintaining the same straight line and allow room for your shoulder blades to move forward naturally. Don't hang abruptly on your shoulder joints at the bottom and check your body line again before the next repetition.
BODY ANGLE
Bar height and foot position change the proportion of weight you need to lift
Raising the bar and bringing your feet closer to your body will straighten your body and reduce the amount of weight you pull. As you lower the bar and move your feet further out, the closer your body gets to horizontal, the greater the demands on your upper body and torso support. When increasing difficulty, rather than lowering the bar all at once, adjust it one rack or one foot to make sure the same repetition standard is maintained.
Although single-leg support may alter balance and rotational inhibition demands, there were no significant differences in measured muscle activity between one-leg and two-leg conditions in direct comparison studies. Rather than lifting one foot to ensure a stronger back stimulation, it is simpler and easier to reproduce by first adjusting the body tilt, overall range, and repetition rate.
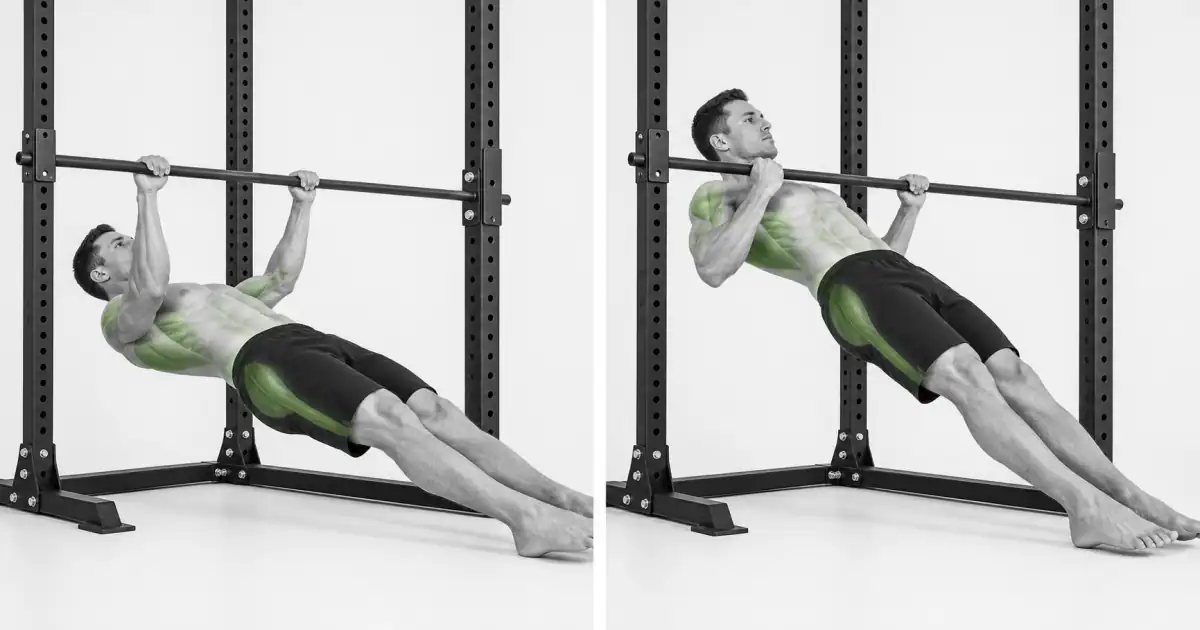
Key point: Difficulty adjustment sequence: Bar height → foot distance → descent speed → foot height or additional weight
PLANK LINE
The hips and abdomen must follow the body line so that the force created in the back is transmitted to the feet.
The inverted row is both an upper body pull and an anti-extension task that prevents the torso from sagging or overwetting. Align your heels, knees, hips, ribs and ears in one line and tighten your hips and stomach. For an easier variation with slightly bent knees, apply the same standard from shoulder to knee.
As your hips drop in the second half of the set, the distance between your chest and the bar becomes shorter, making the repetition seem easier, but in reality you're only lifting part of your body. Take a photo from the side or use the rack post as a reference point to make sure your pelvis doesn't sag below the starting point.
SCAPULA & TOP
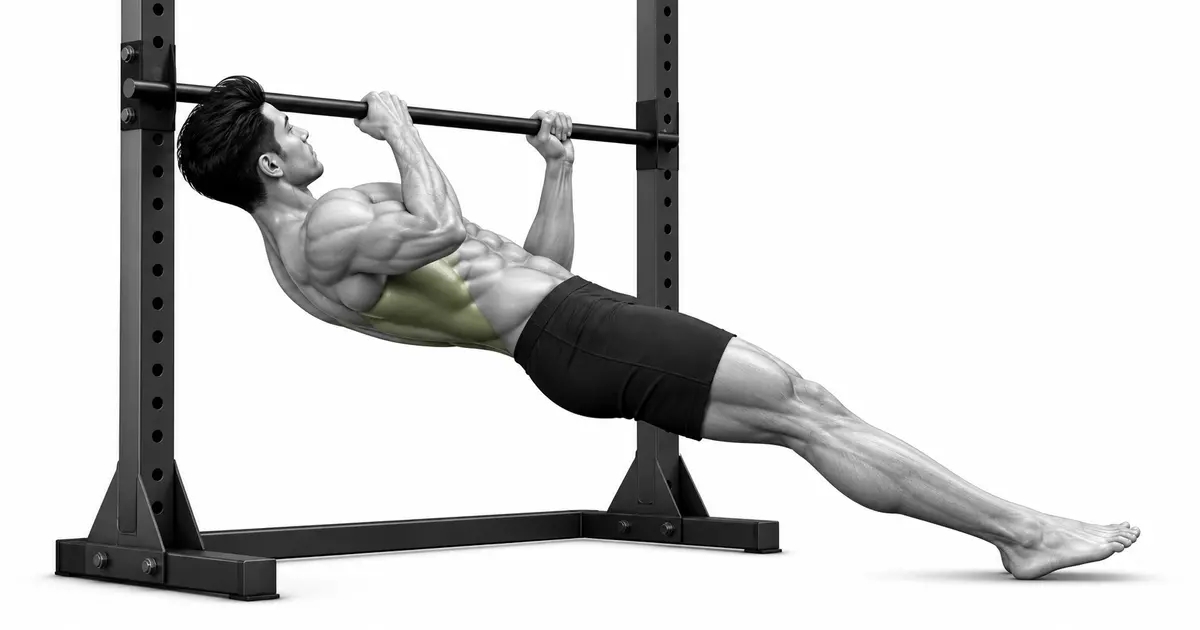
Move the shoulder blades but don't shrug or fill the range with your chin.
When the arm is extended at the bottom, the shoulder blades can naturally move forward over the ribs and come together backwards when pulled. If you keep your shoulder blades as close together as possible from the start, the overall range of your arms will be reduced. Maintain your grip and torso tension, but leave room for your shoulders to move comfortably.
The upper criteria is not to have your chin over the bar, but to have your center of your chest close to the bar and your elbows behind your torso. When the moment comes to crane your neck forward or raise your shoulders toward your ears, stop just before that and raise the bar to regain full range.
TROUBLESHOOTING
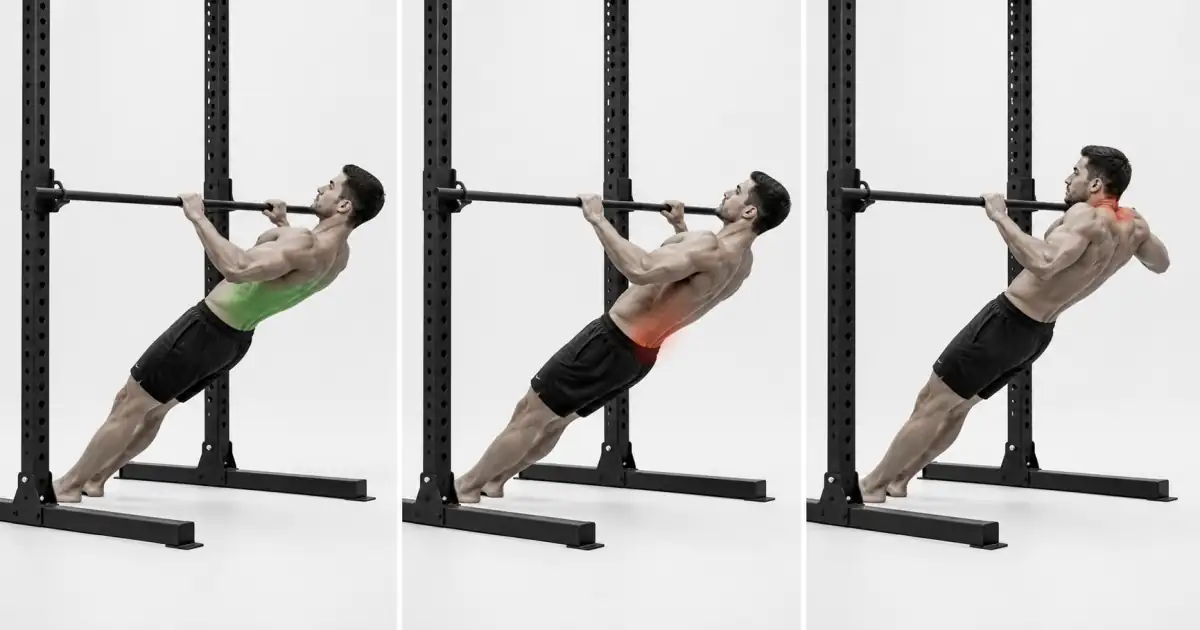
Fix the cause of a mistake, not just its appearance
hips sagging down
- What you see
- At the bottom and top, your pelvis is below the line between your shoulders and ankles, and your lower back is wet.
- Likely cause
- At your current body tilt, your abdominals and glutes may not be able to support your torso or have taken precedence over the number of repetitions.
- How to correct it
- Raise the bar or bring your feet closer to your body to lower the difficulty, and only count reps that keep your hips and stomach in a straight line.
Lift only your buttocks up first
- What you see
- Before pulling, your pelvis rises and your body folds, leaving your chest away from the bar.
- Likely cause
- I started with hip extensions to reduce the distance between my chest and the bar.
- How to correct it
- Start by creating a line from your ear to your ankle, then think of your heels and chest moving at the same time.
Stick out your chin and touch the bar.
- What you see
- The chest remains low, but only the neck is bent forward and the chin is near the bar.
- Likely cause
- Using chin height as a reference for repetitions or lacking pulling range.
- How to correct it
- Keep your eyes on the bar or a point on the ceiling and your neck neutral. If you cannot reach your chest, raise the bar.
Shrug your shoulders towards your ears
- What you see
- At the top, the neck shortens, the shoulders rise first, and the elbows cannot go back.
- Likely cause
- You are trying to pull the bar too high or the current level of difficulty is high.
- How to correct it
- Keeping your shoulders away from your ears, place your elbows back and stop just before the shrug. Stand upright if necessary.
drop yourself from the bottom
- What you see
- Immediately after the top, the arms straighten sharply, the shoulders bounce toward the bar, and the rack swings.
- Likely cause
- You only think of the ascent as a repetition or your grip and back muscles are tired.
- How to correct it
- Hold the descent for 2–3 seconds and finish the set in reps that become impossible.
Use of unstable bars or racks
- What you see
- As you pull, the bar rotates in the J-cups or lifts on one side and the rack feet move on the floor.
- Likely cause
- We did not check whether the bar was prevented from coming off or the rack was secured.
- How to correct it
- Use a structure that is difficult to break off, such as a pin or safety bar, and check the manufacturer’s allowable load. Not performed on shaking equipment.
REGRESSION & PROGRESSION
Match the difficulty before adding load
High bar, bent knees row
Learn the pulling pattern by standing up your body, bending your knees, and maintaining a straight line from your shoulders to your knees.
High bar/leg row
Connect your full body plank with a chest pull by resting on your heels and making your body slightly longer.
low bar inverted row
Even as your body approaches horizontal, maintain your body line and descent for 2 to 3 seconds for 6 to 12 reps.
Inverted row with raised feet
Put your feet on a stable box and make your body horizontal or slightly downhill, and check if the equipment is slipping first.
Heavy inverted row
After performing at least 12 controlled reps of the basic variation, use a small amount of additional weight that fastens to the body like a vest.
BEGINNER PROGRAM
A practical starting framework
It can be used 2–3 times a week as a bodyweight horizontal pull between a vertical pull and a bent over row. Start with 8 reps at the current bar height with 2–3 reps left to spare, and adjust the total amount of pull sets so that they do not exceed the recovery range for your wrists, elbows, and shoulders.
number
Episodes 6–12
Approach the chest and keep it straight
set
2–4 sets
90 seconds – 2 minutes recovery between sets
speed
1–2 second rise / 2–3 second fall
Avoid falling on your joints from the bottom
- Before your first set, shake the bar and rack vigorously by hand to check that they are secure and clear the space under the bar.
- If you maintain the same chest contact, ear-to-ankle alignment, and 2–3 seconds of descent for all repetitions, add one repetition to the next session.
- After hitting the top of your target reps on every set, lower the bar one step or move your feet a little further apart, not changing both variables at the same time.
Frequently asked questions
Does your chest have to touch the bar?
If you can maintain body line and neck neutral without pain, that's a good guideline, but you don't have to force the touch. Stop just before you shrug or jut your chin and raise the bar to learn the full range.
Should I keep my shoulder blades together?
no. At the bottom, the shoulder blades can naturally move forward and come together back again when pulled. Maintain your grip and torso, but do not lock your shoulder blades all the way through.
Does lifting one leg make it more difficult?
Balance and rotational inhibition may become difficult, but in direct comparison studies, differences in measured muscle activity between one- and two-legged support were not significant. First, adjust the difficulty level by the bar height, body inclination, and descent speed.
Are inverted rows better if you have back discomfort?
One small comparative study found that inverted rows had lower back loads than standing and inverted rows, but this does not guarantee safety for your individual condition. Start with an easy, pain-free angle and if symptoms persist, get evaluated by a healthcare professional.
Can I do inverted rows even if I can’t do pull-ups?
yes. The bar height allows you to fine-tune your weight load, making it ideal as a base for horizontal pulls. However, since pull-ups are vertical pulls, the same technique is not automatically completed with inverted rows alone.