LAT PULLDOWN
The lat pulldown is not an exercise where you lower the bar low, but rather an exercise where you send your elbows down and pull your back.
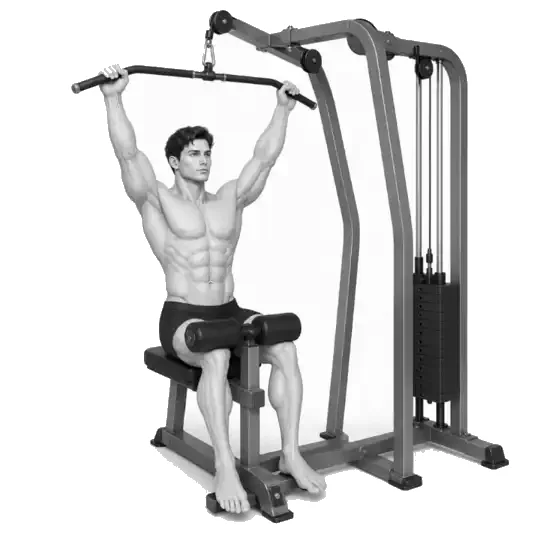
The lat pulldown is a vertical pulling exercise that involves fixing your thighs on a pad and pulling the bar toward your upper chest with a wide overhand grip, as shown in the video. The lats, biceps brachii, teres major, and muscles around the shoulder blades work together, and it is good to practice pulling in the same direction with an adjustable weight before learning pull-ups. However, opening your hands as wide as possible does not automatically mean that your lats will be used more. In a study that directly compared grip widths, lat activity was generally similar in the range of about 1–2 times shoulder width, and the weight that could be lifted was slightly lower for grips that were too wide. Use the wide grip in the video as a starting point, but choose a width that is comfortable for your wrists and shoulders and allows you to keep your elbows down.
- Primary muscles
- lats
- Secondary muscles
- Biceps brachii, teres major, middle/lower trapezius, posterior deltoid
- Difficulty
- Beginner
- Movement type
- Sit and pull vertical cable
How wide should the grip be?
First try about 1–1.5 times the width of your shoulders. In the study, latissimus dorsi activity in the 1–2-fold range was generally similar. The width is adequate to control both the starting point of the arm extension and the upper chest path without bending the wrist.
STEP BY STEP
6 Steps for One Complete Rep
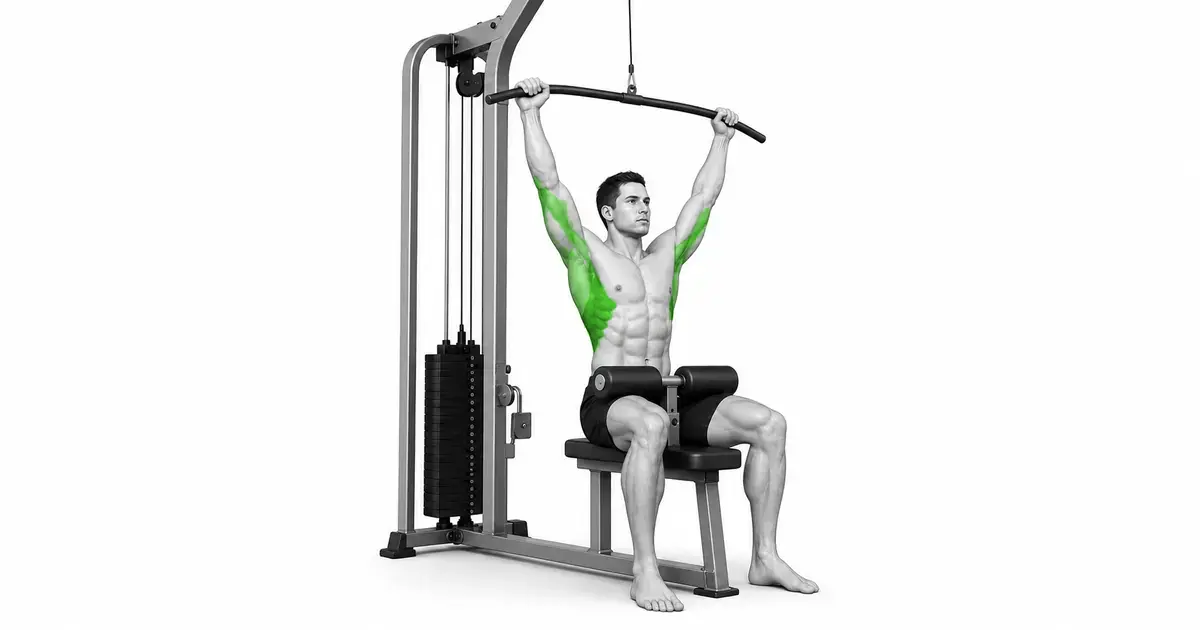
- 1
Check pin, cable, and bar connections
Make sure the weight pin is fully inserted and check the cable sheath, pulleys and carabiner for damage. Make sure the long bar is firmly centered and do not place your hands or objects around the weight stack.
- 2
Fit the thigh pads tightly
Adjust the height so that when you sit on the seat, you can fit only one or two fingers between your upper thighs and the pad. Place the entire sole of your foot on the floor and bend your knees to about 90 degrees so that you do not lift your body upward.
- 3
Grab a comfortable wide overhand grip
Stand up and hold the bar wider than shoulder width, but do not force it all the way to the end. Use a closed grip with the backs of your hands facing your face and your thumbs wrapping around the bar. After sitting down, make sure your wrists are parallel to your forearms.
- 4
Place your ribs and pelvis on top of each other and lean back slightly.
Place your thighs under the pad and raise your chest naturally. Tighten your abdominals and tilt your torso slightly back from vertical to avoid excessive lifting of your ribs. Keep your neck long and your gaze straight ahead or slightly upward.
- 5
Send your elbows down and pull them into your upper chest.
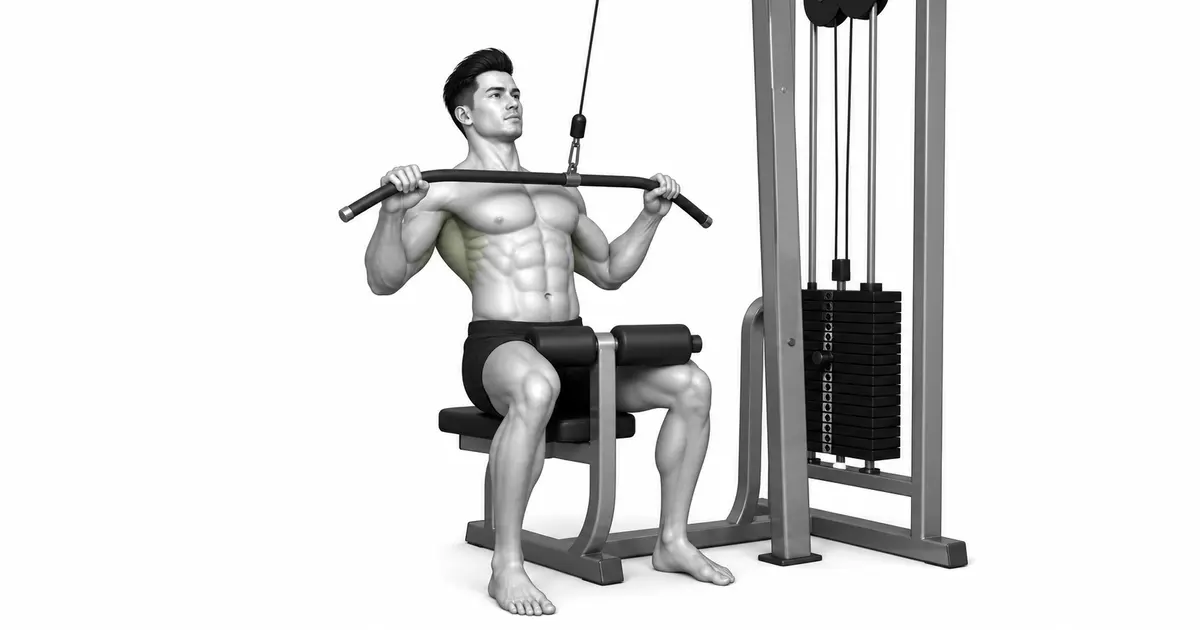
Exhale and lower your elbows toward the floor and sides. Let the bar pass in front of your face and toward your upper chest below your collarbone, and think of your elbows moving first rather than pulling the bar down with your hands.
- 6
Controlled extension of the arm while maintaining tension
Once the bar is close to your upper chest, don't arch your back further or roll your shoulders back. Raise the bar for 2–3 seconds, straightening your elbows and allowing your shoulder blades to naturally rotate upward, but begin the next repetition before the weight stack hits.
SEAT & THIGH PAD
Make sure your thigh pads are firm so you can lower the bar instead of lowering your body.
If the pad is too high, your hips and knees will lift off the seat when you pull the weight, and your range of motion will vary each time. Conversely, the pads do not need to be so low that they press painfully on your thighs. Aim for the minimum distance between your feet that touches the floor and your thighs that do not fall off.
Don't jump or twist your shoulders to grab the bar. If the bar is high, hold it with both hands in front of your seat and slowly lower your body to get under the pad. At the end of the set, control your arms, straighten, raise your body, and release the bar.
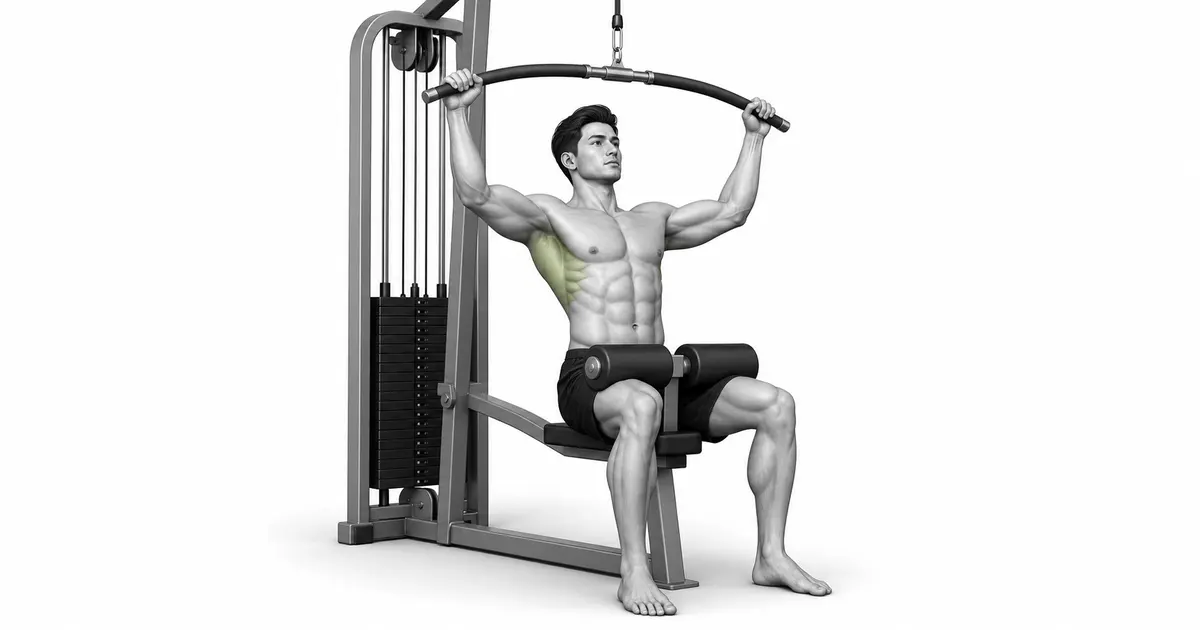
Key point: Check before set: Do your thighs not come out from under the pad when you lift your knees?
GRIP WIDTH
A wide grip is just one option, not the secret switch to open your lats
In a study comparing the width of the overhand grip between 1.5 and 2 times the shoulder width, there was no significant difference in the activity of the lats, trapezius, and infraspinatus muscles during the entire movement. With shoulder-width and medium-width grips, the 6-rep max was slightly higher than with the very wide grip. Make your choice based on whether you can fully extend your arms and lower the bar in front of your chest without pain, rather than spreading your hands further apart.
In studies comparing forearm orientations, overhand had higher latissimus dorsi activity than underhand, but in a recent study comparing more variations, differences in total back muscle activity by grip were not evident. Rather than determining an absolute grip based on electromyography values from one study, use the overhand as shown in the video as a basis and use a variation that is comfortable for your wrists, elbows, and shoulders.
BAR PATH & TORSO
The bar passes in front of the face and reaches the upper chest, with the torso only staying out of its path.
Lean back just a little at the start, as keeping your torso fully vertical can cause the bar to hit your face. If you lower your elbows while maintaining that angle, the bar will pass in front of your nose and chin and come under your collarbone. If you lean back significantly to lower the bar to your stomach, your vertical pull will be closer to a row.
In a study comparing lat pulldowns in front of the chest and behind the neck, one method was not superior in all aspects due to different activation depending on the muscle and contraction zone. The back-of-the-neck path requires external rotation with the head forward and shoulders wide open, so the benefit to be gained from the basic movement is not obvious. As shown in the video, prioritize the path of lowering the bar in front of your face and keeping your neck in a neutral position.
TROUBLESHOOTING
Fix the cause of a mistake, not just its appearance
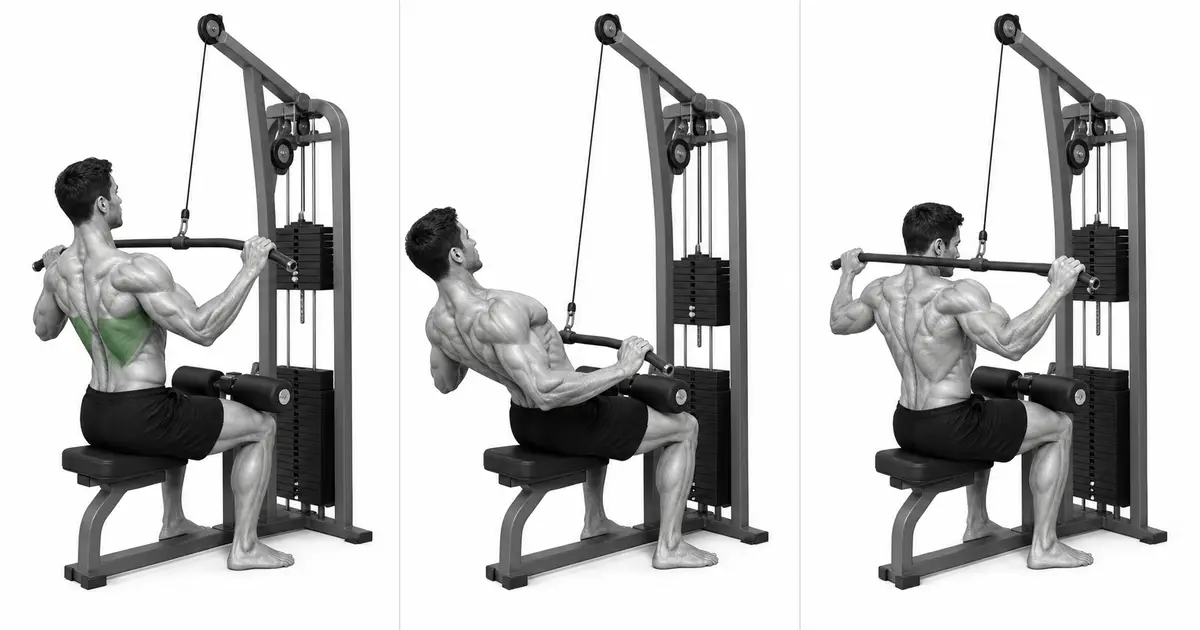
Lean your body back significantly and pull like a row.
- What you see
- As the bar comes down, your chest looks toward the ceiling and the bar moves toward your stomach.
- Likely cause
- You are currently having difficulty controlling the weight into a vertical pull or are very eager to get it to your upper chest.
- How to correct it
- Lower the weight and maintain the small body lean you established at the start. Stop in a controlled range with your elbows well down, without the bar touching your upper chest.
Lower the bar behind your neck
- What you see
- The chin and head are pushed forward and the bar passes under the back of the head.
- Likely cause
- Either you're following the old belief that the back-of-the-neck path is better for the lats, or you're spacing the machine incorrectly.
- How to correct it
- Bring the bar back in front of your face and lean your torso slightly back toward your upper chest. If you have shoulder or neck discomfort, use a narrower or more neutral handle.
Shrug and pull your shoulders towards your ears
- What you see
- The neck becomes shorter and the shoulders rise before the elbows.
- Likely cause
- You either pull the bar down with only your hands or your body goes completely limp at the starting point.
- How to correct it
- Think about keeping your neck long and your elbows on the floor. Do not force your shoulder blades, but use a weight that does not cause your shoulders to rise sharply.
Bend your wrist and pull with your arm only
- What you see
- The backs of the hands fold back and the forearms and biceps tire first, leaving the elbows in front.
- Likely cause
- Your grip may be too wide, or you're pulling the bar with your hands instead of pressing it down.
- How to correct it
- Narrow your grip slightly and place your wrists in line with your forearms. Keep your hands in a loop and focus on moving your elbows down.
Let go of the bar and hit the weight stack.
- What you see
- The return section is fast and the disc lands with a loud sound every time.
- Likely cause
- Only the pulling section was considered a repetition, or the weight and fatigue were beyond control.
- How to correct it
- Extend your arms for 2–3 seconds and maintain tension until just before touching the disc. For the last repetition, slowly raise the bar while holding it and then stand up.
REGRESSION & PROGRESSION
Match the difficulty before adding load
shoulder pulldown
With light weights, practice small ranges of shoulder movement up and down with your elbows almost straight.
Neutral Grip Lat Pulldown
If your shoulders are uncomfortable on the bar, learn the same vertical pull with the handles facing your palms.
suspended lat pulldown
At the point where the bar approaches the upper chest, pause for one second and support it with your back without torso recoil.
standard working set
Repeat the same torso angle and bar path for 8 to 12 reps, leaving 2 reps to spare.
Assisted pull ups
Once your lat pulldown path is stable, link the same vertical pull by offloading your weight to a band or machine.
BEGINNER PROGRAM
A practical starting framework
It can be used 1–3 times a week as a basic vertical pull for back exercises. If you do pull-ups in the same session, put the movement you want to learn first and adjust the combined number of sets for both exercises so that they do not exceed the recoverable range.
number
Episodes 8–12
Maintain torso angle and upper chest path
set
2–4 sets
1–2 minutes recovery between sets
speed
2–3 second return
Maintain tension before stack hits
- Once your thighs are locked and the bar is on the same upper chest path for every repetition, add one repetition to the next session.
- Only increase the pin when you've reached the top of your target reps on every set and have about 2 reps to spare.
- If you have to lean heavily or drop the bar to complete a rep, finish the set and lower the weight for the next set.
Frequently asked questions
Can I lean my upper body back?
A small incline is okay, just enough to make room for the bar to pass over your face. However, the more you pull, the more you lie down or the bar goes towards your stomach, then you have increased recoil and horizontal pull. Maintain the same small angle throughout the set.
Does the bar have to touch your chest?
It doesn't necessarily have to be touching. It depends on arm length and shoulder range of motion. An individual's end range is when the neck and wrists are neutral, the elbows are sufficiently lowered, and the torso is not tilted any further.
Are neck lat pulldowns better for your back?
There is no reason to believe it is consistently better. The difference in muscle activity between the front of the chest and the back of the neck path varied depending on the muscle and contraction section. Rather than sticking your head out and uncomfortably rotating your shoulders to create a path behind your neck, basically use a path in front of your chest.
What should I do if the irritation only occurs in my arm?
Think of lowering the weight and grip width, keeping your wrists straight, and sending your elbows down. Using a 1-second pause at the top and a 2–3 second return makes it easier to reduce recoil and find the feel of holding on to your back.
Evidence and references
- 1. Andersen et al. — Comparison of strength and muscle activity by lat pulldown grip width.
- 2. Lusk et al. — Effects of grip width and forearm orientation on lat pulldown muscle activity.
- 3. Padovan et al. — Comparison of high-density electromyography of lat pulldowns in front of the chest and behind the neck.
- 4. Signorile et al. — Comparison of lat pulldown shoulder muscle use by hand position
- 5. Buonsenso et al. — Comparing back muscle activity of seven lat pulldown variations.