LUNGE
Lunge is not a test of lowering the knee as deeply as possible, but an exercise that maintains the path of the pelvis and knee all the way on one foot.
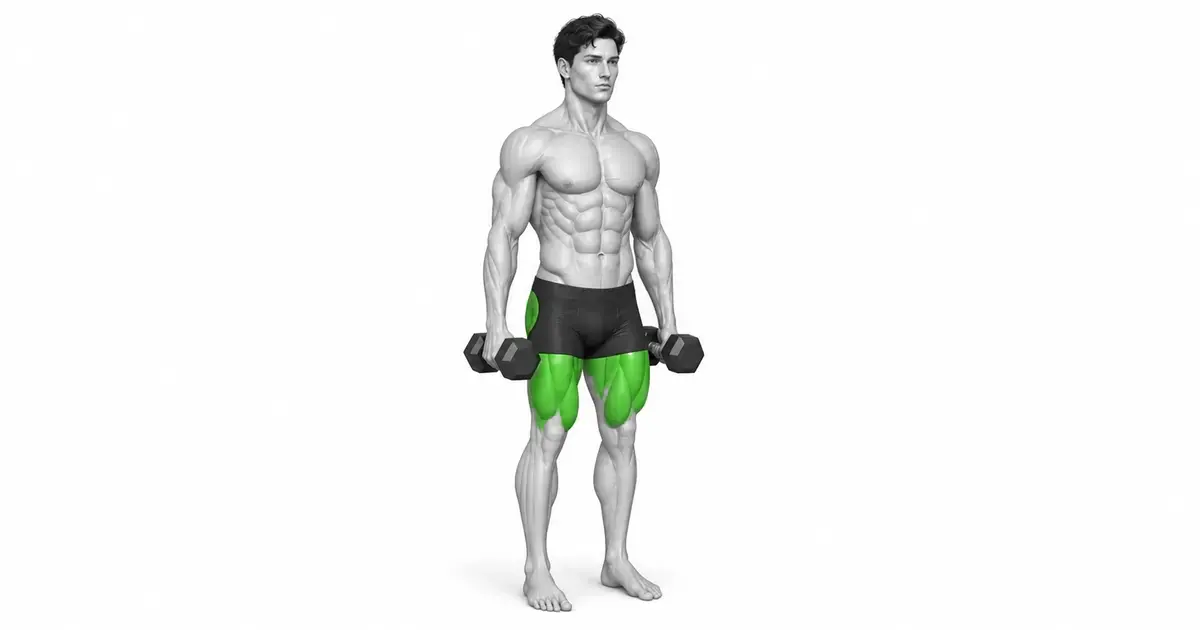
Lunge is a one-legged lower body exercise in which you step forward with one foot, lower your body, then push off the floor with your front foot and return to the starting position. The quadriceps femoris and gluteal muscles of the front leg are greatly involved, and the hamstrings, adductors, gluteus medius, calves, and muscles around the torso work together to keep the knees and pelvis steady. Therefore, the goal of this movement is not to tie the front knee behind the toes or force the back knee to hit the floor, but to stand up again within a pain-free range with the entire front foot stabilized and the knee following the direction of the foot. In a biomechanical study of the forward lunge, mechanical demands on the hips and ankles increased as the weight increased, and higher muscle activity in several lower body muscles was observed when the stride length was longer. However, this is a comparison with a healthy adult sample under defined performance conditions. Longer strides or greater depth do not mean that repetitions are safer or better for everyone. In this guide, we use the standard of starting with a stride length that maintains alignment of the torso, pelvis, and front knee, and controlling the return to the front foot section with the same quality as the step step section.
- Primary muscles
- Quadriceps, glutes
- Secondary muscles
- Hamstrings, adductors, gluteus medius, calves
- Difficulty
- Beginner
- Movement type
- Forward Lunge
Can't the front knee be forward of the toes?
This is not an absolute rule that applies to all people, stride length, or body proportions. The more important criteria are that the entire front foot remains on the floor, the front knee follows the direction of the middle toe, and the pelvis can be controlled without pain or instability. If you lift your heels or lean your torso excessively to force your knee position backwards, readjust your stride length and depth.
STEP BY STEP
6 Steps for One Complete Rep
- 1
Check the floor and surrounding space first
Start on a level, non-slip surface and allow space to step forward and back. Before lifting dumbbells, slowly step to one side with your bare body and check where your feet will land and your balance. Start your first working set with light dumbbells or bodyweight exercises so you don't have to step or twist your torso on the last rep.
- 2
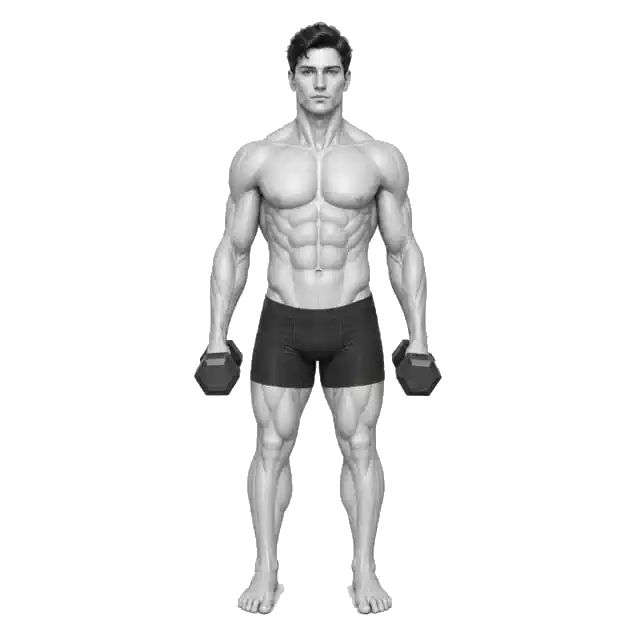
Organizing feet, pelvis, and gaze in standing posture
Place your feet comfortably within the width of your hips and do not shift your weight to one foot. Create a relaxed torso with your ribs resting on your pelvis, and keep your gaze on a point in front of you. Hold the dumbbells at both sides without bending your wrists, but do not stiffen your torso by pulling your shoulders toward your ears.
- 3
Step quietly with your front foot to find a stable stride
When taking a step forward, do not just place your heel firmly, but let your entire foot quietly find the floor. Set the stride length to a length that allows you to control your front knee and pelvis without lifting the entire front foot when going down. Don't force your stride length with one rule that says your front knee should always be behind your toes, but make sure your knee moves in the same direction as your middle toe.
- 4
Go down while maintaining front foot and pelvis
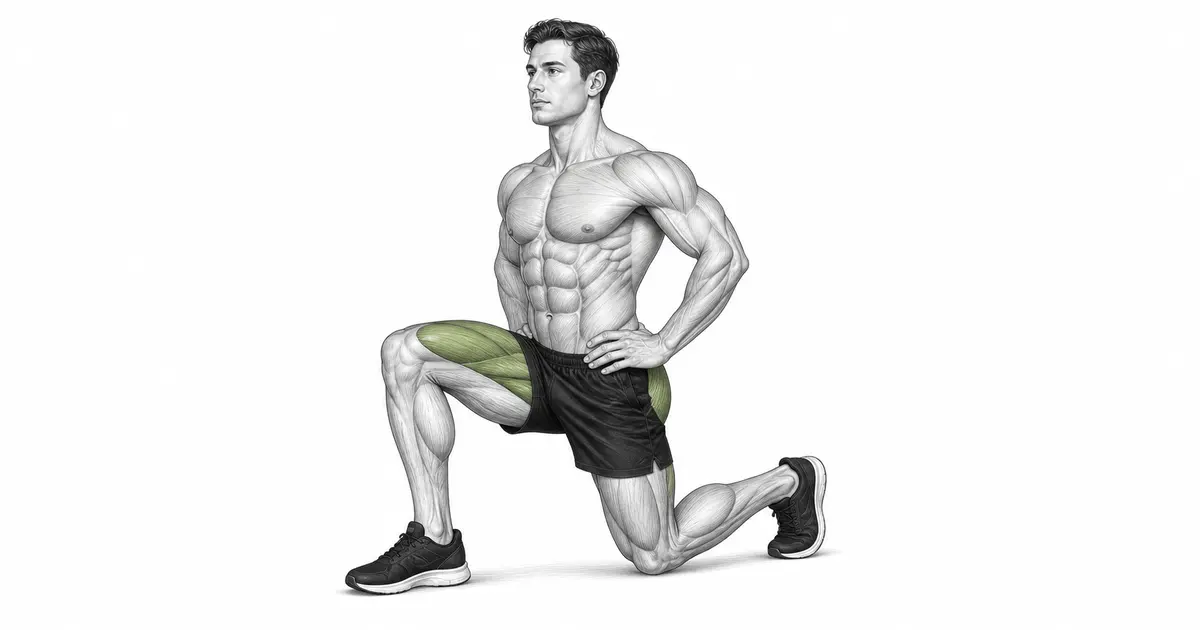
Inhale and bend both knees and hips together to lower your body down. Your torso does not need to be held completely vertical, but do not arch your back or tilt your torso to one side to create balance. The back knee can lightly approach the floor, but does not have to touch it, and only goes down before losing control of the front foot, knee, and pelvis.
- 5
Checking if the front knee follows the direction of the foot
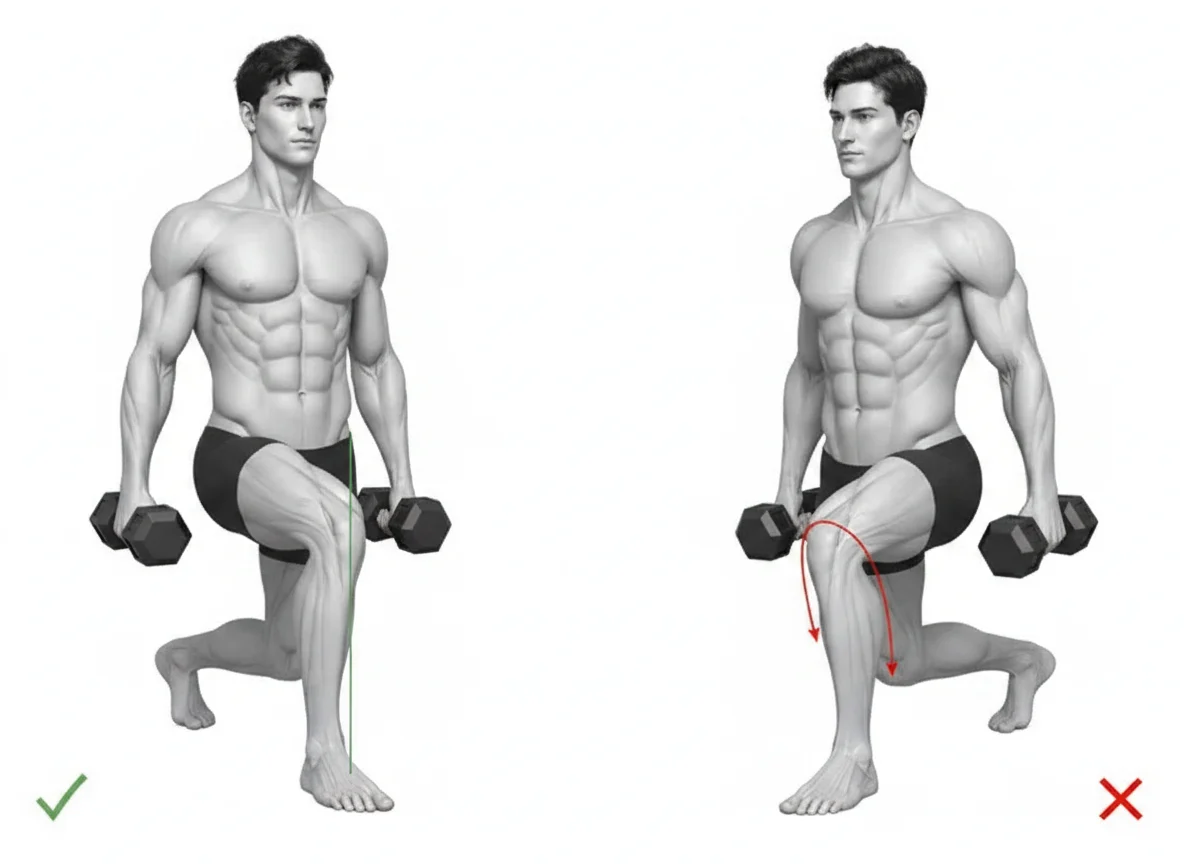
Make sure that the big toe side, little toe side, and heel of the front foot all feel the floor at the lowest position. If your front knee collapses inward or is pushed outward, if your pelvis falls to one side or if your front foot is lifted, you will not be able to go down any further. If you experience sharp pain, unsteadiness, or numbness in your knees or hips, stop immediately and reduce your range, stride length, and load.
- 6
Return to standing position by pushing the floor with the front foot
Exhale and push the entire front foot into the floor to return to the starting position. Do not bounce on your back foot or suddenly lock your front knee to create a kickback. After both feet are stable in the standing position again, start on the other side. If the stride length, depth, and torso speed are significantly different on the left and right, prioritize the controllable side over the number of repetitions.
STEP & BASE
Stride length is not a predetermined number, but rather a work space that can keep the entire front foot and pelvis together.
If the stride length of the forward lunge is too short, the front knee will move forward quickly in the lower position, and if it is too long, it may become difficult to control the front foot, pelvis, and torso at the same time. Studies have shown that longer strides lead to greater muscle activity in several lower body muscles, but this does not mean that longer strides are a better starting point for everyone. The current range of motion, balance, ankle movement, and stride length that allows you to stand up again without the front foot lifting under the dumbbell load come first.
The rule that your front knee should never go past your toes does not apply to all body proportions and stride lengths. Instead, keep the entire front foot on the floor, keep the knee in the direction of the middle toe, and watch for pain, instability, or sharp rotation of the pelvis. If you find a new foot position each time, practice stepping to the same position with your body again before adding dumbbells.
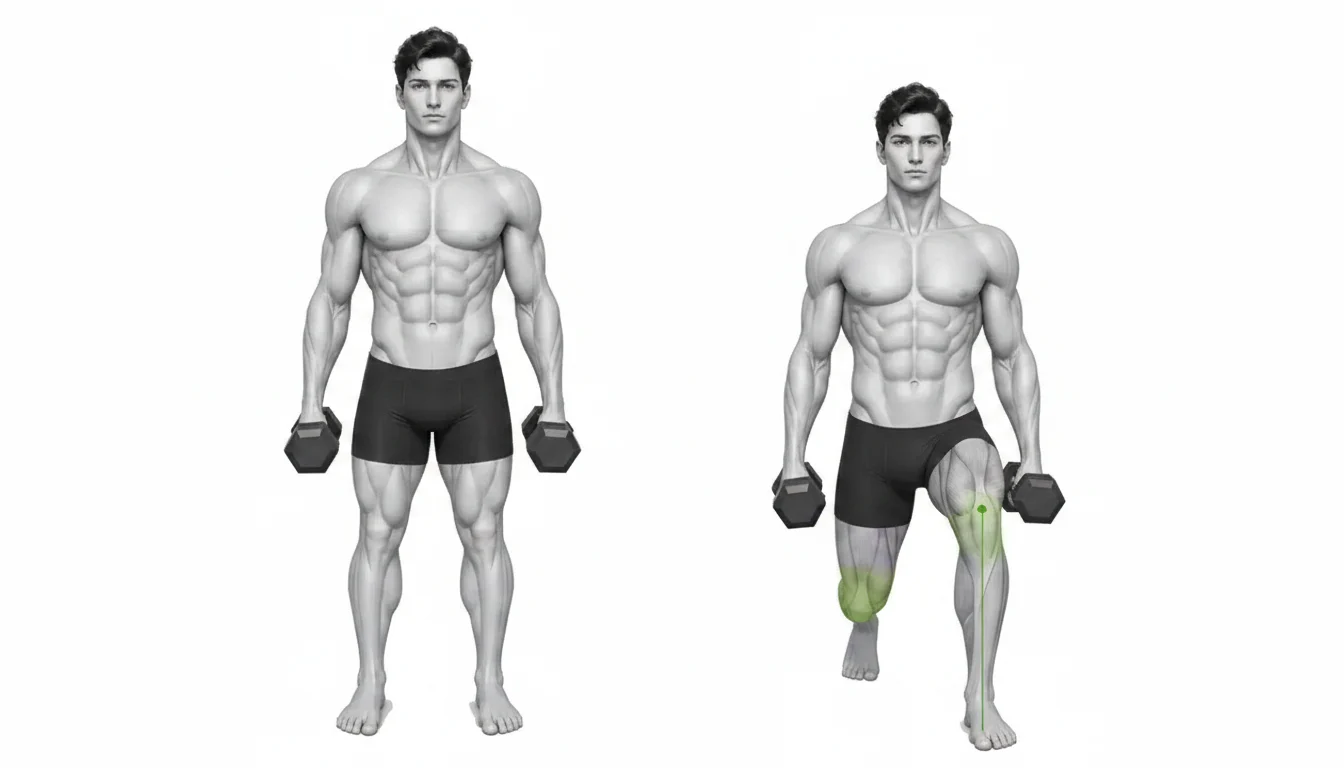
Key point: Check now: Full front foot on the floor Front knee toward middle toe Hip not off to one side Back foot helps with balance but does not take the place of the front foot
DEPTH & TRUNK
Going deeper doesn't mean a better rep, and keeping your torso erect doesn't mean you have to stop your pelvis.
In a lunge, it is not necessary to have your back knee touching the floor or your front knee to be at exactly 90 degrees. Clinical practice guidelines also recommend going only to controllable depths. When the front foot is lifted or the front knee begins to collapse inward, and the position of the lower back, pelvis, and neck changes, it is difficult to see deeper ranges as repetition of the same movement.
The torso may tilt slightly forward depending on the individual's hip and ankle movements and stride length. If you try to freeze it completely vertical, you may end up compensating by lifting your heels or hyperextending your lower back. Conversely, suddenly folding your torso forward or turning to one side to avoid the dumbbells is also a sign of loss of alignment. Go down slowly within a range that does not significantly change the relationship between your ribs and pelvis, and choose a depth that allows you to push back with your front foot.
RETURN & LOAD
Lifting dumbbells is a progression after control of the front foot has already been achieved, heavier loads are a different condition
Forward lunge is one repetition, not only on the way down but also on the way back to the starting position by pushing the floor with the front foot. Experiments have shown that increased external loading can significantly increase the mechanical demands on the hip and ankle, but these are averages across specific participant and weight conditions. Therefore, the criterion for increasing the dumbbell weight is not depth or post-exercise fatigue, but whether the path of the front foot, knee, and pelvis can be reversed at the same speed on both the left and right sides.
If your front foot swings in or out in the last few reps, you kick hard with your back foot to stand up, or the dumbbells start to hit your legs, your current load may be beyond what you can control. First, perform the set number of repetitions with bodyweight or light dumbbells, all with the same quality. Then increase either the reps or the load in small increments, but not both on the same day.
TROUBLESHOOTING
Fix the cause of a mistake, not just its appearance
Step firmly on the front foot and immediately push the knee in.
- What you see
- Heel strikes with a loud thud, knee moves forward quickly before the entire forefoot stabilizes.
- Likely cause
- Stepping up and down are done in one hasty movement, so there is no time to check the position of the front foot, knee, and pelvis.
- How to correct it
- After quietly touching the front foot, briefly find your balance and go down. Put down the dumbbells and repeat the same foot position on your body to determine the stride length.
Front knee collapses inward
- What you see
- When going down or returning, the front knee moves sharply toward the big toe, and the pelvis drops to the same side.
- Likely cause
- At the current stride length/depth/load, the front foot and hip area are not controlling the direction of the knee.
- How to correct it
- Gently turn your front knee in the direction your middle toe is facing, and lower only as far as you can maintain that alignment. Shorten your strides or go back to the bodyweight phase.
Heel or outside of front foot lifts
- What you see
- At the lowest position, the heel floats or the foot tilts inward or outward, causing the entire front foot to lose ground.
- Likely cause
- Stride length or depth is greater than the current ankle/hip joint movement and balance, or body weight is not distributed across the entire front foot.
- How to correct it
- Stop going deeper and look for full foot reach. Adjust your front foot position slightly, but don't over-clinch your toes to stabilize your foot.
Hitting the back knee hard on the floor
- What you see
- When coming down, the back knee hits the floor and the torso and dumbbells shake.
- Likely cause
- Either you think your back knee has to touch the floor to complete the repetition, or you are not controlling the speed of your descent.
- How to correct it
- The back knee can stop close to the floor or touch lightly, but there is no need to make an impact. Change direction at a height that maintains control of your front foot, knees, and hips.
Kicks back with the back foot instead of the front foot
- What you see
- When you stand up, your back foot pushes the floor strongly, your body springs forward, and the path of your front knee and dumbbells shakes sharply.
- Likely cause
- Rather than creating force and balance by pushing the floor with your front foot, you are creating a starting position with the kickback of your back foot.
- How to correct it
- First, find the feeling of pushing your entire front foot into the floor and returning your body up and back. If you have difficulty with balance, place the dumbbells down and practice while lightly holding the support.
Create balance by twisting your torso while holding a dumbbell.
- What you see
- One dumbbell swings widely in front of the thigh, and the ribs and pelvis rotate towards the front foot or the opposite side.
- Likely cause
- The left and right dumbbell load or stride length is greater than what your torso and pelvis can currently control, or you are insisting on the same number of repetitions even after fatigue.
- How to correct it
- Lower the dumbbells to a weight that you can hold quietly next to your body. Do the same number on the left and right sides, but if one side falls out of alignment first, the set ends on that side.
REGRESSION & PROGRESSION
Match the difficulty before adding load
Body split posture with a light grip on a support object
Hold lightly on a wall or fixed support with one hand, place your feet back and forth, and bend and straighten both knees in a small range. First, learn whether the direction of the entire front foot and front knee is maintained.
Bodyweight forward lunge
From a standing position, quietly step forward with one foot, reaching with the entire front foot, and then lower to a controllable depth. Keep your foot position and return area constant for 6–10 reps on each side without dumbbells.
Forward lunge with light dumbbells in each hand
Quietly hold the dumbbells next to your body and maintain your existing bodyweight stride length and depth. If the dumbbell hits your leg or your torso twists, regain control from the previous step first, not the weight.
Controlled Stride or Load Progression
If the left and right strides, front knee direction, and return speed are maintained in all sets, adjust either the stride length or the dumbbells in small increments. Long strides are not automatically a better choice and are only used if alignment of the forefoot and pelvis is maintained.
BEGINNER PROGRAM
A practical starting framework
1–3 times a week, can be used at the beginning of lower body exercises or as a one-leg auxiliary exercise after squats or hip hinges. First, check your left and right foot position and balance with your body, and start the work set with a load that maintains the alignment of your front feet, knees, and pelvis until the last repetition. If you do exercises that cause significant lower body fatigue, such as squats, deadlifts, or jumps, on the same day, you should observe whether you still have control of your knees and hips before adding lunge depth and dumbbell weight.
Count
6–12 times left and right
Range that can maintain the entire forefoot and knee direction
Set
2–4 sets
60–120 seconds recovery after performing both left and right sides
Speed
1–2 seconds step down, 1–2 seconds return
Do not start the next repetition by stamping your foot or kicking back with your back foot
- With the entire front foot remaining on the floor and the front knee following the direction of the foot on every repetition, first increase the number of repetitions to the top of the target range.
- Increase either the dumbbell load or stride length in the smallest increments only after you have achieved the top of each left and right repetition target at the same stride length and depth for all sets. I don't post both on the same day.
- If the front knee collapses inward or the front foot lifts and the back foot kicks in or the body starts to rotate, return to the previous range or previous load. Returning the same path takes precedence over deeper repetition.
Frequently asked questions
Does the back knee have to touch the floor?
No. You can get your back knee close to the floor or touch it lightly, but touching it with impact is not the goal. Go only to a depth that maintains alignment of your front foot, front knee, and pelvis, and choose a shallower range if you experience pain or instability.
Are longer strides always better for the glutes?
Studies have shown higher muscle activity in several lower body muscles during long stride conditions, but the results do not determine which stride length is better for everyone. If you find that your front foot lifts or you lose hip/knee alignment during long strides, a shorter, more controlled stride may be more appropriate for you at this time.
When can I start lifting dumbbells?
Add light dumbbells when you can repeat the left and right foot position, front knee direction, and return section consistently while barefoot. If you have to slam your feet or twist your torso after lifting dumbbells, you are still at the stage of practicing body control rather than load.
My knee hurts. Can I fix it with lunges?
Lunges are a general resistance exercise and are not intended to diagnose or treat the cause of an individual's knee pain. If pain persists or you experience swelling, locking, unsteadiness, or numbness, seek evaluation from a medical professional rather than increasing your stride length or weight on your own.
Evidence and references
- 1. Riemann et al. — Joint biomechanics of the forward lunge under external loading conditions.
- 2. Escamilla et al. — Forward lunge lower body muscle activity according to stride length and stride change
- 3. Mayo Clinic — Guidelines for performing lunges and knee-torso alignment
- 4. Escamilla et al. — Patellofemoral joint load and step height in anterior and lateral lunges.