NARROW NEUTRAL-GRIP LAT PULLDOWN
The narrow grip pulldown is not an exercise in which you pull the handle down, but rather a vertical pull with your elbows directed toward your sides.
The video shows a lat pulldown in which you hold a V-shaped handle with a narrow neutral grip with both palms facing each other, and pull the handle toward your upper chest from the starting point with your arms extended above your head. The narrow handle makes it easy to keep your wrists and forearms in a neutral position and allows you to lower your elbows closer to your body, making it easier to create a long range of motion, but it is not a magic grip that will further isolate your lats. In a study comparing three overgrip widths in 15 people, the overall muscle activity of the latissimus dorsi, trapezius, and infraspinatus were generally similar, and in a study comparing seven variations, including a narrow neutral grip, in 40 experienced people, no significant differences were found in most back muscles. Thigh lock, repeatable torso angle, elbow path and controlled return take precedence over the name of the grip.
- Primary muscles
- Latissimus dorsi and teres major
- Secondary muscles
- Biceps brachii, brachialis, middle and lower trapezius
- Difficulty
- Beginner to Intermediate
- Movement type
- vertical pull
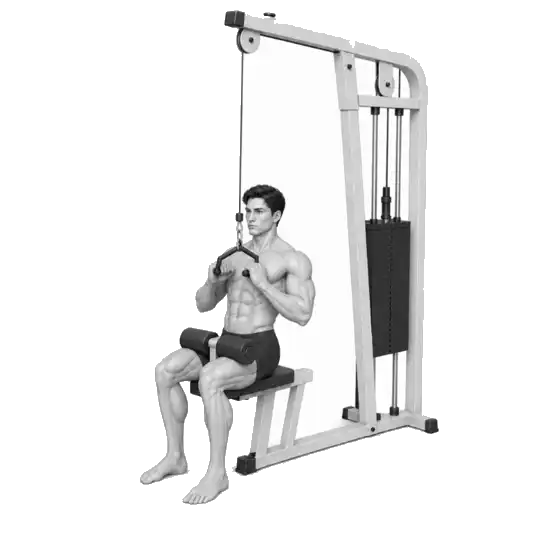
Is a narrow grip better for your lats than a wide grip?
It is difficult to say that this is absolutely true. Across studies, differences in latissimus dorsi activity across grip width and orientation were small or inconsistent. Choose a grip that allows you to do long range repetitions and gradually increase load without pain.
STEP BY STEP
6 Steps for One Complete Rep
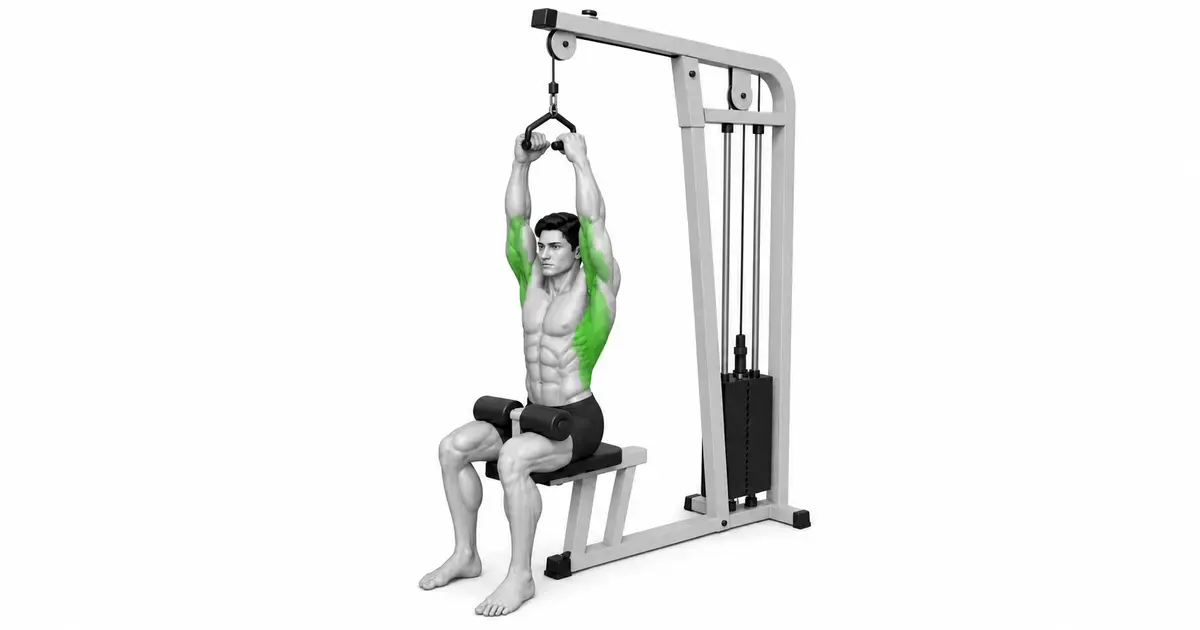
- 1
Check the cable and V-shaped handle connections
Make sure the carabiner is fully locked, the cable is not frayed or cracked, and the weight pin is fully inserted. Lightly pull the handle and check that the connection does not wobble.
- 2
Align thigh pad and foot position
When sitting, adjust the height so that the pad presses firmly against your thighs but does not put pressure on your knees or groin. Place both feet flat on the floor and do not let your pelvis swing from side to side.
- 3
Hold the V-shaped handle with your neutral wrist
Wrap your palms around the handle facing each other and close your thumbs. Instead of folding your wrists inward, hold them so that the back of your hand and forearm are in one line.
- 4
Extend your arms long and keep your torso steady
Extend your elbows overhead, without locking them, and place your buttocks on the seat. Set your starting angle by keeping your torso erect or leaning back 10–15 degrees without excessively lifting your ribs.
- 5
Pull your elbows down your sides
Exhale and gently lift your chest and send your elbows toward the floor and sides. Rather than pulling with your hands, think of your upper arms coming down next to your torso.
- 6
Pause at the upper chest and return slowly.
Stop when the handle approaches your upper chest below your collarbone and your elbows are next to your torso. Extend your arms for 2–3 seconds and reset for the next rep before hitting the weight plate.
ELBOWS DOWN
If you decide the direction in which your elbow will move, not the handle, the lat path will become clearer.
The lats are largely involved in shoulder compression and extension, which lowers the upper arm toward the torso. If you try to force the handle to touch your chest, your wrists may bend, your elbows may pass behind your torso, and the end of the movement may turn into a row. It is enough to have your elbows pointed towards the floor and sides and your upper arms next to your torso.
At the top, avoid both passive hangs that push your shoulders toward your ears, and repetitions that limit your range of motion so much that your scapula doesn't move at all. Extend your arms long within a pain-free range, allow your shoulder blades to naturally rotate upward, and control your shoulders so that they do not shrug excessively on the next pull.
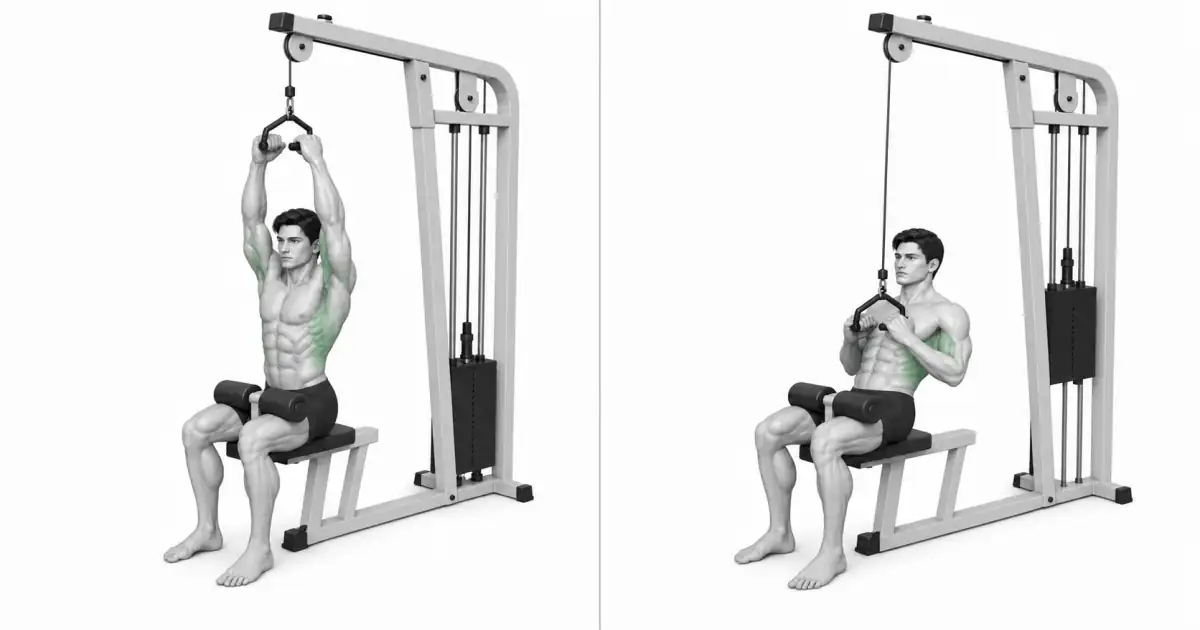
Key point: Cue to use right away: “Push your elbows into the pockets under your sides” rather than “lower the handle.”
GRIP REALITY
A narrow neutral grip is an option, not an absolute answer to lat activation.
In a study comparing grip widths, the overall muscle activity of the lats was generally similar between narrow, medium, and wide overgrips, and the 6RM weight of the narrow and medium grips was slightly higher than that of the wide grip. A recent study also found no significant differences in most muscles, including the lats, mid and lower trapezius, and biceps, between seven lat pulldown variations, including a narrow neutral grip.
Therefore, the V-shaped handle is a good tool when your wrists and shoulders are comfortable and you can repeat a sufficient range of motion. You may feel more arm fatigue due to the greater elbow bending range than with a wide bar, but that alone does not mean the exercise is wrong. Evaluate pain-free routes, equal speeds and progressive loads rather than target muscle feel.
TROUBLESHOOTING
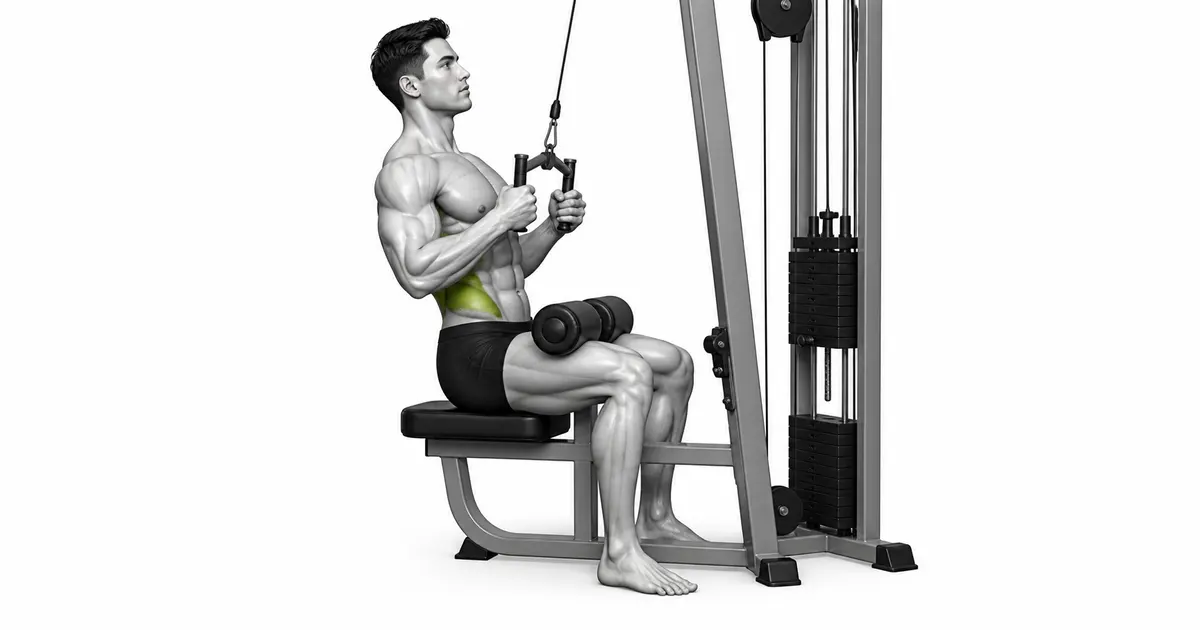
If your torso angle and wrist alignment are off, pulldowns turn into rows or arm exercises.
If you lean your torso back more than 30–40 degrees and pull the handle towards your stomach, the horizontal pull will be greater than the vertical pull. A slight incline creates space for the handle to move past your face and down into your upper chest, but you should maintain the same 10–15 degrees in or out throughout the repetition and keep your pelvis from moving off the seat.
When holding the V-shaped handle narrowly, bending your wrist inward or pushing your elbow behind your body may cause discomfort in the front of your wrist, elbow, and shoulder. Keep your wrists and forearms in one line, and stop your elbows next to your torso as the handle approaches your upper chest. It does not change the joint alignment to pull it further down.
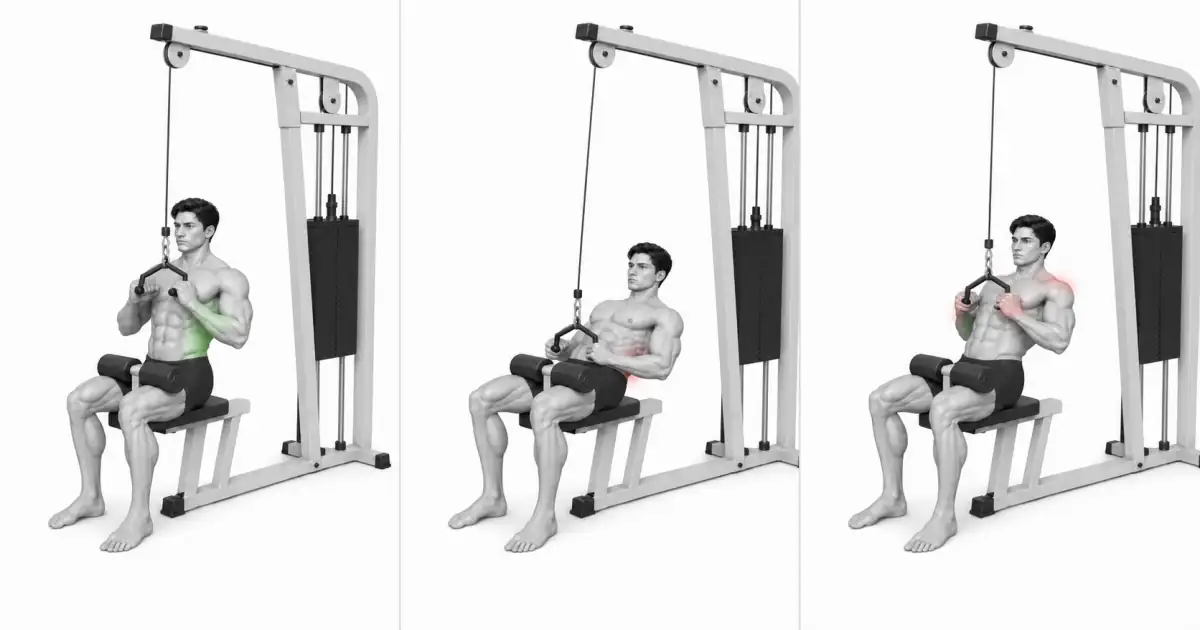
TROUBLESHOOTING
Fix the cause of a mistake, not just its appearance
Excessively leaning the torso back
- What you see
- Each time you pull, your body lies at least 30–40 degrees and the handle points toward your stomach, not your upper chest.
- Likely cause
- Currently, the weight cannot be controlled with a vertical pull, so it uses body weight and recoil.
- How to correct it
- Lower the weight and keep your torso angle at 10–15 degrees. Maintain pelvic contact with the seat with your thighs under the pad.
bend the wrist inward
- What you see
- You twist and squeeze the end of the handle, the back of your hand and forearm bend, and you feel pressure on the inside of your wrist.
- Likely cause
- I tried to squeeze the narrow handle harder or pull it with just my hand.
- How to correct it
- Close your thumb, but do not over-squeeze the handle, and keep the back of your hand and forearm in one line. If pain persists, use a different neutral handle.
Shoulders rise toward ears
- What you see
- At the bottom, the shoulders are shrugged, the neck is shortened, and only the handle touches the chest.
- Likely cause
- The weight is heavy or you are pulling it down with your hands instead of your elbows.
- How to correct it
- Begin the first movement with your elbows moving down, and only pull your shoulders as far as they are comfortable.
Putting your elbows too far behind your body
- What you see
- The handle goes down to the chest or stomach and the front of the shoulder sticks out.
- Likely cause
- I thought a lower position would result in a greater lat contraction.
- How to correct it
- Stop where your upper arms are next to your torso and the handles are close to your upper chest.
Release the weight on the return leg
- What you see
- The arms are quickly extended, the weight plates collide, and the shoulders are suddenly pulled upward.
- Likely cause
- I only thought of the pulling section as repetition, or my grip and arms got tired first.
- How to correct it
- Extend your arms for 2–3 seconds and stop before they touch the weight plate. End the set when the return velocity disappears.
Thigh pads are loose
- What you see
- When pulling, your knees and pelvis lift and your entire body moves up and down along the handle.
- Likely cause
- The pad height is too high or the seating position does not suit your body type.
- How to correct it
- Lower so that the pad rests firmly on your thighs but does not put pressure on your joints. Place both feet on the floor.
REGRESSION & PROGRESSION
Match the difficulty before adding load
Light V-grip pulldown
First, learn to fix your thighs, keep your wrists neutral, and return for 2 to 3 seconds with a weight that can be performed at least 15 times.
Stop narrow grip pulldown
When the handle approaches the upper chest, pause for one second and check the elbow path without recoil.
Gradual increase in weight
Maintain the same torso angle and return speed for 8–12 reps, then increase the weight pins one step at a time.
Independent handle neutral grip pulldown
Use the left and right handles separately to find a path that is comfortable for your wrists and shoulders and check the difference between the left and right sides.
Assisted pull-ups or neutral grip pull-ups
After performing a steady pulldown, move to a bodyweight pull with the same neutral grip. Maintain your technique with assistance weights.
BEGINNER PROGRAM
A practical starting framework
It can be used 1–3 times per week as an accessory exercise for the main vertical pull or pull-up in back training. For the first set, check your shoulder and wrist response, thigh stability, and cable path at a weight that allows you to do at least 15 reps, and choose a weight that leaves 2–3 reps to spare until the end.
number
Episodes 8–12
Same torso angle and upper chest path.
set
2–4 sets
60–120 seconds recovery between sets
speed
1–2 seconds pull, 1 second pause, 2–3 seconds return
Control without collision with weight plate
- Before the first set, check the cable, carabiner, V-shaped handle, weight pin, and thigh pad, and determine a pain-free range with light weight.
- If you maintain the same torso angle, neutral wrists, upper chest finish and 2–3 second return for all repetitions, add one repetition to the next session.
- After hitting the top of your target reps on every set, increase the weight pin just one step. If there is a torso twist or quick return, return to the previous weight.
Frequently asked questions
How far should the handle go down?
A point below the collarbone, close to the upper chest and with the upper arm next to the torso is sufficient. Do not lean down or put your elbows back to lower the handle to your stomach.
How far can I lean back?
A small incline of 10–15 degrees to allow space for the handle to pass over your face is sufficient. If the angle changes during a repetition or you lie on your stomach more than 30 degrees, lower the weight.
Is it wrong to lose strength in your arms first?
Pulldowns are a complex exercise that also uses the elbow flexors, so it is normal to experience some arm fatigue. However, if your wrists buckle or your body bounces, lower the weight and readjust your elbow path and return speed.
Should I fully let my shoulders hang at the top?
Extend your arms within a pain-free range and allow your shoulder blades to move naturally, but avoid passive hanging where your shoulders are suddenly pulled up by the weight. Control the next repetition with a 2–3 second return.
Can I just do this exercise instead of pull-ups?
Both are vertical pulls, but the way the body is held and loaded is different. If your goal is to do pull-ups, it is advantageous to change the movement by creating strength and path with narrow-grip pull-downs and then practicing auxiliary pull-ups together.
Evidence and references
- 1. Andersen et al. — Comparison of 6RM and muscle activity by lat pulldown grip width
- 2. Carangelo et al. — Muscle activity of seven lat pulldown variations including a narrow neutral grip.
- 3. Lusk et al. — Lat pulldown grip width, forearm direction, and muscle activity
- 4. Lehman et al. — Comparison of muscle activity by lat training movement