ONE-ARM PUSH-UP
The one-arm push-up is not a stunt of holding yourself on one arm—it is a whole-body pressing skill that controls trunk rotation inside a wide base
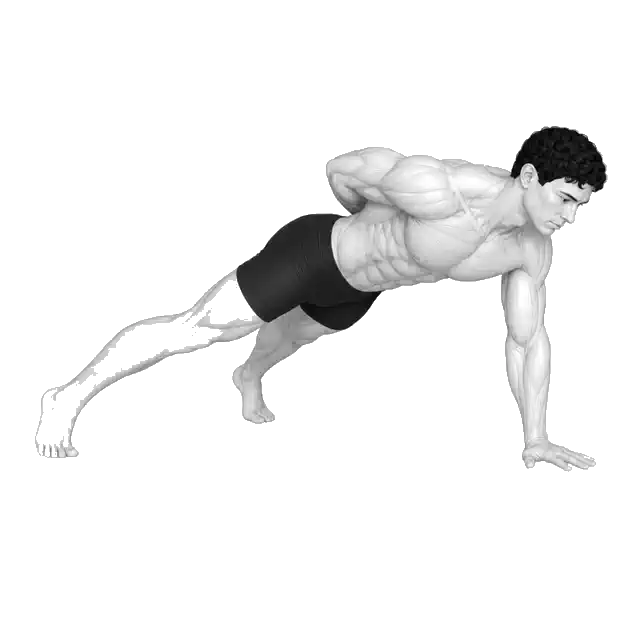
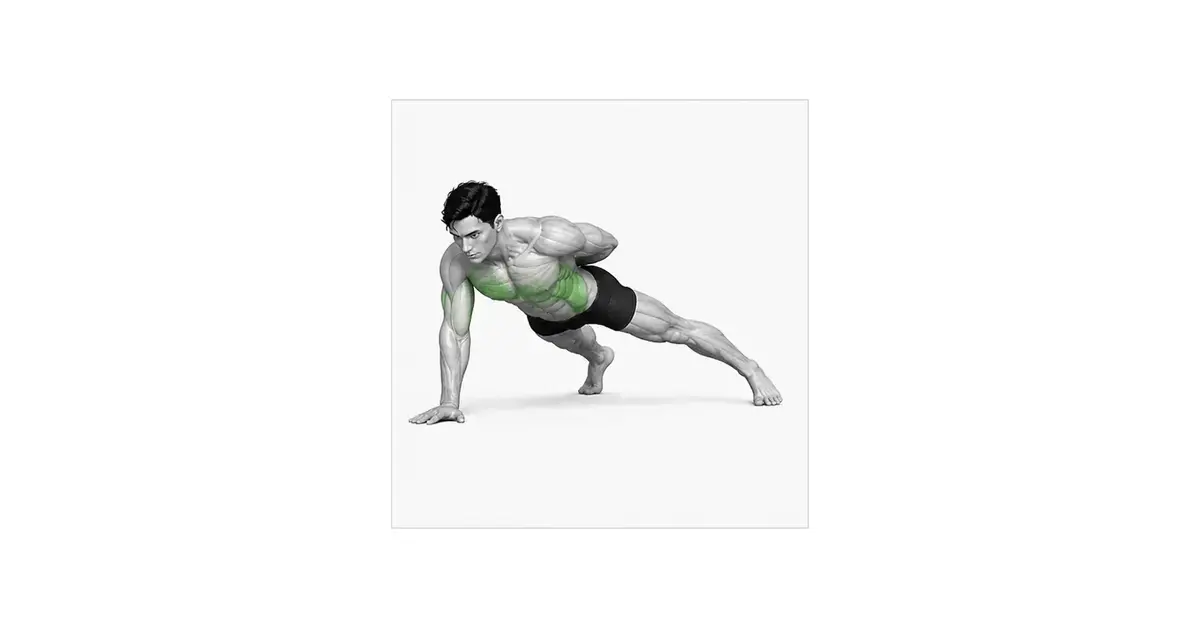
The one-arm push-up is an advanced push-up in which one hand and both feet support the body, the pectoralis major, triceps, and anterior deltoids press, and the trunk muscles including the serratus anterior and obliques resist rotation. The base is narrower than a two-hand push-up and the load concentrates on one arm, so simply doing lots of standard push-ups does not build this skill on its own. In the version shown in the movement demonstration, with the feet spread wide and the free hand behind the back, the chest travels toward the supporting hand while the shoulder and pelvis descend together. Rather than twisting hard to hold the body perfectly parallel to the floor, prioritize moving as one piece from head to heels within a small amount of controllable rotation.
- Primary muscles
- Pectoralis major · triceps
- Secondary muscles
- Anterior deltoids · serratus anterior · obliques · core
- Difficulty
- Advanced
- Movement type
- Single-arm horizontal press · anti-rotation
Is spreading the feet wide cheating?
No. Wide feet are the standard entry-level setup: they enlarge the base and make trunk rotation easier to control. Narrowing the feet raises the difficulty considerably, so attempt it as a separate progression once both sides are stable in the wide position.
STEP BY STEP
5 Steps for One Complete Rep
- 1
Clear the standard push-up and asymmetric progressions first
Attempt the floor version only once you can do standard push-ups across several sets without your trunk sagging and can control an equal range on both sides in an incline one-arm push-up or an archer push-up. Find a non-slip space where your wrists and shoulders feel comfortable.
- 2
Spread the feet wide and set the supporting hand
Take the feet wider than shoulder width to build a triangular base. Place the supporting hand directly under the shoulder or shifted slightly toward the midline, with the fingers spread. If the hand sits too far out, it is hard to move the trunk over it.
- 3
Put the free hand behind your back and lock the trunk
Rest the free hand lightly on your lower back and make the head, ribs, pelvis, and heels one long board. Keep the supporting shoulder away from your ear and brace the abdomen and glutes so the pelvis does not open first.
- 4
Lower the chest toward the supporting hand under control
Inhale and bend the supporting elbow diagonally backward from the torso. Let the chest descend near the hand with the ribs and pelvis moving at the same speed. Stop at a depth before the shoulder rides toward your ear or the low back sags.
- 5
Push the floor away and return to your starting trunk angle
Press the floor away through the whole palm to extend the elbow and raise the chest and hips together. At the top, do not let the supporting shoulder collapse forward or slam the elbow into lockout—stabilize once before the next repetition. Work each side as its own set with matching repetitions.
BASE OF SUPPORT
The wider the feet, the easier the balance; the narrower, the greater the rotation demand
You have to keep your center of mass inside the triangle formed by one hand and two feet. Spreading the feet widens the side-to-side base and makes pelvic rotation easier to control, so the wide stance shown in the demonstration is a sensible starting point. Narrowing the feet is not a cosmetic change—it is a separate progression that raises the anti-rotation demand on the trunk.
The supporting hand also needs to shift from outside the torso to beneath the shoulder and slightly toward the midline so you can bring the chest over it. That said, placing the hand too far toward the center or forcing the fingers to turn inward can make the wrist and elbow uncomfortable. Start with wide feet and a comfortable hand angle, and find the position you can repeat without wobbling.
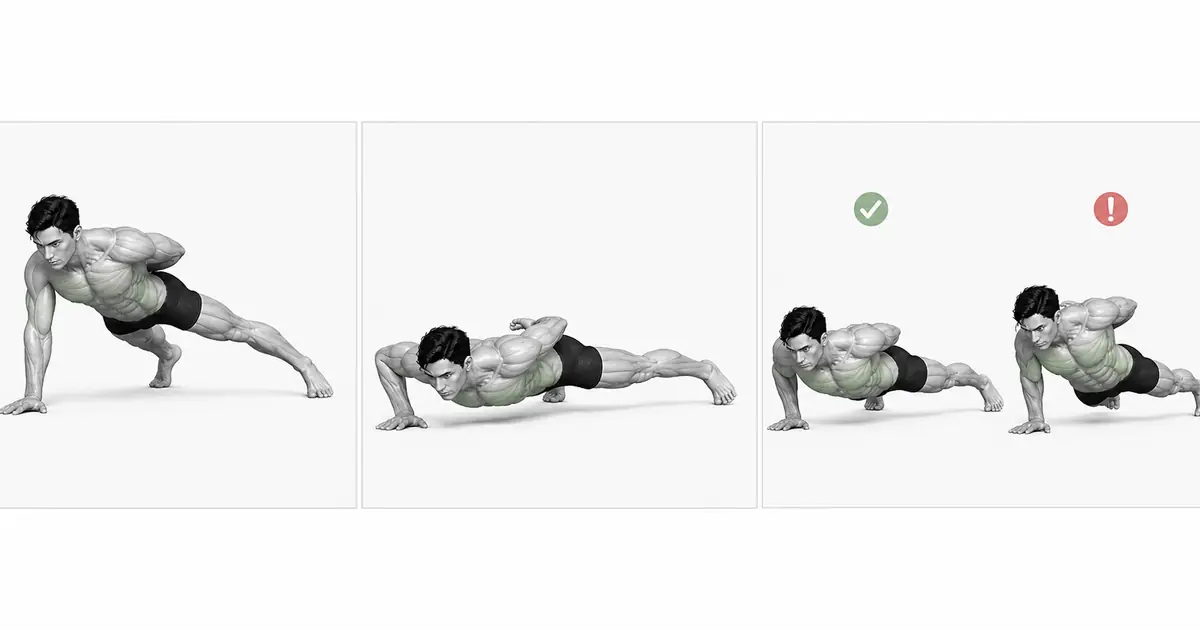
Key point: Practical cue: “Feet wide → hand under the shoulder → chest over the hand.”
ANTI-ROTATION
The chest and pelvis must descend at the same speed rather than rotating separately
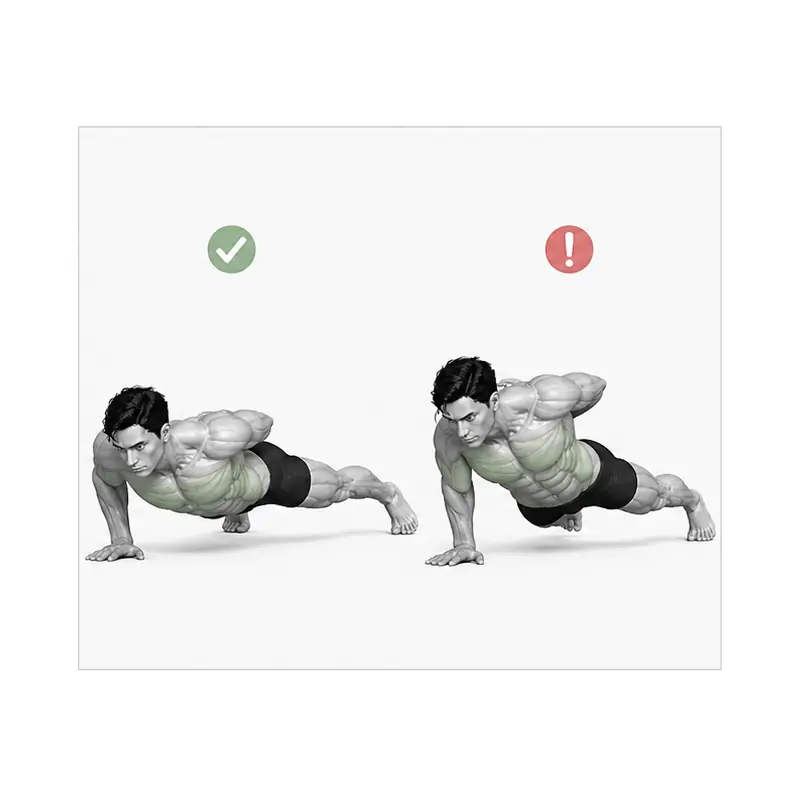
Because only one hand presses the floor, the trunk naturally receives a rotational force that wants to open it away from the supporting hand. The obliques, glutes, and a wide foot base do not eliminate that rotation so much as keep it within a controllable range. If the pelvis opens toward the ceiling first, or the chest alone drops toward the supporting hand, the body is no longer moving as one piece.
Filming from the front or at an angle makes it easy to check how the shoulder and pelvis heights change. A small amount of rotation is fine as long as the line from head to heels holds and the ribs and pelvis move together. Do not over-arch the low back or drag your feet in to hide the rotation.
WORKING ARM
Align the supporting hand, wrist, elbow, and shoulder so they share the load
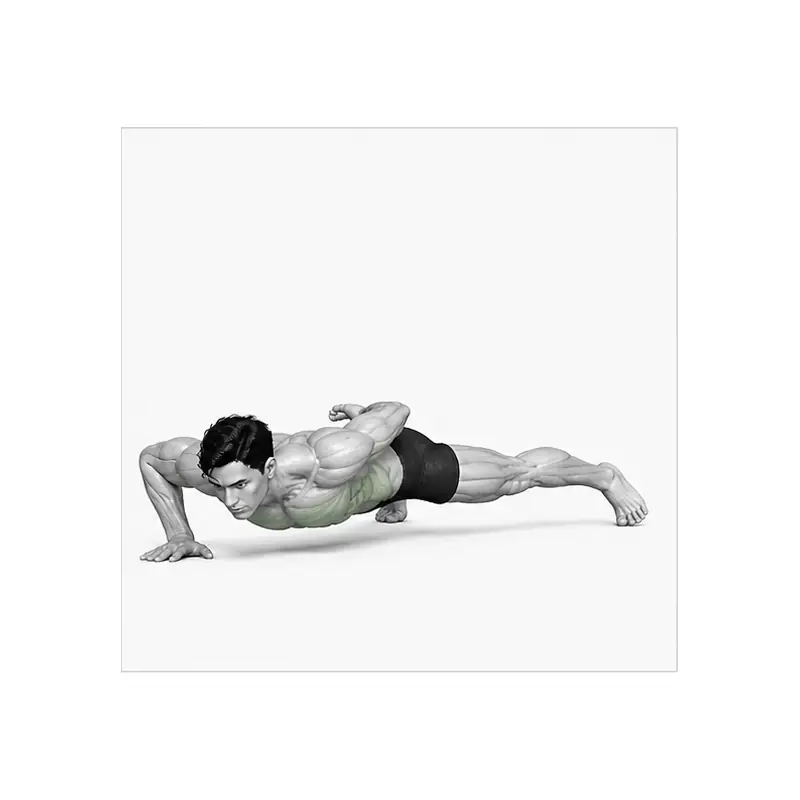
Because the load concentrates on one hand, spread the fingers wide and press the floor with the whole palm. Twisting the wrist excessively or letting the outer edge of the palm lift can funnel the load into a small area. If pressing through the palm is uncomfortable, you can first use a variation with handles or parallettes that brings the wrist closer to neutral.
As you descend, rather than flaring the elbow fully out to the side, bend it diagonally backward from the torso so the chest comes down toward the hand. Biomechanics research indicates that elbow loading in the one-arm push-up can also vary with forearm rotation, so rather than imposing one hand angle on everyone, use a pain-free angle and a repeatable path as your standard.
TROUBLESHOOTING
Fix the cause of a mistake, not just its appearance
The pelvis opens far toward the ceiling
- What you see
- The navel and pelvis turn to the side as you descend and the pressure on the two feet becomes very uneven.
- Likely cause
- The rotation demand of the floor version may exceed your current trunk control, or the feet may be too close together.
- How to correct it
- Widen the feet further and go back to an incline one-arm push-up with the hand on an elevated surface.
The hips sag first
- What you see
- The chest stays high while the pelvis drops toward the floor and the low back bends.
- Likely cause
- Abdominal and glute tension may have released, or you may be using low-back movement to create depth.
- How to correct it
- Keep the ribs and pelvis close together and work only within the range where the whole body can descend together.
The supporting shoulder rides toward the ear
- What you see
- The space between the neck and shoulder narrows at the bottom and the front of the shoulder lifts.
- Likely cause
- The hand may be too far away, or the depth and load may exceed your shoulder-blade stability.
- How to correct it
- Move the hand under the shoulder, raise the height, and practice the sensation of continuously pushing the floor away through the palm.
The elbow flares completely out to the side
- What you see
- The elbow points toward shoulder height and the chest drops outside the supporting hand.
- Likely cause
- The hand may be placed too far out, or you may be applying a standard wide push-up path.
- How to correct it
- Shift the supporting hand slightly toward the midline and send the elbow diagonally backward.
Locking the elbow on momentum at the top
- What you see
- The elbow snaps into extension at the end of the press and the trunk bounces away from the supporting hand.
- Likely cause
- You may be continuing repetitions close to failure or failing to control the speed of the ascent.
- How to correct it
- Lower your target repetitions and pause one second at the top to realign the shoulder and pelvis.
REGRESSION & PROGRESSION
Match the difficulty before adding load
Standard push-up
Learn alignment from head to heels and the wrist and elbow path with both hands first.
Archer push-up
Load one arm more heavily while keeping support from the other hand to practice asymmetric pressing.
Incline one-arm push-up
Put one hand on a sturdy elevated surface to lower the load and learn the wide base and anti-rotation.
Floor one-arm push-up
Once both sides are stable on an elevated surface, lower the height in stages to move to the floor.
BEGINNER PROGRAM
A practical starting framework
Practice it once or twice per week, before your standard push-up sets or as the first movement of an upper-body strength session. Low repetitions that hold the same trunk angle and depth on both sides suit this better than repetitions close to failure. Match the stronger side to the successful repetitions and height of the weaker side, and if the floor is too hard, log your support height and progress from there.
Reps
2–5 per side
Same height and depth on both sides
Sets
3–5
Rest 2–3 minutes between sets
Tempo
3s descent
Controlled at the top and bottom without rebound
- Add one repetition next session only when both sides complete the target reps without pelvic rotation or shoulder shrugging.
- With the incline variation, lower the support height in small increments and do not narrow the feet at the same time.
- If wrist, elbow, or shoulder pain appears, stop the floor repetitions and adjust the height and hand angle.
Frequently asked questions
Does the trunk have to stay perfectly parallel to the floor?
A small amount of rotation can be structurally natural. The standard that matters is whether the chest and pelvis move together, without the pelvis opening first or the low back bending. Do not force a painful hand position or excessive twisting in pursuit of perfect parallel.
How many standard push-ups should I be able to do first?
No single repetition count guarantees readiness for the one-arm push-up. Beyond alignment in the standard push-up, a more direct standard is whether you can control asymmetric load and trunk rotation in archer push-ups and incline one-arm push-ups.
Does the one-arm push-up correct a left-right imbalance?
It is useful for observing differences in strength and rotation control between sides, but it does not diagnose the cause or correct an imbalance automatically. Adjust the height and repetitions to the weaker side, and if the difference is large or painful, get a professional assessment.
Evidence and references
- 1. Donkers et al. — Elbow loading by forearm position in the one-arm push-up
- 2. Cogley et al. — Pectoralis major and triceps activity by push-up hand position
- 3. Marcolin et al. — Shoulder, arm, and trunk activity across push-up variations
- 4. NASM — Archer Push-Up Progression
- 5. ACE — Push-Up Exercise Library