WRIST CURL
Wrist Curl: Support the forearm completely and move through the wrist instead of lifting the elbow.
Inhale and slowly straighten your wrists so that the bar lowers slightly towards your fingers. If your forearm is lifted or your elbow is pushed forward, reduce your range of motion. Stop the repetition if you feel sharp pain or numbness in the front of your wrist. Start with a range and resistance that let you repeat the same path without pain, and reduce the difficulty when alignment changes.
- Primary muscles
- Wrist Flexors
- Secondary muscles
- Finger flexors, forearm stabilizers
- Difficulty
- Beginner
- Movement type
- Wrist Flexion
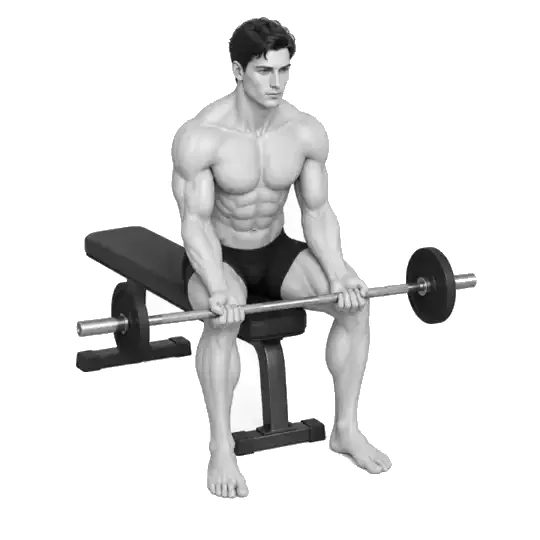
Should I roll the bar to my fingertips?
Inhale and slowly straighten your wrists so that the bar lowers slightly towards your fingers. If your forearm is lifted or your elbow is pushed forward, reduce your range of motion. Stop the repetition if you feel sharp pain or numbness in the front of your wrist. Beginners should shorten the range or use an easier variation until they can control the same path on every repetition.
STEP BY STEP
5 Steps for One Complete Rep
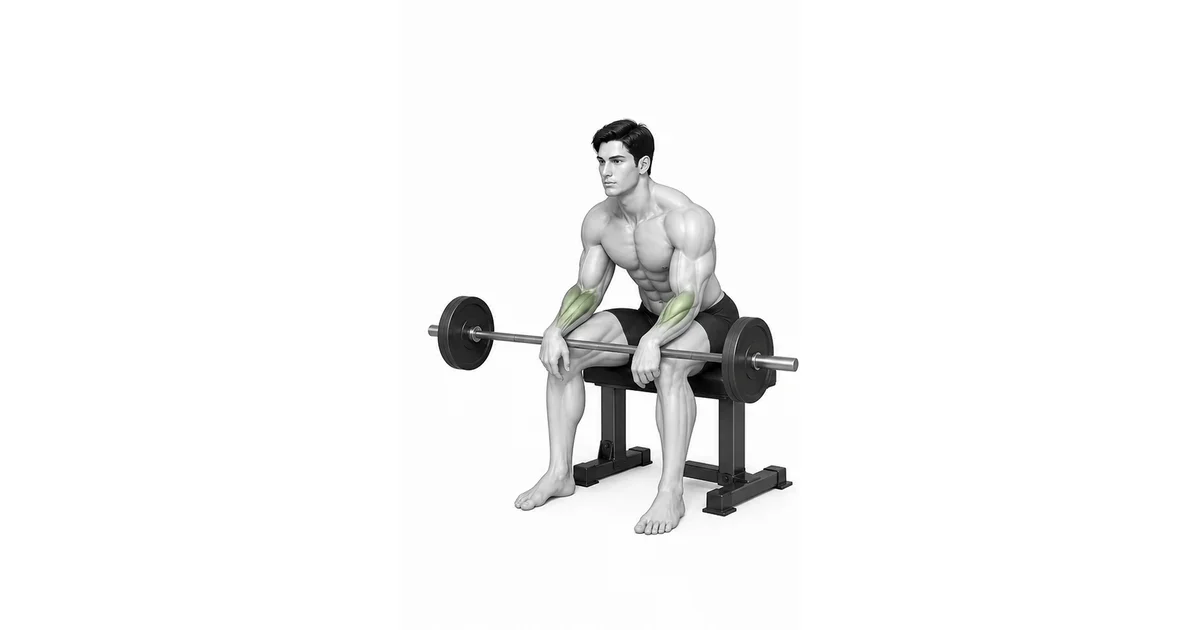
- 1
Preparing a light bar and a stable support surface
Initially, choose resistance that you can control with your wrists, such as an empty bar, light easy bar, or dumbbells. Place your entire forearm on a bench or thigh, with only your wrist hanging over the edge. If your elbows are wobbly, lower the weight or increase your support range.
- 2
Grip with palm facing up
Hold the bar with both hands, palms facing upward. You can start with the bar resting lightly on your fingers rather than the middle of your palms, but keep control with your thumbs and fingers so you don't completely let go of your fingertips.
- 3
Slowly release your wrist down
Inhale and slowly straighten your wrists so that the bar lowers slightly towards your fingers. If your forearm is lifted or your elbow is pushed forward, reduce your range of motion. Stop the repetition if you feel sharp pain or numbness in the front of your wrist.
- 4
Gently roll up with fingers and wrist
Roll the bar back into your palms with your fingers, then lift the bar with the flexion of your wrists. Don't lift your elbows or shoulders; just change the angle made by the back of your hand and forearm. At the top, do not bend your wrist excessively.
- 5
Return to original position at the same speed
Exhale, return your wrists to near neutral, and begin a controlled descent again. Don't chain your next rep with a kickback, and make sure the range of motion of your wrists and the tilt of the bar don't change significantly.
FOREARM SUPPORT
Forearm must be stationary for wrist to actually move
In wrist curls, when the forearms are lifted off the bench or thighs, elbow flexion and shoulder movement are involved in lifting the bar. This makes it difficult to feel the wrist flexors, and the standard for repeating the movement with the same weight changes. Place the support just in front of the wrist joint, and secure it comfortably from the middle of the forearm to the elbow.
If the support point is too far away, your elbows may be stressed or your wrists may be excessively bent. First, check with an empty hand that you can move your wrist down and up from neutral, leaving only a small gap between the end of the forearm and the wrist.
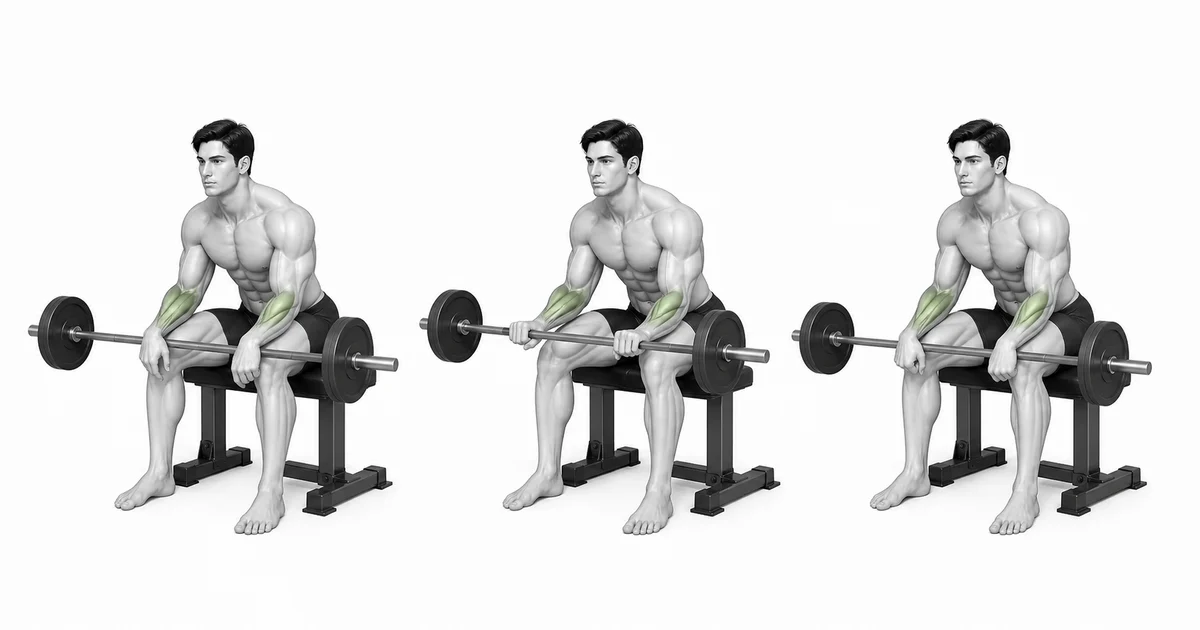
Key point: Cue to use right away: “Stay forearm → roll with fingers → fold only wrist”
GRIP & RANGE
Returns the bar to the fingers to maintain wrist range of motion
Shifting the bar slightly toward the fingers at the bottom can create a longer section of wrist flexion. However, if the bar slips to the tips of your fingers and you lose control, you will quickly bend your wrists and grab it. Use only the range that leaves the bar in your palms for each repetition, and if your grip is unstable, lower the weight before range of motion.
At the top, it's more important to keep your forearms steady than to fold your wrists as high as possible. If the front of your wrist is pressed or your joints are stiff, slightly reduce the upper range and maintain a slow lower range. Lowering deeper is not always better repetitions.
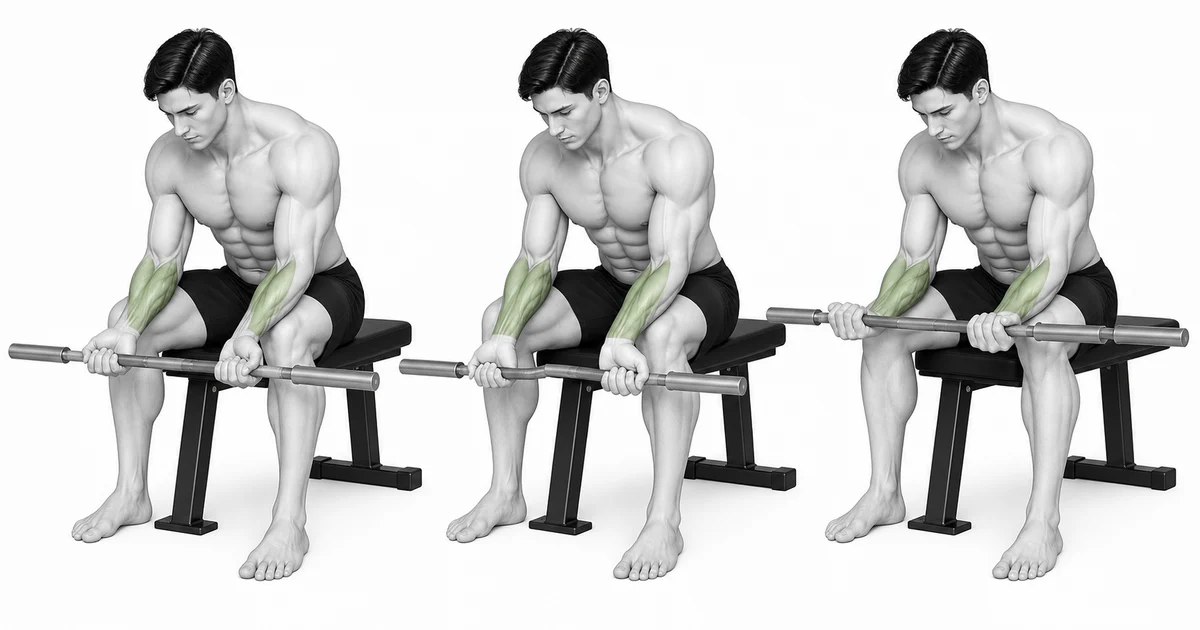
LOAD&TEMPO
Forearm movement mixes recoil easily even with small weights
Since the wrists are small joints, there is no need to apply the same weight as you would for barbell curls or rows. If you have to shake your torso or raise your elbows to continue your reps, that weight is not suitable for wrist curls. Even with light resistance, you can make it obvious by stopping at the bottom, returning the bar to your fingers, and only bending your wrists.
If you use a steady pace of about 2 seconds when lowering, it will be easier to notice when the bar slips from your palms and any discomfort in your wrists. Slowing down doesn't mean you have to endure pain. If you experience joint pain, numbness, or changes in sensation, stop immediately and check the cause.
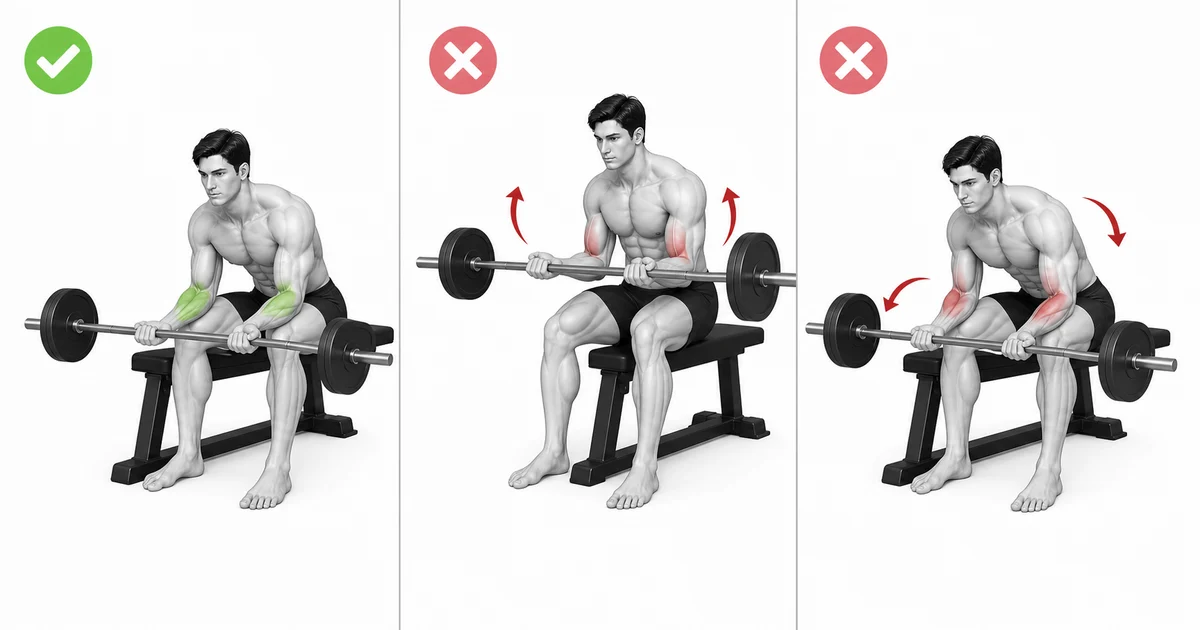
KEY MOVEMENT CUE
Support the forearm completely and move through the wrist instead of lifting the elbow.
This cue gives the wrist flexors a repeatable path while the finger flexors, forearm stabilizers support the position. Apply it before adding speed, load, or range.
Compare the first and final repetitions from the most useful camera angle. If the joint path, balance, or tempo changes, end the set or reduce the difficulty before repeating it.
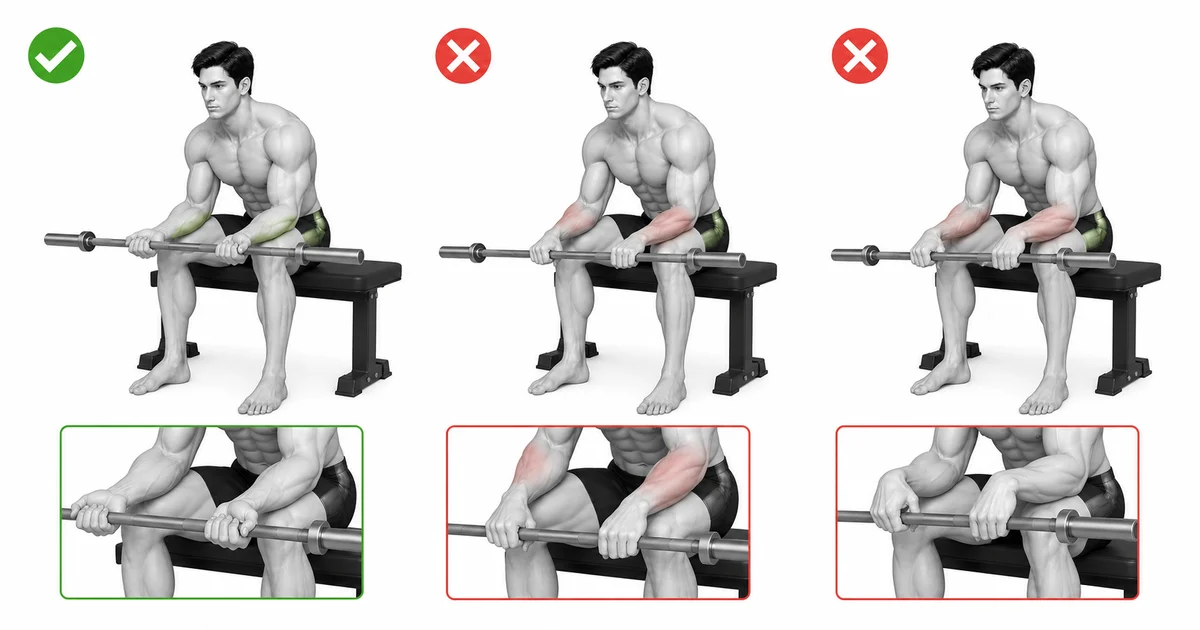
Key point: Practice standard: Support the forearm completely and move through the wrist instead of lifting the elbow.
TROUBLESHOOTING
Fix the cause of a mistake, not just its appearance
Lift your elbows to pull the bar up
- What you see
- For each repetition, forearms rise off the bench and elbows are bent.
- Likely cause
- The weight may be too heavy to control with just your wrist, or the support point may be unstable.
- How to correct it
- Lower the weight and support your forearms wider. If the elbow moves first rather than the wrist, reset the repetition. Key cue: Support the forearm completely and move through the wrist instead of lifting the elbow.
Lower the bar until it leaves your fingertips
- What you see
- The bar is quickly snatched from the bottom and the wrists are suddenly bent.
- Likely cause
- I think a larger range of motion is always more effective, or if grip pressure is not enough.
- How to correct it
- Stop at a point where you can control the bar with your thumb and fingers. Pain-free range of the wrist is a priority.
Excessive wrist fold at the top
- What you see
- At the top, the back of the hand and forearm form a very steep angle and the front of the joint is compressed.
- Likely cause
- This is due to the desire to make the contraction larger or excessive weight.
- How to correct it
- Raise your wrist only to the point where it gently bends, and do not push the joint all the way in.
Shake your arms and shoulders
- What you see
- The torso moves back and forth and the path of the bar follows the trajectory of the entire arm rather than the wrist.
- Likely cause
- There are many cases where fatigue at the end of a set is resolved through recoil.
- How to correct it
- Stop reps or reduce weight. Even with a small range of motion, repetitions that involve only moving the wrist are more appropriate.
Consider discomfort as a normal sign of forearm movement
- What you see
- Sharp pain, tingling, or paresthesia in the wrist joint that persists into the next day.
- Likely cause
- You may not be able to distinguish between muscle fatigue and joint or nerve irritation.
- How to correct it
- Stop immediately and reconsider operating range and load. If symptoms persist or you have a pre-existing wrist or elbow condition, consult a qualified healthcare professional.
REGRESSION & PROGRESSION
Match the difficulty before adding load
Empty hand wrist flexion
Slowly move your wrist with your free hand on a support surface to learn the range and forearm fixation without discomfort.
Light dumbbell wrist curl
Perform one hand at a time to more easily adjust wrist angle and grip pressure. Start with the same number of repetitions on each side.
Barbell or Easy Bar Wrist Curl
Use a light bar only when the hand path is stable and the bar is not tilting.
Add incremental load or repetition
Add small amounts of weight or repetitions only when the forearm remains on the support surface for all repetitions and there is no pain.
BEGINNER PROGRAM
A practical starting framework
Inhale and slowly straighten your wrists so that the bar lowers slightly towards your fingers. If your forearm is lifted or your elbow is pushed forward, reduce your range of motion. Stop the repetition if you feel sharp pain or numbness in the front of your wrist. Begin with an easier variation that you can repeat consistently, then increase only one variable at a time: repetitions, range, or resistance.
Repeat
10–15
Range where only the wrist can move at the same speed
Set
2–3
Check recovery status for at least one day after forearm workout
Frequency
1–2 times a week
Considers the total amount of pulling exercises and grip training together
- Only add small loads or repetitions in the next session when you have completed all repetitions without pain in your wrist joints.
- If the bar starts to lean to one side or your forearms start to lift, finish that set and lower the weight for the next set.
- Grip fatigue and joint pain are different. If you experience tingling, numbness or sharp pain, do not repeat.
Frequently asked questions
Which is better, dumbbells or barbells?
Light dumbbells can be convenient to learn the angle of one wrist, and light barbells or easy bars can be useful to practice the same trajectory for both hands. Pain-free wrist alignment is a priority with any tool.
Can I continue even if I feel my forearm burning?
Inhale and slowly straighten your wrists so that the bar lowers slightly towards your fingers. If your forearm is lifted or your elbow is pushed forward, reduce your range of motion. Stop the repetition if you feel sharp pain or numbness in the front of your wrist. Progress one variable only after every repetition follows the same path and the joints remain comfortable afterward.